Table of Contents
Windows 10 is a vast platform of active and inactive processes running either in front of you or in the background. If you want to check what software or processes are operating on your device and how much memory or disk space they are consuming at the moment, then you can see every detail by opening Task Manager.
An easy way to open Task Manager is by pressing the “CTRL” and “Shift” keys, followed by pressing the “ESC” key altogether. There is a good chance you may have taken notice of a certain process called “Windows Audio Device Graph Isolation.”
In this article, we will tell you everything there is to know about Windows Audio Device Graph Isolation on Windows 10. Continue reading for more information on this topic. Let’s begin.
What is Windows audio device graph isolation?
Windows Audio Device Graph Isolation is one of the primary parts of Windows 10. In Windows 10, this process is second to the primary audio engine. It takes care of digital signal processing, including Windows’ sophisticated audio enhancement techniques. However, Windows Audio Device Graph Isolation is not to be confused with Windows Audio which is a standard of this operating system tasked with handling the main audio components of Windows 10.
What Windows Audio Device Graph Isolation really does is isolate the audio services so developers can easily implement creations of their own and incorporate additional audio enhancement services without discarding Windows Audio which would potentially crash the whole operating system. The major benefit here is increased stability, especially when troubleshooting is required and your options are narrowed down instead of fixing the whole of Windows Audio.
This also means that irrespective of the hardware you’re using, Windows always gives you the option to turn off audio improvements in the OS. You don’t get that type of flexibility with third-party audio hardware manufacturers. Moreover, it is also worth noting that Windows Audio Device Graph Isolation can be substituted by some other process supplied by another manufacturer.
Is Windows audio device graph isolation some malware?
This is a commonly asked question regarding Windows Audio Device Graph Isolation, and the answer is no. As mentioned at the start, this process is an official part of Windows and is not a virus. However, there is no harm in making sure of this, and the process of doing that is quite simple. Windows Audio Device Graph Isolation is usually found in the Windows\System32 folder, and you can easily go there and search for “audiodg”. If it’s there, you’ve basically confirmed that the process is the real Windows Audio Device Graph Isolation.

Audio Device Graph Isolation
However, if you trace the process from the Task Manager to some other location, then it’s probably malware of some sort that has disguised itself. Right-click on the process in the Task Manager and then click on “Open file location” to double-check. In addition, it’s a good idea to scan your Windows 10 using antivirus software.
Can I turn off the audio device graph isolation?
No, it’s not as simple as turning off Audio Device Graph Isolation. This Windows process is a proper audio signal service, and switching it off, which isn’t straightforward as well, would mean having no sound on your computer. In addition, terminating the task will have no meaningful effect, and you’ll be directed towards opening the Audio Troubleshooter.
How to fix audio device graph isolation utilizing too many resources
Audio Device Graph Isolation performs at its best when it is not using your CPU, Hard Disk, or RAM frequently, especially when no sound is being played. However, if you find it utilizing your PC’s resources more often, this process has to be given some attention because that type of behavior isn’t normal. We have compiled several methods for you to try and fix this issue. Let’s start with the first one below.
Update the audio drivers
Drivers are components that regulate the core essentials of a Windows 10 operating system. The ones that take care of audio might require an update on your end, and this could be the reason behind high resource utilization by Audio Device Graph Isolation. Fortunately, it’s not hard at all to update your drivers. All you need to do is follow some steps, and you will be good to go.
- Open “Run” on your computer by either using the “Windows + R” shortcut key combination or by searching for “Run” using the Windows search bar.
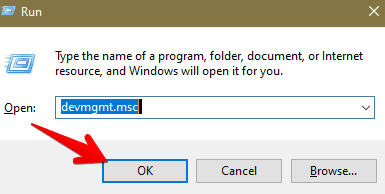
2. Next, type in “devmgmt.msc” in the Run terminal and press the “Enter” key. This will open the Device Manager on your computer.

Opening Run Command
3. After having the Device Manager opened, click on “Sound, video, and game controllers” to get more options for it. You will now see all your audio drivers below this section.

Opening Device Manager
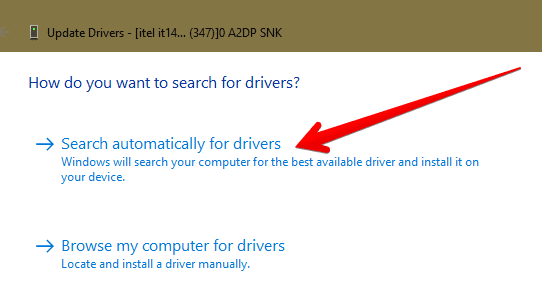
4. Right-click on each driver and choose “Update driver.” When the system asks you whether you’d like to search automatically or using your computer, choose the automatic option. If your drivers have an update available, you’ll be notified.

Searching Automatically for Drivers
Additionally, you can also use any other third-party application to find a new version for your driver. DrivePack Solution is an effective tool that is renowned and well-known. Apart from that one, there is a load of applications out there that can get this done for you.
Disable advanced sound effects
Sometimes, those drivers that are not updated frequently cause high consumption of system resources. Fortunately, a convenient feature of Windows Audio Device Graph Isolation is that audio enhancements can be easily turned off to lay your system at rest. You can experiment with the software provided by your device manufacturer to see if you can eliminate any of the complex audio effects. This can be done simply in your device’s settings, but the condition here is that the device must support audio enhancement. Here’s how you can do it.
- By right-clicking the speaker icon in your Notification area and selecting “Sound,” you can access the Sound settings window.
- Select the device that you believe is creating problems on the “Playback” tab of the “Sound” window, then click on “Properties.”
- Under the “Enhancements” tab, you will find numerous enhancements that your device is supporting. Then, click on the “Disable all enhancements” box and then click on “OK” to finish.
The above method usually resolves the problem that you are having. We recommend implementing it on each Sound device so that you may have better chances of resolving issues with Windows Audio Device Graph Isolation.
Try uninstalling Skype
It could be that the problems associated with Windows Audio Device Graph Isolation do not have to do anything with audio drivers or audio enhancements. Several people using Windows 10 have said that Skype had some relation with Windows Audio Device Graph Isolation utilizing too many system resources. A reason that makes sense is that Skype is a video-conferencing application used to host video calls. It uses audio drivers as well as audio enhancement effects.
A simple fix here is to uninstall Skype and then re-install it back again. This has turned out to solve the problem for many users.
Conclusion
Windows Audio Device Graph Isolation can mostly go by harmless, but sometimes it can come under the radar of many when caught utilizing more CPU usage than it should. There are many fixes for this issue which we have all explained above, so be sure to give them all a try. We highly recommend that you try disabling audio enhancements to see if that works first of all. Then, you can also uninstall Skype if you have it on your Windows 10 to check if that is why the problem persists. We hope that this article will be helpful to solve hassles with the Windows Audio Device Graph Isolation.
