
Table of Contents
Nintendo DS is a console whose games are still loved by many people around the world. The console was launched in 2004, and it was one of the best-selling at that time. The main reasons for this accomplishment were its amazing games and, on top of it, the graphics and sound effects it has. It has had many games come out for it over the years, and we have managed to enlist some of the best games in one of our articles that you can check out here (The 10 Best Nintendo DS Games).
That said, a Nintendo DS is hard to come by these days. However, many people who would like to revisit their childhood games have good news coming for them. You can actually play Nintendo DS games on Windows 10 if you know the correct methods. This article will tell you everything you need to know for getting started with Nintendo DS games on your Windows operating system. So let’s not waste any more time and get into this Windows Pixel guide.
Using an emulator to play Nintendo DS games on Windows 10
To play Nintendo DS games on Windows 10, we need to download and install an emulator. This is any software or program that mimics the functionality of another platform or operating system. Several kinds of emulators are available online that can be used to play games, and it does not depend on the type of games since emulators are diverse and versatile.
A popular Nintendo DS emulator known to work well for many people is called NO$GBA. This software is currently the most up-to-date Nintendo DS emulator out there that is sufficient enough to handle this console’s games with great performance. Furthermore, the developers are keen on constantly improving how NO$GBA operates on Windows 10 devices, and they are hard at work to fix bugs, glitches, or any other inconvenience whenever one arises. Therefore, NO$GBA is the best option available right now to play Nintendo DS games with easy installation and set-up.
Let us now talk about how you can install NO$GBA on your PC and start playing Nintendo DS games.
Installing NO$GBA on Windows 10
The following steps are going to explain the process in detail.
- Click here to go to the download page of the latest stable build release of NO$GBA. After arriving on the page, click on the file name to start downloading the emulator.

Downloading Nintendo DS Emulator
2. As the download finishes, you’ll go into your File Explorer to find what you’ve just downloaded. The NO$GBA emulator will need to be extracted first to ensure it runs properly and does not give you any issues. So you will now open the file and click on “NO$GBA.” After that, as the prompt comes up, you will click on “Extract all” to begin the extraction process.
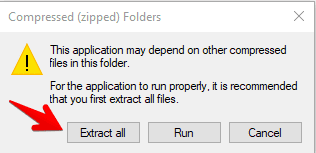
Extracting the Files of the Emulator
3. After the extraction process finishes and you’ve chosen the storage place of the emulator. You will simply find the extracted folder and click on the NO$GBA application to launch the emulator. You will be automatically shown the emulator folder the first time you extract the files. However, whenever you have to launch it next, keep in mind to look for a distinctive app icon with a size of 217 KB.

Launching the Emulator
You now have the Nintendo DS emulator installed on your Windows 10 PC and all ready to go. But before we launch it, we are obviously going to need games to play. Luckily, that part is also easy to handle and does not require any effort. All you have to do is search online for ROMs of Nintendo DS games, and you will find plenty of websites dedicated to offering a lot of those. A great website for downloading free ROMS is Emuparadise. You can check it out here.
Downloading a Nintendo DS ROM
The next step, as mentioned, is to find a Nintendo DS ROM. There are plenty of good websites for that, such as romsgames.net, gamulator.com, and emulatorgames.net. You can check out anyone you like and download the games you want to play on your Windows 10 computer using the NO$GBA Nintendo DS emulator. After downloading the ROM, you’ll basically repeat what you did above and extract the files of the downloaded ROM to a separate folder. Once you do that, it’ll be time to get into the next step.
Launching the Nintendo DS ROM using NO$GBA
You’ve now hopefully downloaded the Nintendo DS ROM you wanted to play. It is now time to load the game into the emulator and start playing.
To do that, launch NO$GBA and click on “File,” and then select “Cartridge menu (FileName).” You will now be able to navigate to your downloaded ROM and choose it.
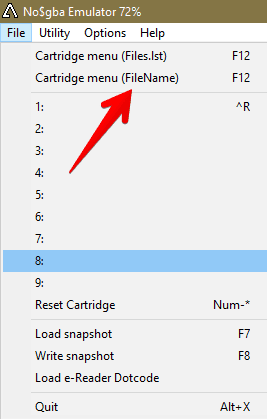
Inserting the Nintendo DS ROM
Your game will launch immediately within the interface after inserting the Nintendo DS ROM into the NO$GBA emulator. This software is pretty good at what it does so that you will experience good performance with it. You can also configure the emulator by going to the “Options” tab and mapping out the functions of your keys. In this manner, you can optimize the gameplay to your preference and have a good time playing Nintendo DS games on your Windows 10 PC. It was all as easy as that.
Conclusion
The Nintendo DS has a line-up of impressive games for its time. This handheld console’s dual-screen design was genre-defining in its time, and many people would love to experience their favorite games back in the day in the current generation. If that is also the case with you, you can easily play Nintendo DS games on your Windows 10 PC using the NO$GBA emulator that we’ve shown you to install and start operating in this article. When you get all of that done, don’t forget to download the ROMs of your favorite games to play using the emulator. We hope that this article would prove its worth to all of you looking to revisit the old times. Good luck!