Table of Contents
In the early days of the internet, IP addresses were used to match computer names and associate with network domains. However, it was nearly impossible and bulky to memorize and maintain IP addresses for every device connected to the internet since all IP addresses are assigned to every device connected to the internet.
This problem resulted in creating solutions such as Hosts file, Net Bios, and distributed Domain Name System (DNS) through standardization efforts and distribution protocols.
In this article today, we will focus on what a hosts file is, how to access it and edit it, and how to use it in the networking domain.
What is a hosts file?
Essentially, a hosts file, in simple terms, is a system file you can edit to map domain names to IP addresses of your choice before proceeding to domain name servers. It applies to all operating systems, which include Linux and macOS.
The hosts files can be different and usually vary from one system to another. Often, if you are a website developer, you experience the extensive use of hosts file when networking and developing websites. You can configure it to point a website on your local computer to monitor how it would behave before going live on the internet.
To further your understanding of this concept, we can use the example of a hosts file below to illustrate the syntax. It primarily contains three interlinked sections, and the existence of one depends on the other. The first section indicates the IP address to which a request will be directed. The second section denotes the location to redirect a request, and the third section is a comment for the entry.
127.0.0.1 windowspixel.com #this is windowspixel.com
How to access the Hosts file
A hosts file contains several entries which may differ significantly, usually stored in a plain text file in the windows systems folder. To be precise, C:\windows\system32\drivers\etc\\hosts will help you locate your Hosts file. It’s worth noting that for you to access the Hosts file, you must first have administrator privileges; otherwise, you will need to get an administrator’s password if you are a third-party user.
Editing and using the Hosts file
While some PC users may never feel the essence of editing their Hosts file, you will need to frequently edit the Hosts file on your machine to make specific applications changes. It could be prompted by malware attacks and the need for restrictions to access unauthorized websites.
Since hosts file is necessary for protecting your privacy, editing it can be helpful in various ways such as;
- when you suspect that malware and viruses have interfered with the hosts file
- when you want to block access to unauthorized websites from your kids
- when you’re having trouble with setting up your local development
- when there is a dire need to set up some relevant shortcuts
- when running tests on your network
Now that we understand the Hosts file better, we will look at two ways to edit it. So, without further ado, let’s dive in and see how.
1. Editing the Hosts file using Notepad
You can make use of the Notepad on your PC to accomplish the editing with the following steps;
Step 1: Opening Notepad as an administrator
- On your keyboard, press the Windows button to open the windows menu and search bar. Alternatively, you can find your search windows bar on the bottom left side of your PC’s screen.
- Type in “notepad” and wait for the search results to pop up.
- Right-click on the Notepad application in the search results.
- On the menu that expands, click on the run as an administrator. It results in Notepad opening as the administrator. A windows security warning to open the application might pop up. Click on ‘yes’ to proceed.
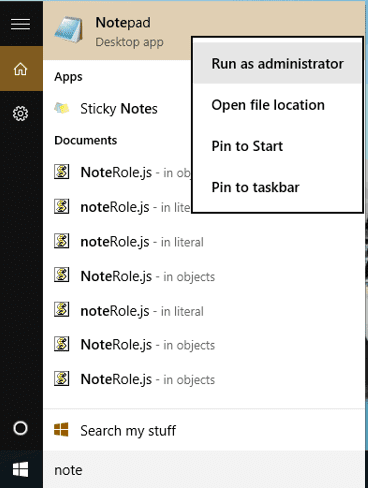
run as administrator
Step 2: Opening the windows hosts file
1. Click the File menu in Notepad and select open
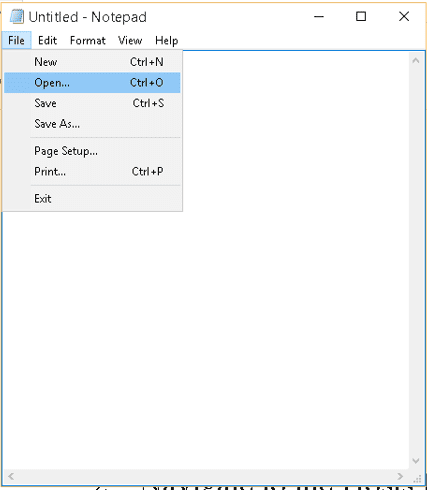
open Notepad
2. Navigate to the Hosts file, that is; c:\Windows\System32\Drivers\etc. If shortcuts are your daily norm, you want to copy and paste the above path into the bar at the top of the window and press Enter to get directed.
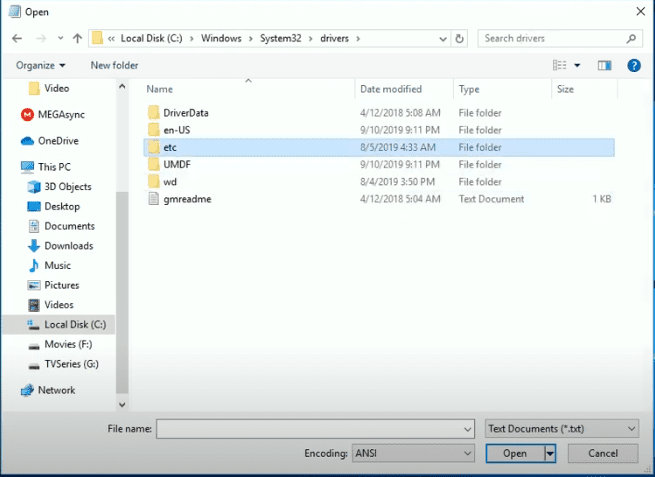
c:\Windows\System32\Drivers\etc
3. On the bottom right of the screen, select ‘all files from the dropdown menu. Having done that out of your way, you should now gaze at various files, including the hosts file.
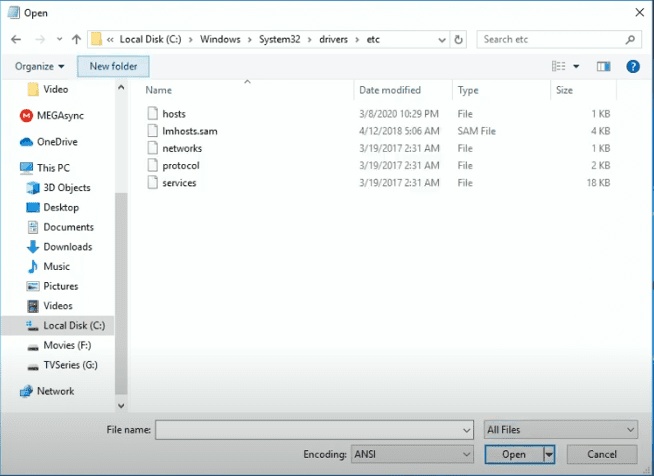
all files
In a case where nothing returns in the ‘etc’ folder, edit as normal on the file name at the bottom, then click on open as illustrated below.
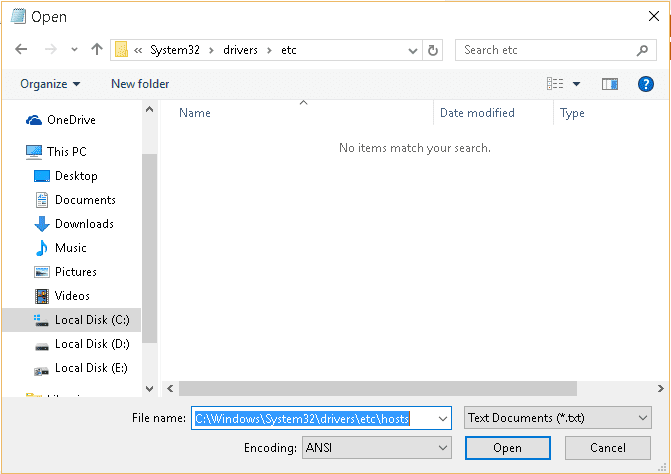
edit as normal
4. Select “hosts” and click open. With that, you can now proceed with the editing.

hosts file
Step 3: Editing the hosts file
Now that the file is open, you can add the correct lines to the file. When adding a line to the hosts file, the IP address comes first, followed by the domain name being mapped to. Then you’ll have to separate them with a tab or space, keeping each entry on its line.
Once you are done with whatever modification you wish, click on the file menu, select “save”, then close the file. This will save the changes made to the hosts file.
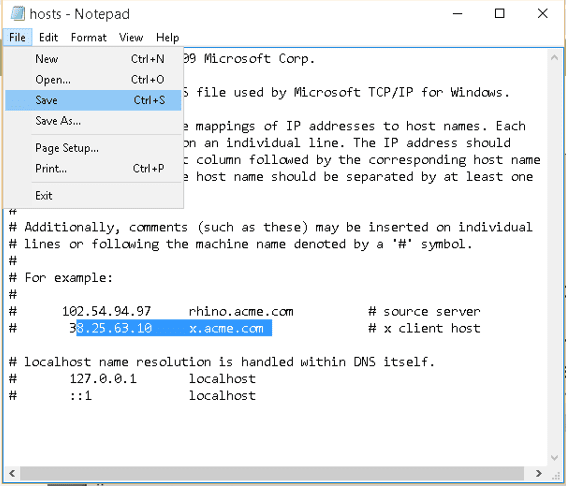
save changes
Finally, you want to end this process by flushing your Domain Name System (DNS) cache. This will make it possible for your computer to recognize changes made to the file. To flush the DNS;
• Search for command prompt on the windows search bar
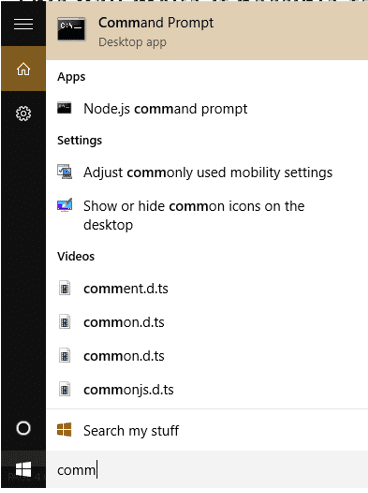
command prompt
• Type into the terminal the command below and press “enter.”
ipconfig /flushdns
2. Editing using Hosts file editor by Scottlerch
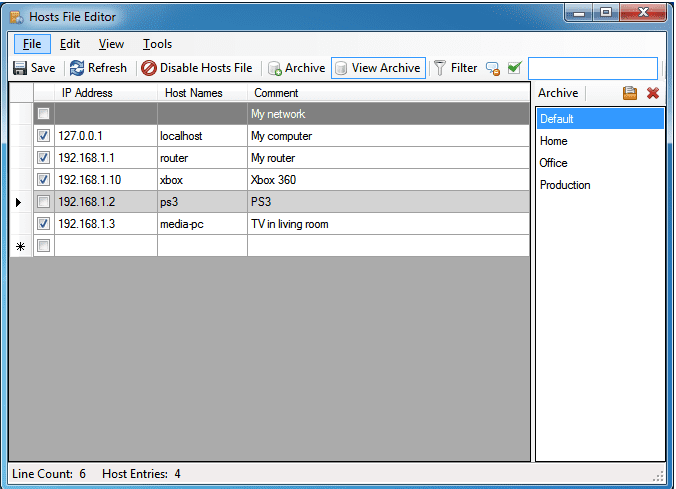
hosts file editor
Editing using Notepad may sound technical and bulky to some people. Fortunately, there is no need to worry since some third-party applications exist which you can use to modify your hosts files. Many of these applications exist today, including Hostsman, Hosts file editor by Daanav.com, and many more.
Hosts file editor by Scottlerch is a free and lightweight program you can download and install to reduce all the steps of editing using Notepad. With this application, you can easily modify and manage hosts file from its interface or the system tray.
After installing the application, you first populate the table with IP addresses, Hosts names, and comments concerning the websites and devices on your home network that you wish to manage.
On the left side of the table, check the box relating to the website you want to restrict or prevent access. Finish up by clicking on the “save” tab; isn’t that a walk in the park?
Final note
Editing the hosts file is not a must-do for every PC owner, but it can be significantly crucial for several reasons, as we have discussed above. Remember always back up the hosts file before editing and avoid deleting your new edited file.
I hope this helped smoothen your editing journey. Remember to choose any method that works best for you.
