Table of Contents
Windows 10 and now Windows 11 ship with many built-in applications and programs useful for those who spend most of their time on their computers and online. These include Calendar, Camera, Microsoft Store, and Office 365. This intricate operating system is capable of many great things. You can play classic Windows 7 games on your modern-day PC and even download comic readers to effectively read and organize your comics. There’s virtually no limit as to what can be achieved on the internet with a capable operating system like Windows 10 or Windows 11 by your side.
All that said and done, there’s another in-built application called Notepad. This humble text editor isn’t adorned with many features, but it’s fast, easy to use, and very minimal. All of these qualities make Notepad the go-to text editor for millions of users all across the world. In addition, this simple application has made it possible for other competitors to follow by forming a fundamental foundation first.
Since its well-grounded presence in modern-day desktop PCs, many other likewise applications have followed, and what brings our attention to write this article is a text editor called Notepad++. The names may sound quite similar, but there’s a day and night difference between the original Notepad and Notepad++, so rest assured. In this article, we will talk about everything you need to know about Notepad’s upgraded counterpart, including how you can get it on your PC and use it as default for all text files.
Without wasting any time, let’s jump right into this article.
Notepad++ best features
Let’s check out some of the most prominent features of Notepad++.
Free source-code editor
Unlike Notepad, Notepad++ is a huge step up and is not a regular text editor. It is a source code editor that boasts many features to its name. Some of these features include syntax highlighting when an editor displays written code in a different color or font to stand out from the rest of the code. Syntax highlighting is something that makes life a lot easier for professional programmers.
There’s also code folding offered by Notepad++, which is quite an advanced category feature. This feature also allows programmers to handle large bundles of text without manually dealing with them individually. Another functionality offered by Notepad++ is autocompletion which is otherwise somewhat limited. Still, it provides this service for markup languages used for text formatting and programming.
Wide variety of supported syntaxes
Syntax is a proper format for the text structure containing symbols in a programming language. They are a combination of different rules that ensure whether a language is correct or not. Notepad++ has support for multiple syntaxes. It can feature text and special characters elements of more than 75 syntaxes. Some of them include:
- ActionScript
- Assembly
- BlitzBasic
- CSS
- Forth
- PureBasic
- Matlab
- MMIX
- Objective-C
- Perl
- Pascal
- SQL
- XML
This list is just the tip of an enormous iceberg. You’ll familiarize yourself with the syntaxes once you consistently use this application.
Autosave
You’re probably already aware of what autosave means if you’re a video gamer. In gaming terms, it’s when the title you’re playing automatically saves the progress you have made in the game without you having to save it manually. The same is the case with Notepad++. It does the saving part simultaneously with your work, so, in case of an emergency shutdown, a bug, a crash, or a freeze, nothing happens to your progress, and it’s right where you left it off. This is a prevalent feature that is otherwise absent in the original Notepad.
Tabbed interface
Another high-quality feature that gives Notepad++ the upper hand is its tabbed document interface. You get multiple tabs to open and work within a single container with Notepad++. Think of it as the Google Chrome browser, and you’re opening a new tab on it to search for something. The application at hand pulls off something similar with its interface. This means that you can work on multiple projects at once without moving to a full-fledged Independent Development Environment (IDE).
Plug-in compatibility
Notepad++ is unique in another regard. As if its base functionality and the number of features given weren’t enough, the developers thought of bumping up its operation even more by making it integrate with a comprehensive array of plug-ins. Not only that, but Notepad++ supports macros, which are rules that determine the methodology of a specific input being assigned in place of the output. Moreover, there are over 140 plug-ins that can be downloaded for Notepad++. A small chunk of those already come pre-installed on the program that allows it to perform functions like text sorting, case modification, and even validations for particular programming languages.
Simultaneous editing
Notepad++ provides profound functionality to all its users. It lets them multitask like never before through simultaneous editing. For large-format projects where there are no less than thousands and thousands of lines of code, you’re going to need all the help you can get from your preferred choice of text editor. Thankfully, with something like Notepad++ by your side, you can make your work more streamlined by directly manipulating different text parts simultaneously without having to tend to them individually. All of the described features make Notepad++ a well worth it affair, not to mention bringing it in as a replacement for the original Notepad.
How to replace Notepad with Notepad++
To replace Notepad with its big brother Notepad++, the very first thing that you’re going to want to do is install the program on your Windows PC. It’s only from there on out that you can manage to replace the original Notepad with this one. So before getting into the replacement procedure section of the article, let us talk about the installation of Notepad++ first.
Installing Notepad++ on a Windows PC
The following steps illustrate installing Notepad++ on Windows 10 or Windows 11. Be sure to follow them as instructed for the best results.
- Click on this direct link to get straight to the official Notepad++ website. The embedded link will do you the favor of stopping directly at the “Downloads” section, so you won’t have to meddle around looking for the option yourself. Once you are there, click on the version of Notepad++ that you want to install to continue. We recommend picking the latest version as it has received more stability and performance improvements. At the time of writing this article, the most recent release of the program is Notepad++ v8.1.9.3.

Downloading the latest version of Notepad++
2. Clicking on the version you want to download of Notepad++ will take you to another page. This is where you’ll choose if you wish to install the 32-bit or the 64-bit version of the program on your PC. You will have to assess the bit version of the operating system installed before proceeding. If you’re running 64-bit Windows, click on the relevant section below. That should begin the download for you.
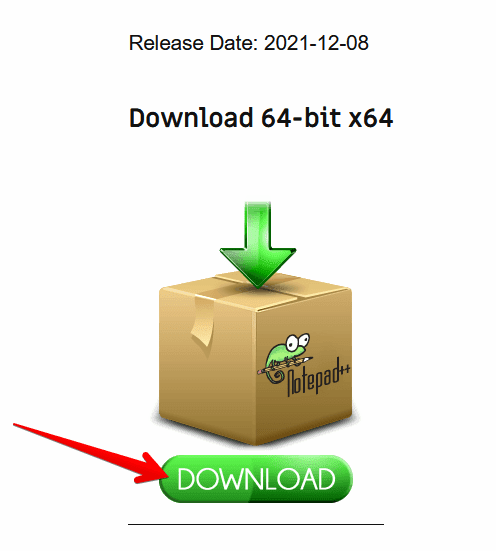
Downloading the 64-bit version of Notepad++
3. Once the download concludes, the next step is to go to your “Windows Explorer” application. You will find the executable setup application sitting there, awaiting your attention. Right-click on it to reveal more options, and click on “Run as administrator” to launch the setup. You will proceed toward the installation of the application.
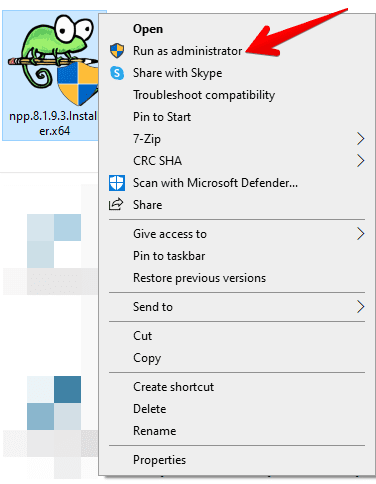
Running the Notepad++ as an administrator
4. You now have to run the setup of the program. After you’ve clicked on “Run as an administrator,” the setup should launch. It will welcome you to the first screen, so click on “Next” right away to proceed.
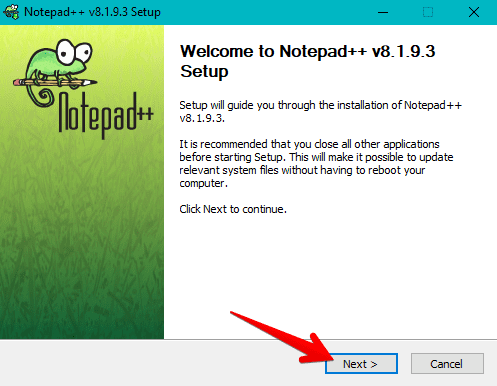
Initiating the Notepad++ setup
5. The next step is to agree to the license agreement to continue. Click on the option specified in the setup window, and you should be good to go.
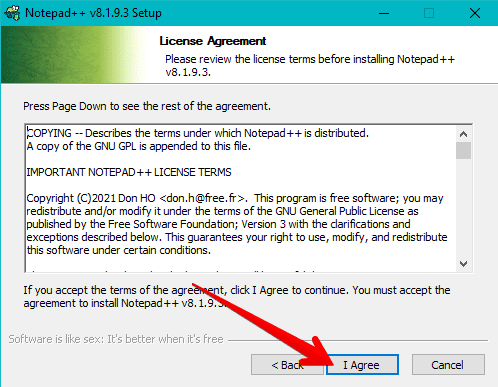
Agreeing to the license agreement of Notepad++
6. It’s time for you to now set the destination folder of Notepad++. The default pathway works fine but if you want to specify a folder of your preference, feel free to do that here. Double-check your selection when you make changes to remember the stored destination folder.
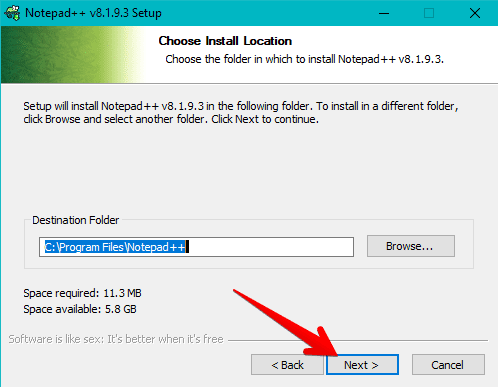
Choosing the destination folder for Notepad++
7. Remember all those plug-ins that we mentioned earlier? They are now going to factor in at this step. This is where you can choose which features, components, or in simple words, plug-ins will be pre-installed with Notepad++. You can choose from the initial options available easily. Once you are done with that, click on “Next,” and you should be good to go.
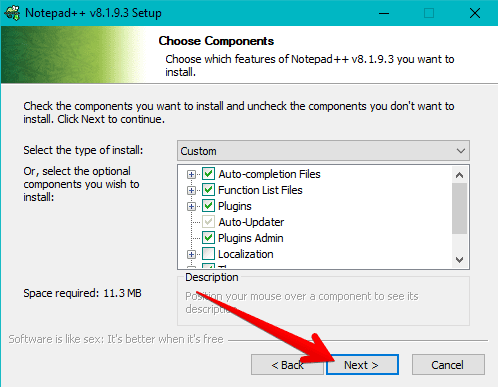
Choosing the features of Notepad++
8. You’ve now reached the step where clicking on “Install” will commence the installation. Do that right away to minimize any wastage of time. You can also check the “Create Shortcut on Desktop” box to make the application more accessible and have an icon of it placed right on the home screen.
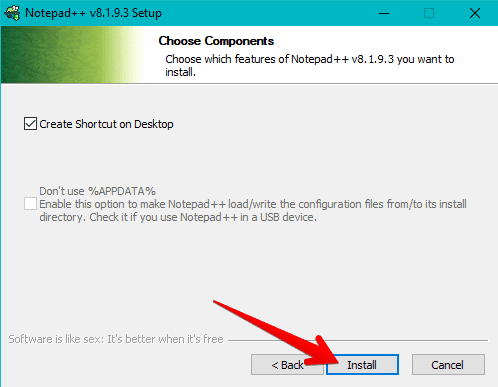
Commencing the installation of Notepad++
9. If you’re seeing a screen similar to the one specified below, you’ve successfully managed to install Notepad++. Click on “Finish” to finalize the entire process. You can check the “Run Notepad++” box here to make it run straight away. If not, leave the box unchecked to continue.
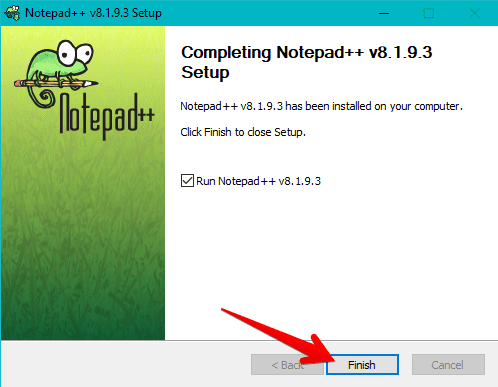
Notepad++ installed
You’ve successfully installed Notepad++ on your Windows 10 or Windows 11 PC. We will now get into the primary purpose of this article and show you how to replace the original Notepad with this upgraded iteration of Notepad++.
The process of replacing Notepad with Notepad++ explained
It turns out that there are a variety of different ways you can replace Notepad with Notepad++ on your computer. We will go through all of them to know your options and effortlessly choose one to go with. Let’s start with the first one.
Method #1. Using the Command Prompt to replace Notepad with Notepad++
The following steps are going to take it from here.
- Click on the Windows Search bar and type in “Command Prompt” or “cmd.” Both can work equally effectively. Once the application appears, click on “Run as administrator” to launch the program without potential interruptions.
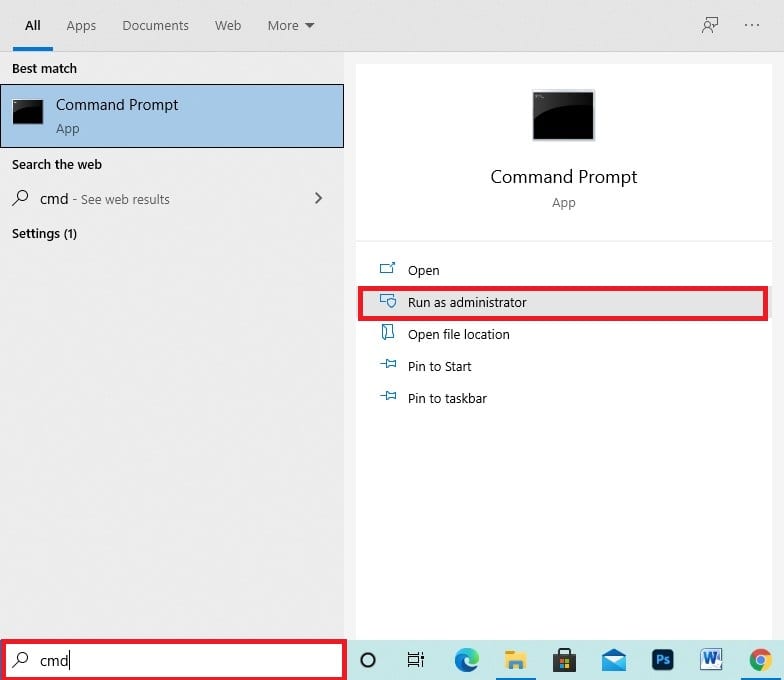
Opening the Command Prompt
2. As soon as you have the Command Prompt opened up, the first thing that you have to do is type in the following command. That should get you going the right way. However, it’s worth noting that the forthcoming command is only for those users who have installed the 64-bit version of Notepad++. We’ll also mention the command that 32-bit users of the application should use.
reg add "HKLM\Software\Microsoft\Windows NT\CurrentVersion\Image File Execution Options\notepad.exe" /v "Debugger" /t REG_SZ /d "\"%ProgramFiles%\Notepad++\notepad++.exe\" -notepadStyleCmdline -z" /f
The following command is for those who have the 32-bit version of the application installed on their PC.
reg add "HKLM\Software\Microsoft\Windows NT\CurrentVersion\Image File Execution Options\notepad.exe" /v "Debugger" /t REG_SZ /d "\"%ProgramFiles(x86)%\Notepad++\notepad++.exe\" -notepadStyleCmdline -z" /f
We will use the 64-bit version command for this tutorial as we downloaded that variant of Notepad++.

Running the required command line in the Command Prompt
3. This should return you with a “The operation completed successfully” response from the Command Prompt. This means that you have successfully replaced Notepad with Notepad++.

Notepad replaced with Notepad++
That’s about it for the first method of this procedure. If you ever change your mind and wish to go back to the original settings, then there will be a way to do that as well. All you have to do is input the following command, and you’ll be good to go.
reg delete "HKLM\Software\Microsoft\Windows NT\CurrentVersion\Image File Execution Options\notepad.exe" /v "Debugger" /f
Let us now increase the depth of this article and talk about the following method of replacing Notepad with Notepad++.
Method 2. Install third-party software for replacing Notepad with Notepad++
There’s one more way of replacing Notepad with Notepad++. This method involves using a third-party program called Notepad Replacer created by Binary Fortress Software that automatically goes through all the handiwork for you and accomplishes the task at hand.
You will have to install it, but don’t worry as the process is not lengthy or complex. Just follow the steps written below, and you will undoubtedly be good to go.
- Use this direct link to get straight to the official website. Then, click on “Download Installer” when you are there to begin the process.
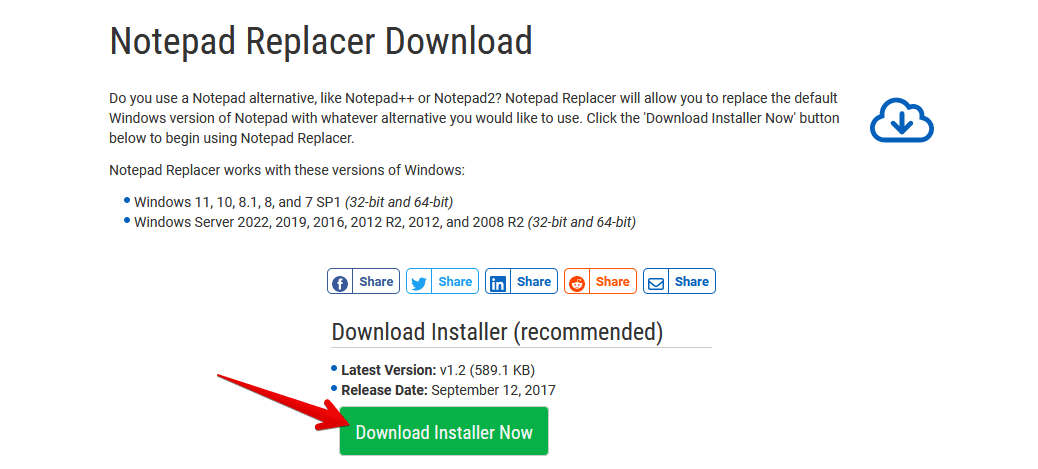
Installing Notepad Replacer from the official website
2. The installation file size is relatively minimal, so you should have the setup ready in your File Explorer application in no time. Once it has been installed, click on the setup and run it. That should take you to the next step. Be sure that you click on “Run as administrator” to avoid any potential problems moving forward. You will also need to confirm the UAC (User Account Control) prompt that will ask you to confirm this program’s changes. Select “Yes” here to continue.
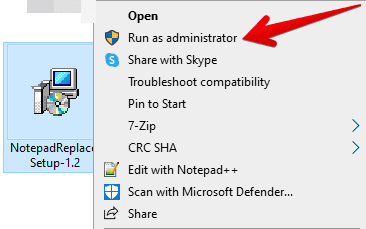
Running the Notepad Replacer set up as an administrator
3. Completing the last step should launch the setup window. The first thing you’ll have to do here is accepting the license agreement. Check the toggle beside “I accept the agreement” and swiftly continue toward clicking on “Next.” You will now get to the next step subsequently.
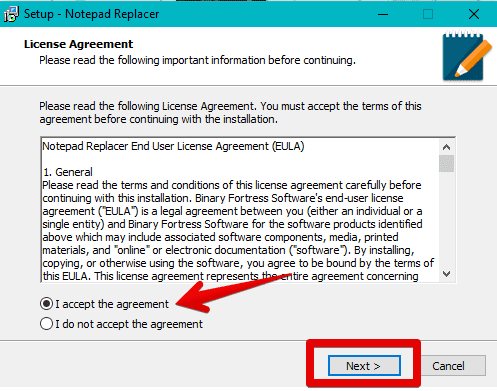
Accepting the agreement
4. You now have to pick the destination location for “Notepad Replacer.” The basic destination that goes for every other program will do, which is Local Disk (C:), but you can always browse your local storage if you want to pick something else. Once done, click on “Next” to continue.
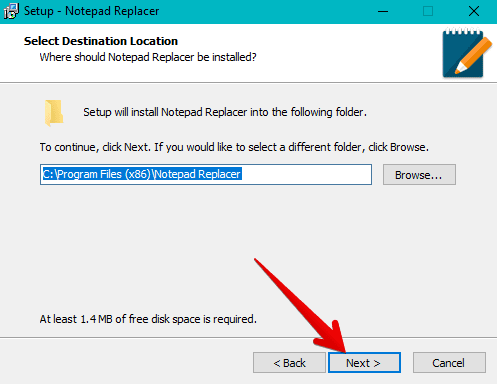
Choosing the destination folder for Notepad Replacer
5. The next step is quite crucial. You will have to pick the program you want to use instead of Notepad in this setup step. Click on “Browse” and navigate your PC’s local storage to find Notepad++. Select it and then click on “Next” to continue.
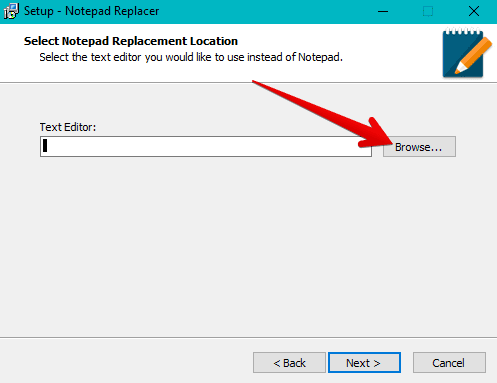
Browsing the PC local storage for selecting Notepad++
6. After you click on “Next” using the instructions from the previous step, you now have to prepare the setup for installation. Click on “Install” after double-checking the destination folders of Notepad++ to move ahead.
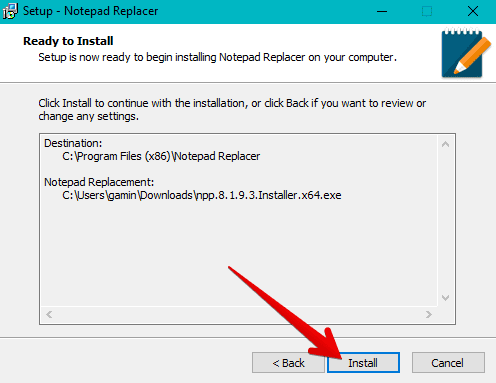
Installing the Notepad Replacer
7. The installation will take no more than a couple of seconds, given how lightweight the program truly is. Once the installation concludes, click on “Finish” when the wizard prompts you to do so, and you’ll be good to go.
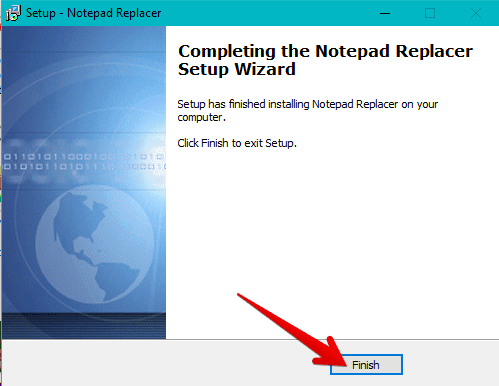
Finishing the Notepad Replacer setup
That’s about it for the second method of replacing Notepad with Notepad++. You’ve completed the process, and you can now effortlessly go forward with using Notepad++ with all of your text-based documents on your Windows 10 PC, especially those under the use of Notepad primarily. By default, you may still need to apply other methods if some of your text documents open with another application, such as the WordPad.
With the second method out of the way, let’s talk about the final method of replacing Notepad with Notepad++.
Method 3. Change the launching behavior of text files
Another rather uncomplicated way of replacing Notepad with Notepad++ is simply changing the application used to launch them. This means that instead of Notepad, all of your text-based documents and files will launch using Notepad++.
This is one of the more straightforward methods you can accomplish the task at hand. You do not have to run any commands in the Command Prompt while functioning as an administrator or install any third-party programs to do this. The following steps will explain how to replace the original text-based editor with its more refined counterpart.
- Please create a new text document or go to an existing one and right-click on it. That should reveal multiple options. Then, click on “Properties” next to continue.
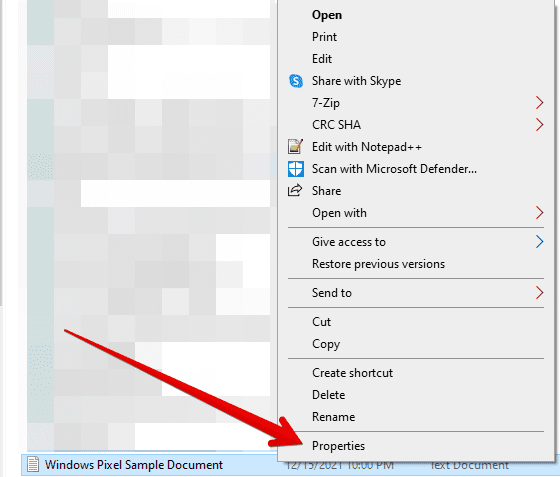
Accessing the properties of the text document
2. As soon as the properties window of the text document loads, the next step is to click on “Change.” You can see that it says “Notepad” and its icon beside the “Open with:” section. In this tutorial, we will change that. After clicking on “Change,” you can continue to the next step.
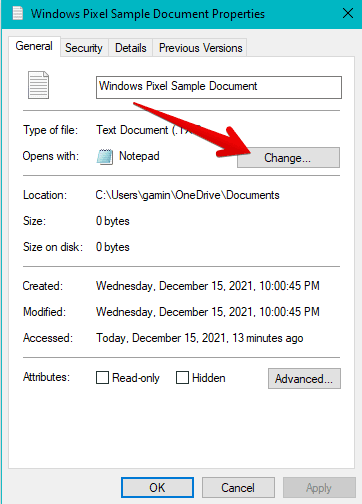
Changing the property of text documents
3. A small-scale window will appear right after clicking on “Change.” This will be where the system will ask how do you want to open text-based files from now on. If you don’t see “Notepad++” in the “Other options” section, you can click on “More apps” to reveal more relevant programs.
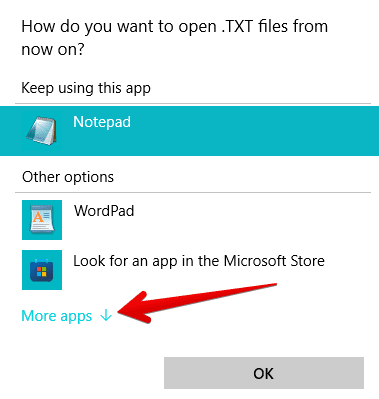
Exploring more apps to find Notepad++
4. You should see “Notepad++” in the “More apps” section. Double-click on it to move ahead. If, however, you still do not see the application, you will have to opt for “Look for more apps on this PC.” That will take you to the local storage of your PC, particularly to Local Disk (C:) where most of the system applications are stored. You will have to navigate your way yourself to find Notepad++.
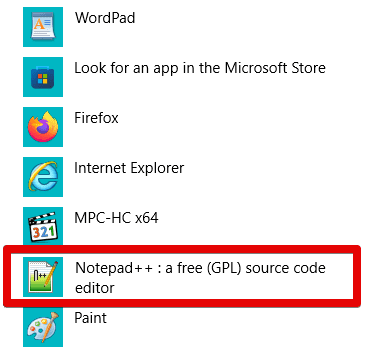
Selecting Notepad++ as the default application
5. Once you are done with that, you will return to the original “Properties” window. You will have to finalize the process by clicking on “OK.”
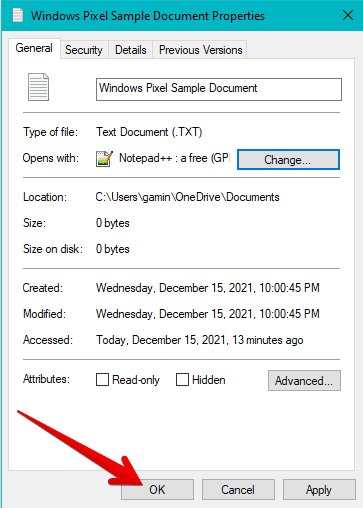
Finalizing the process
That’s about it for the final method of replacing Notepad with Notepad++. We hope you know the most workable ways of pulling this off.
Conclusion
By default, Windows gives its users a highly simplified application to work with, called Notepad. However, you do not have to settle for less anymore, and there’s another more powerful program awaiting users. It is called Notepad++, and you can swap it in place of the original Notepad as your default app for opening text-based documents.
In this article, we have shown you how to do that using not just one but three different unique ways, so there’s a solution for every type of user out there, both beginner ones to the expert tier. We hope you’ve found what you were looking for in this detailed article. Do let us know down in the comments section if you finally managed to replace Notepad with Notepad++ using any of the listed methods.
