Table of Contents
Windows 10 is compatible with almost all major PC games. It allows the user to run modern tiles titles and retro games. It also provides a way for Xbox One streaming and recording. However, to get the best performance while playing your favorite games, you must tweak the built-in settings and the third-party software.
This article guide is tailored to help you understand how to optimize the performance of your Windows 10 for gaming on both low-end PCs and those equipped with the latest high-end specs.
Optimizing Windows 10 for gaming
Below are some of the ways we can use to optimize our Windows 10 PCs for gaming:
1. Changing your Windows settings for better performance
Windows 10 has several settings that allow you to set up and personalize your device. These settings help you achieve better gameplay. Let us jump right into the settings that can be tweaked for a better gaming experience and performance without wasting any more time.
a) Removing the visual effects settings to reduce the lag
Visual effects are a part of the components that make up your Windows OS. They only get more complex and attractive as the system improves. Nonetheless, computers have suffered from lagging due to such effects since they take up too much of your GPU’s resources.
To optimize your Windows 10 computer for better performance, you can disable visual effects by following the procedure provided herein:
Select the “Start menu” and choose “Settings.” Next, lookup for “performance” in the search bar on the settings window, then select “Adjust for better performance” in the available options.
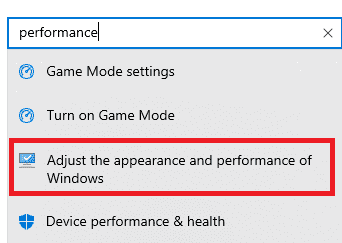
Adjust for best performance
On doing this, all the visual effects will automatically be unchecked.
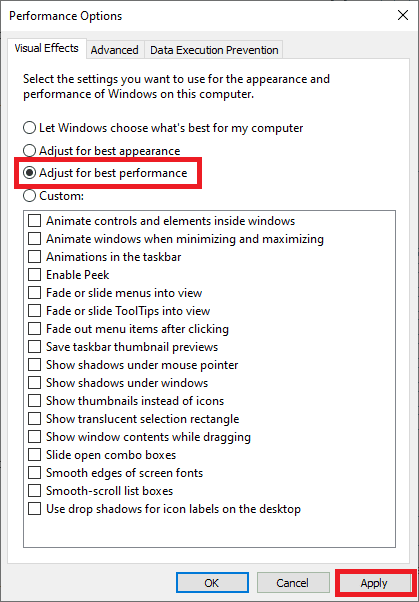
Performance
After that, click on apply, then switch to the “Advanced” tab and select “Programs,” which is under the “Adjust for the best performance of” section. Finally, click on OK to apply the changes made.
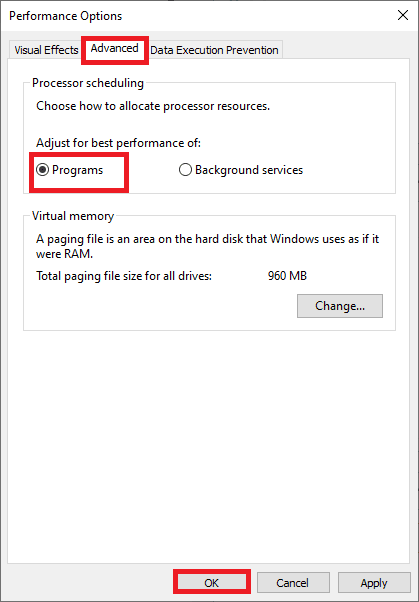
Select Programs
Doing this will save your computer from lagging; hence you’ll experience smooth gameplay.
b) Optimizing your power plan for high performance
Windows 10 comes with various power-saving options. However, despite these functionalities, you might at times find out that your Windows OS is not performing at its best. To enable high performance easily, follow the guide below:
First, click on the windows and I keys together, then select the “system” tile.
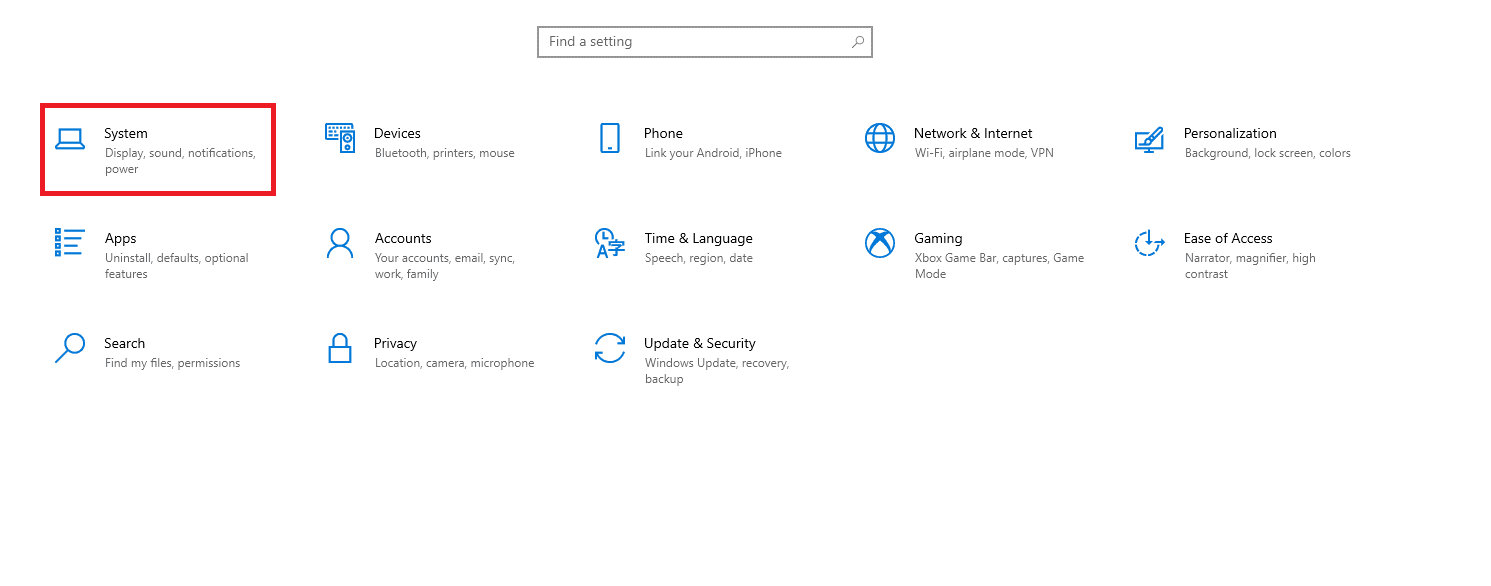
System
On the left pane, choose “power & sleep.” After that, click on the “Additional power options,” which is on the far-right side of your screen.

Power & Sleep
A control panel window will pop up. Select “Create a Power Plan’.”
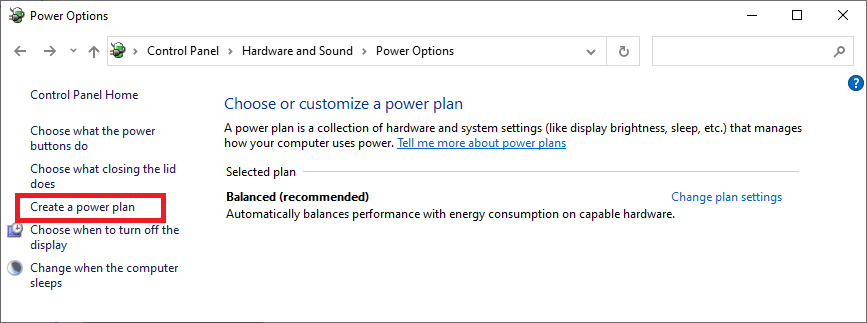
Create a Power plan
Next, proceed and select the “High performance” option so that your computer can perform at its best. Besides, you can design your custom plan to allow your computer to use its resources without restrictions.
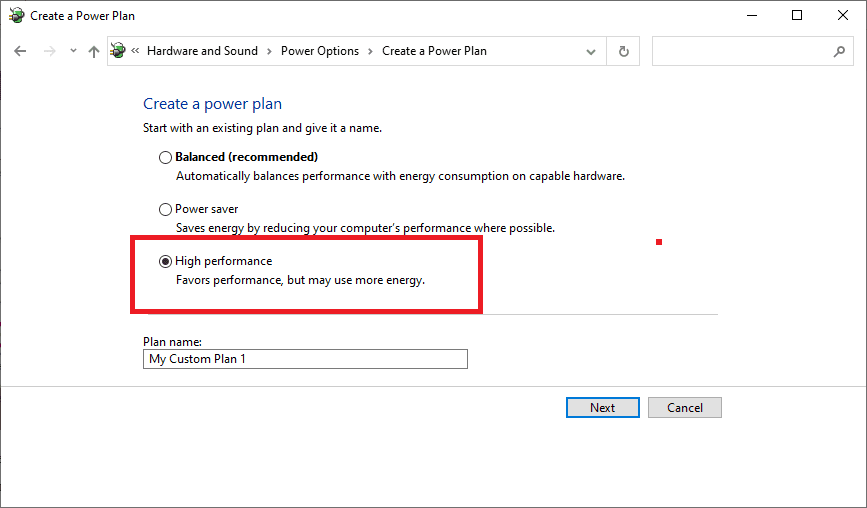
High Performance
c) Disabling some of the startup applications
Startup applications habit slowing down your computer and making the booting process take longer than expected. There are times when applications automatically launch upon booting, and they keep running on your device until you exit them manually. This is burdensome for your CPU, and it will cause lag in your system while gaming. You can stop this from ensuing by disabling the startup applications as delineated below:
In your taskbar, right-click on space and select “Task Manager.”
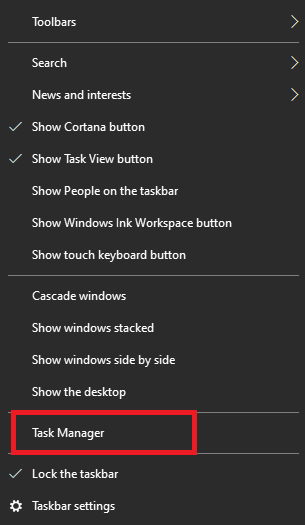
Task Manager
Once the Task Manager has been launched, click on “More Details” on the lower left side.
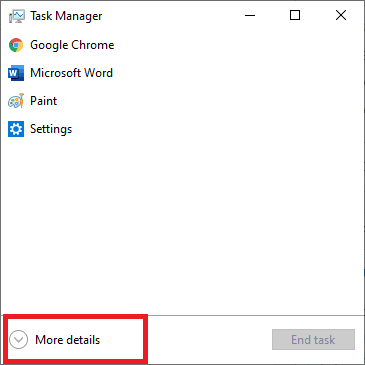
More Details
After that, switch to the “Startup” tab using the menu on top of the window. Here, you will see all the applications you want to start alongside your system. To disable any application, select it by clicking on it, then click on the “Disable” tab that will appear in the right lower corner of your screen.
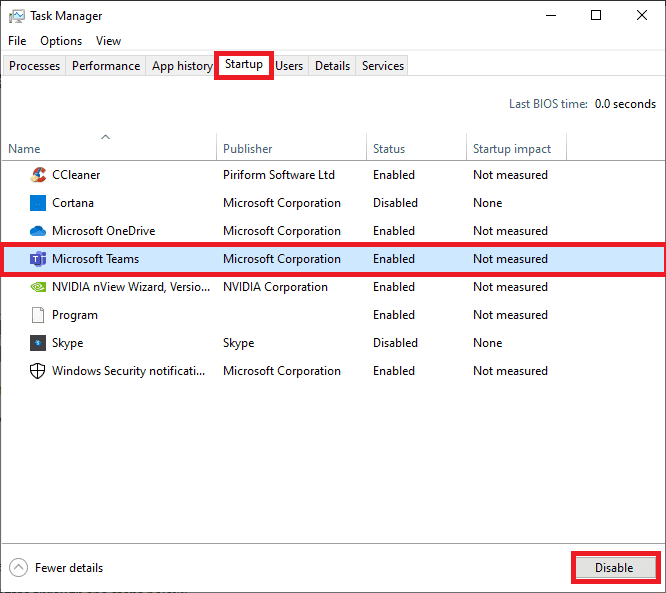
Disable Startup applications
After that, restart your device to finalize the changes and enjoy the performance boost.
2. Disabling mouse acceleration for better aim
In every Windows 10 OS, the “mouse acceleration” feature is enabled by default. This feature is aimed to speed your mouse, but it can mess with your aiming in video games. To turn it off, navigate through the steps below:
Bring up the run utility by pressing the Windows and R keys simultaneously. Type in “Control” and click “OK” to launch the Control Panel.
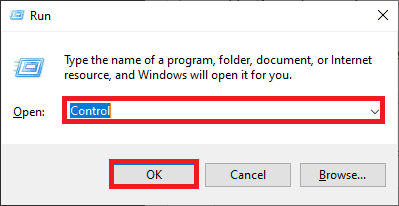
Control
To see all the Control Panel items on the same page without having to navigate through multiple menus, make sure that your view is either set to “Large icons” or “Small icons .”
Large Icons
On the listed items, choose the “Mouse” option, then switch to the “Pointer Options” tab by using the header menu.
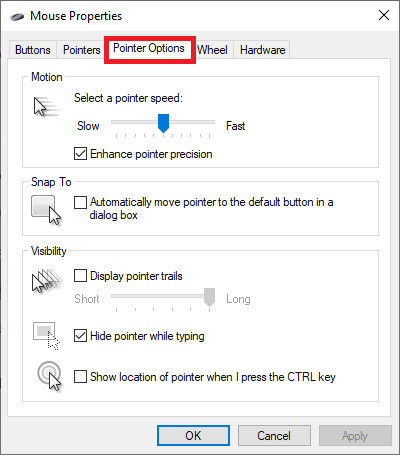
Pointer Options
After that, make sure you uncheck the “Enhance pointer precision” option under the “Motion” tab. Doing so will turn off the mouse acceleration feature. Click Apply to make the changes effective to have a better aim.
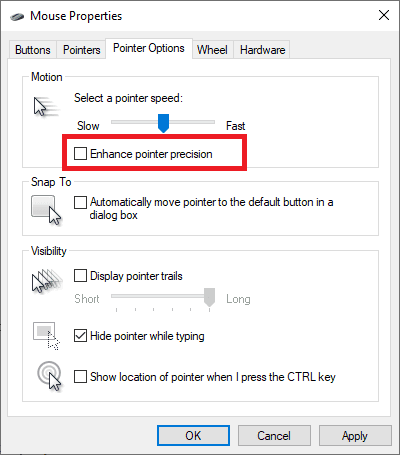
Enhance Pointer Precision
3. Turning off the accessibility key combination
Accidentally launching the warning keys and having to exit the game midway breaks your gaming mojo. “Sticky keys” are examples of features that are infamous for ruining games, and it is the reason why we recommend turning off accessibility key combinations when gaming.
How to turn off the accessibility key?
Click on the “Start menu” in the taskbar, then click on “Settings.” From the available menu options, choose “Ease of Access.”
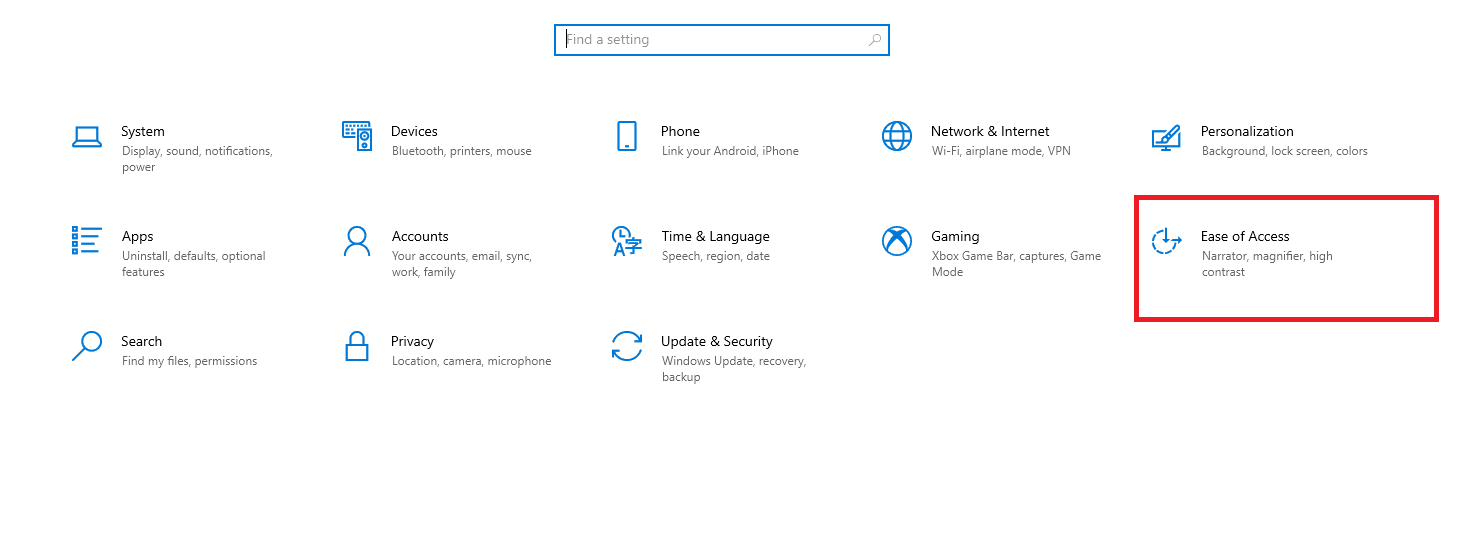
Ease of access
In the left-side panel, scroll down and click on “Keyboard,” listed under the “interaction” section. After that, set the toggle under the following options to “OFF”:
-
Use Sticky Keys.
-
Use Toggle Keys.
-
Use Filter Keys.
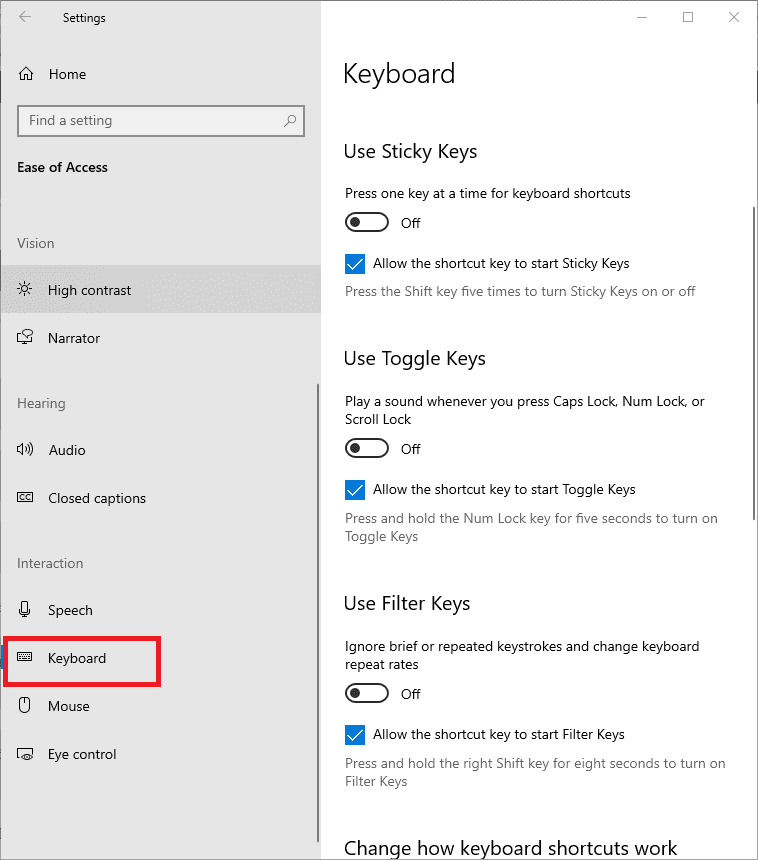
Keyboard
Once you are done doing that, scroll to the bottom of the page and uncheck the following selections:
-
Show a warning message when turning on Sticky Keys, Filter Keys, or Toggle Keys from the keyboard.
-
Make a sound when turning Sticky Keys, Filter Keys, or Toggle Keys on or off from the keyboard.
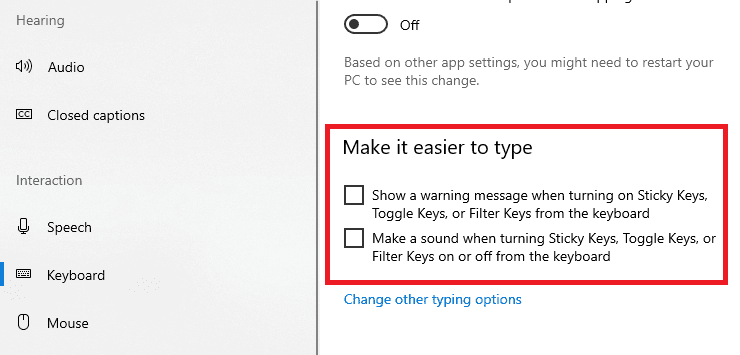
Uncheck the above options
In addition, you can uncheck options that allow you to use a shortcut that turns these features on so that you don’t experience any of them while gaming.
4. Lower your game’s resolution and graphics settings
You need to make sacrifices to get the best graphics for smooth gameplay in this stage. FPS is improved when you lower your game’s graphics settings because it eases the load on the GPU since it won’t have to support many pixels with each frame. Therefore, you have to overlook quality and reduce the FPS (Frame Rate per Second) to get your desired speeds. Besides, lowering the resolution is also another trick that helps users experience higher gaming performances.
5. Updating your graphics drivers
Updating the GPU to the latest drivers is a classic piece of troubleshooting because it dramatically enhances gaming performance. The use of outdated graphics is why gamers experience lag and horrendous FPS. Therefore, if you are after high performance, you should ensure your graphic drivers are updated regularly.
6. Disabling SuperFetch
SuperFetch, which is now known as SysMain. It is a built-in Windows feature that helps to improve the startup time for apps and Windows. Despite that, games generally do not benefit from it. When this feature is enabled, background activity increases, but background activities are reduced once turned off, improving your PC’s gaming performance.
7. Make sure that settings don’t conflict with games
Windows 10 was not primarily made for gaming. Therefore, some of its default settings may conflict with your gaming experience and game settings. Below is a list of settings recommended to be checked out and tweaked to avoid such problems.
Enabling Game Mode on your PC
This is the easiest way to tweak performance on your PC because all you have to do is enable the “Game Mode” feature in Windows 10. By enabling Game Mode, background activities such as windows updates and app notifications are stopped, boosting the FPS in your games. The Game Mode is always ‘On’ by default, but doing a quick check has no harm and is beneficial to ensure that it was not turned off mistakenly. To check if the “Game Mode” feature has been turned on, click on the Windows + I keyboard combination simultaneously. After that, type “gaming” in the search bar, then scroll until you locate “Game Mode.”
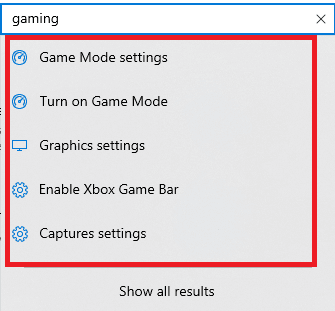
Gaming
Click on “Game Mode,” then switch it on if not. Doing so will enable seamless running of video games without lagging, as this feature prevents the OS from using many resources that might lead to unnecessary lags.
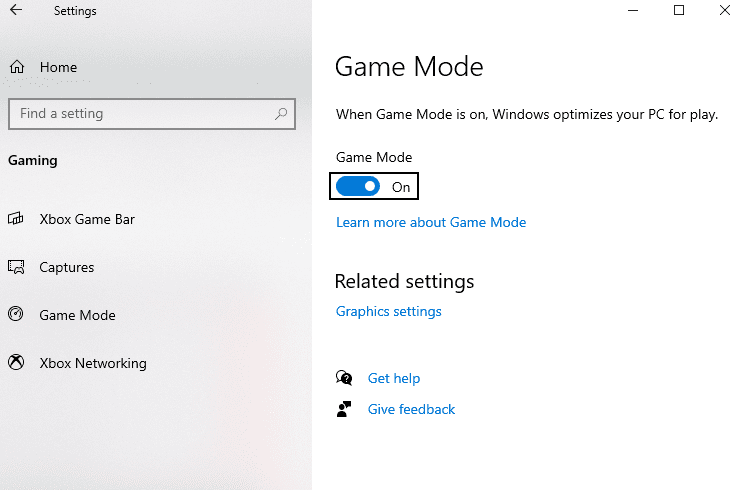
Turn on game mode
-
Disabling Nagle’s Algorithm via Registry Editor.
The implementation of Nagle’s algorithm in Windows 10 was to increase the performance of TCP/IP networks by bundling data packets. This allows fewer packets to be created and sent over the network, improving efficiency. Before instigating this guide, you need to create a backup of your Registry. Disabling this algorithm helps you avoid ping spikes and latency issues in online video games. First, launch the run utility by pressing the Windows and R keys simultaneously. After that, type “Regedit,” then click on the “OK” button so that you can launch the Registry Editor.
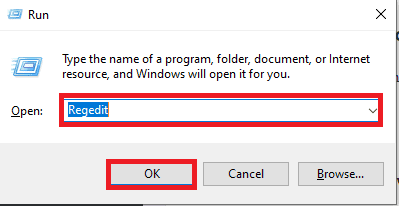
Regedit
Once the Registry editor has launched, navigate to the following location:
HKEY_LOCAL_MACHINESYSTEMCurrentControlSetServicesTcpipParametersInterfac
Note: If you can’t access that location, skip and try out other options highlighted in this article guide.
Once you are in the said location and you have your correct IP address, proceed and create two DWORD 32 bit values containing the following names:
TcpAckFrequency

TCPNoDelay
Ensure all their values are set to 1, as shown in the example below, then close your Registry Editor.
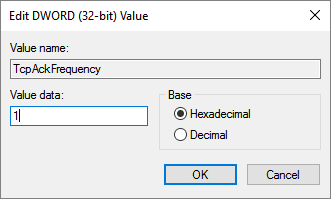
TcPAckFrequency
8. Disabling automatic updates
Automated updates are good, but they tend to slow down your internet and the device too. To warrant that this does not happen while gaming, disable some automatic updates. Follow the guides below to disable the updates in your device automatically.
a) Automatically disabling Windows 10 updates
In the taskbar, select the “Start menu,” choose “Settings,” then click on the “Update & Security” tile.
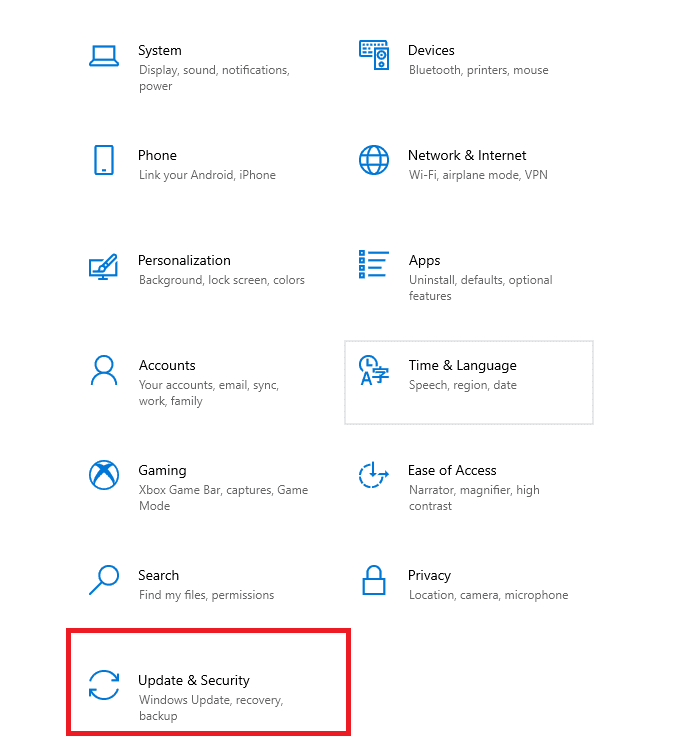
Windows Updates
Make sure you stay on the “Windows Update” tab, after which you will click on “Advanced Options.”
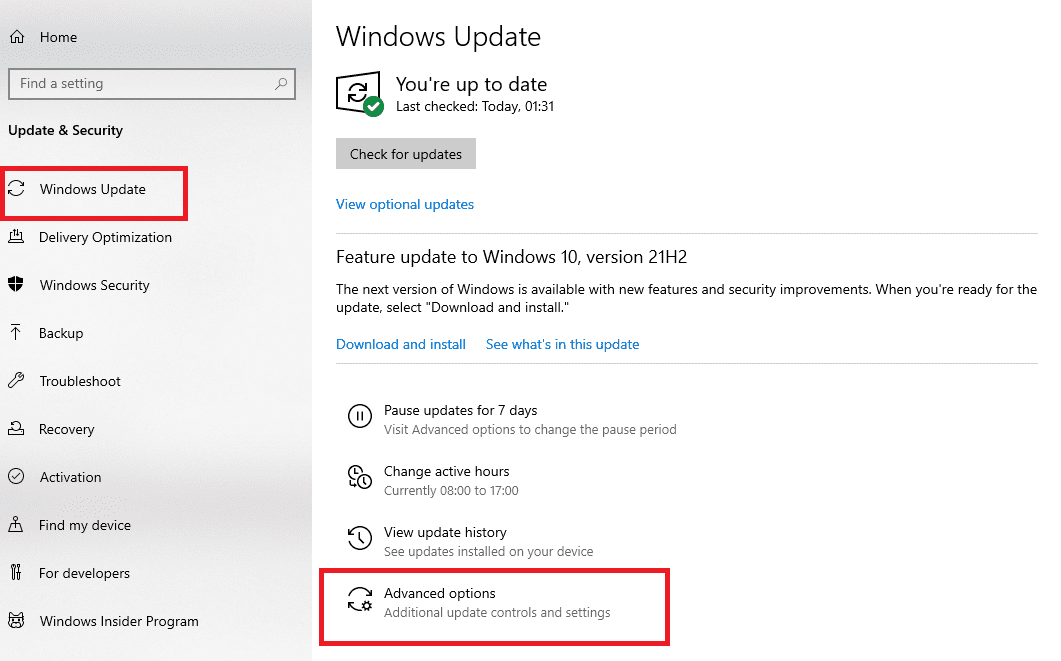
Advanced options
Check and confirm if the “Automatically download updates, even over metered data connections (charges may apply)” toggle has been turned off.

Update options
Once you have turned it off, proceed and manually update your Windows 10 OS. This is done by navigating to the update menu and simply checking for a new update.
b) Disabling Steam automatic updates while playing.
One of the principal video game daises today is Steam. It keeps all of your games up-to-date, and similarly to windows updates, it may cause issues with the internet connection speed and device speed. To make sure that Steam does not update any game while you are playing, follow the steps below:
Launch the Steam client, log into your account if prompted, click on “Steam” from the header, and choose “Settings.” Next, navigate to the “Downloads” tab using the left-side pane and uncheck the option, “Allow downloads during gameplay.” This prevents Steam from updating any games as it detects when a game is running on your Windows 10 PC.
9. Downloading and using apps to optimize your PC
Third-party applications help you to optimize your system for gaming. These apps are open-source; hence they can be easily downloaded and installed. Also, they are easy to operate, but some basics are required to help increase your computer’s speed, thus enjoying your favorite video games even more. Below are some of the basic tweaks:
a) Clearing your PC and Registry using CCleaner
A CCleaner is an application that can clean unwanted data from your computer. It also keeps your Registry keys organized. Below is a quick article guide on how to use the CCleaner to clean your PC and repair Registry issues:
Select “CCleaner” on the left-side pane, then click on the blue “Run Cleaner” icon for the process to begin. Uncheck the options you do not want to delete before starting the cleaning.
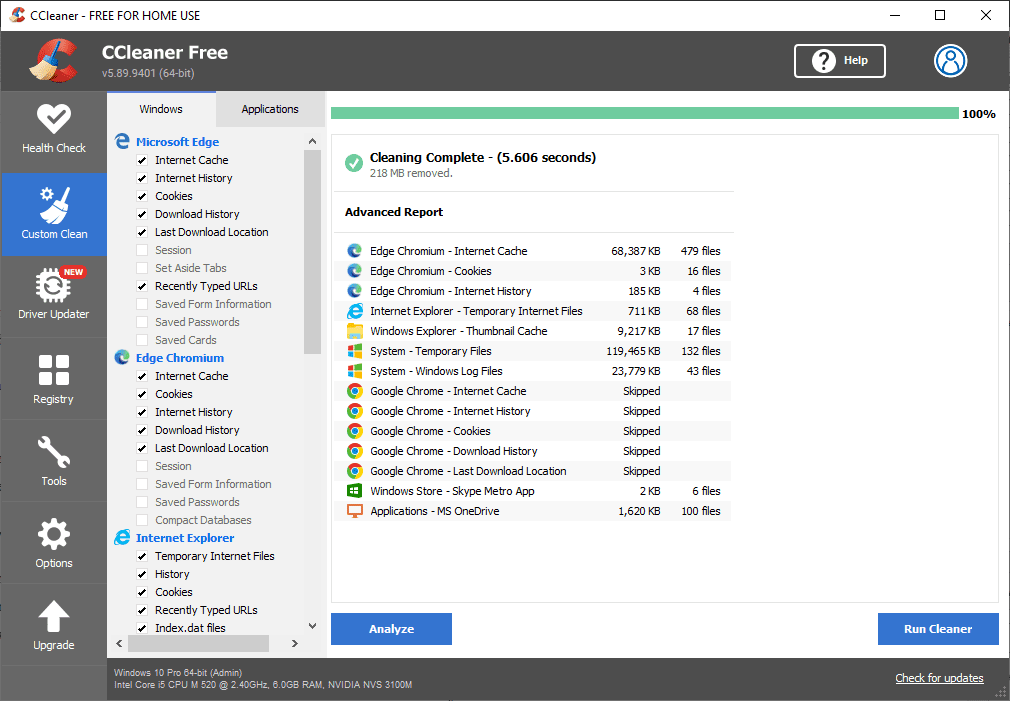
Run CCleaner
Be patient until the cleaning is complete, then switch to the “Registry” tab. After that, click on “Scan for issues” and wait for the app to identify any Registry errors.
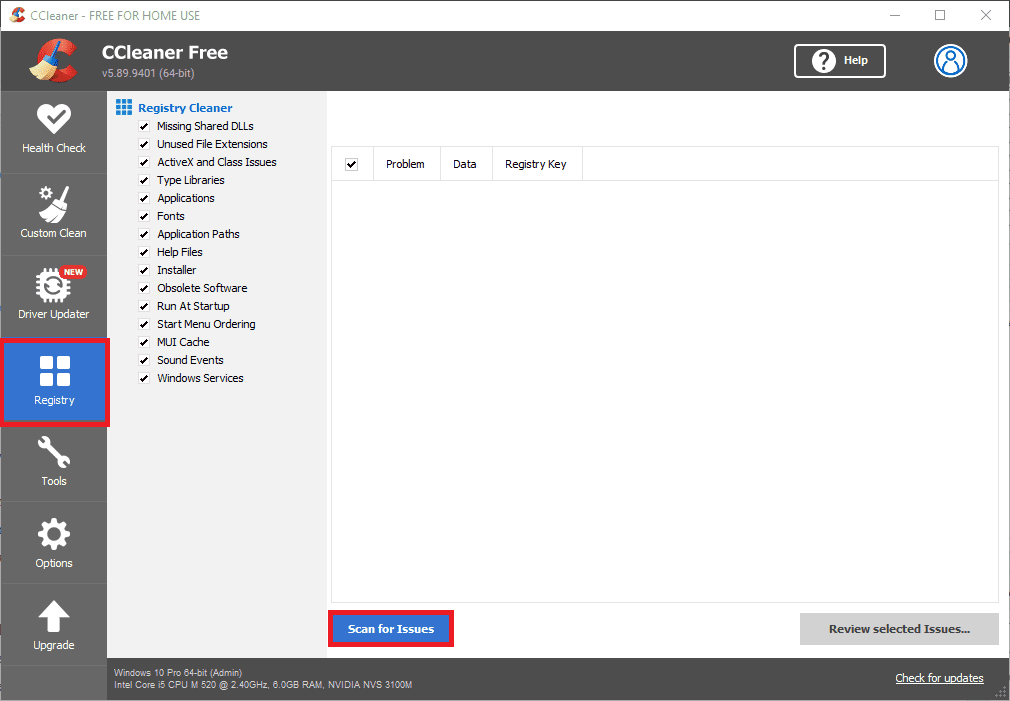
Registry
If any glitches are found, click on “Fix issue.” Then, reboot your computer to apply the made changes. After this, you should notice a performance boost on your PC.
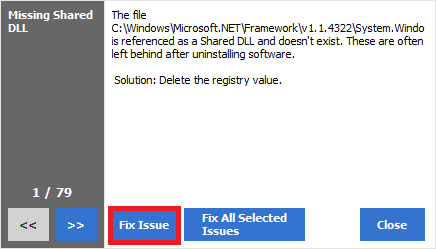
Fix Issue
b) Keep your GPU drivers up-to-date
The GPU is responsible for rendering everything on the screen. A good GPU uses more resources allowing you to run games smoothly. Without proper and updated drivers, there are high chances that your games will lag and potentially lose the desired quality as well. To update your GPU drivers, follow the guides provided herein:
Right-click on the “Start menu” and hand-pick “Device Manager.” Expand the “Display adapters” tab.
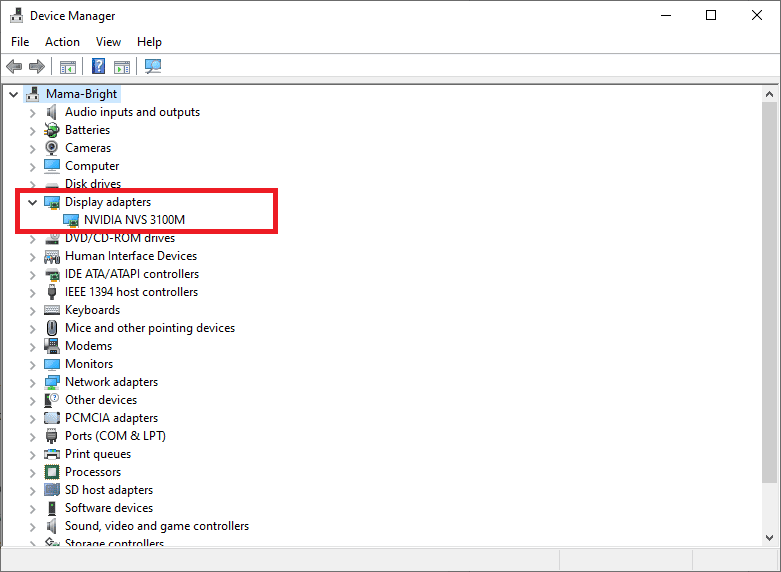
Display adapters
The GPU model is listed here. Right-click on the GPU’s name to update its driver, then select “Properties.”
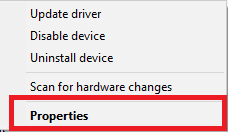
Properties
After that, switch to the “Driver” tab using the header menu. After that, press the “Update driver” button.
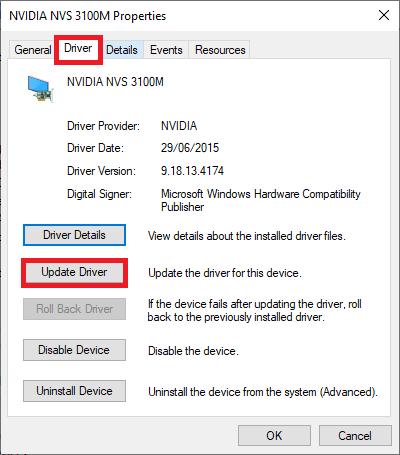
Update driver
Next, select “Search automatically for updated driver software,” then allow Windows 10 to locate the newest driver update.
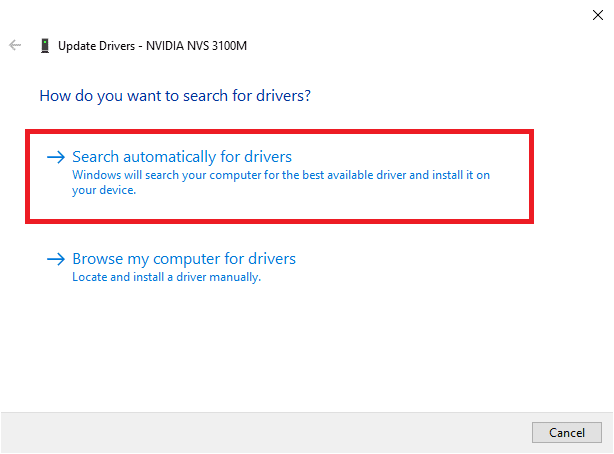
Search for drivers
-
Installing DirectX 12
DirectX is a must-have Windows 10 component for all gamers, and it installs onto your PC while installing games.
However, you may have an obsolete version of DirectX. Therefore, we recommend upgrading to DirectX 12 to enjoy the new and improved features. Follow the quick prompts provided herein to check if you have the latest DirectX software on your PC:
Bring up the run utility by pressing the Windows and R keys together. After that, type “dxdiag” and click OK.
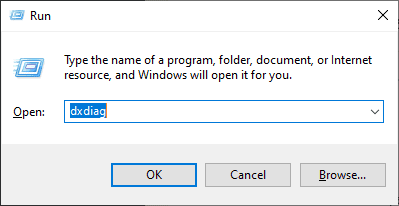
DirectX Diagnostic
Wait for the DirectX Diagnostic tool to fire up, and once the tool is open, locate the “DirectX Version” line. If it says “DirectX 12,” then it means that you are already on the latest version. If it does not say so, you will need to update DirectX.
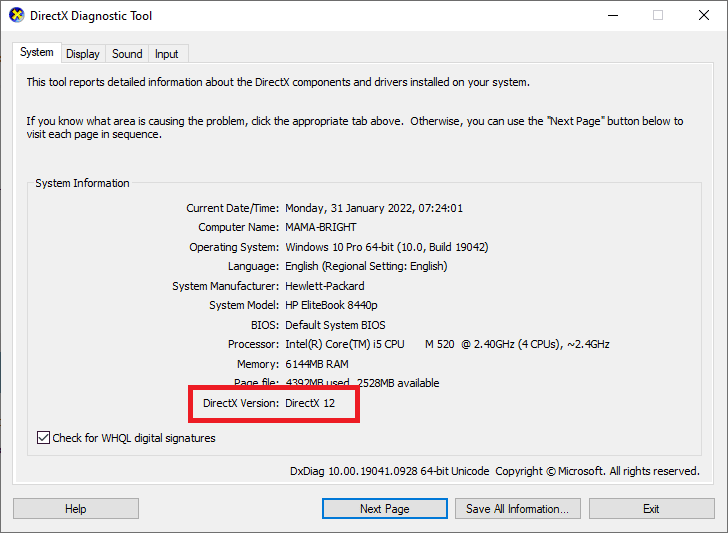
DirectX Version
c) How to update DirectX?
Click on “Start menu” and choose “Settings,” then select the “Update & Security” tile. Next, stay on the “Windows Update” tab and press the “Check for updates” button, then wait for Windows 10 to verify if there are any new updates available. Next, use the on-screen prompts to update to the latest version of Windows 10, and by doing so, you will have installed the latest DirectX 12.
Conclusion
This article has covered all the steps you need to know to optimize your Windows 10 PC for gaming. As a gamer, you always yearn for faster speeds, higher resolution, and FPS rates. This article provides some tricks that can help you boost your speeds and resolution quality as a gamer. We hope this article tutorial has helped you optimize Windows 10 for a better gaming experience. Your audience matters a lot to us; therefore, reach out via the comments section in case of any concerns.
