Table of Contents
Microsoft Windows is an operating system at the forefront of the gaming scene. With the release of the literal game-changer Windows 11, the tech giant has taken extraordinary measures to ensure the world comes to only this operating system for playing video games and having the best experience possible. After all, six years of development didn’t occur in vain, and Microsoft has been serious about improving gaming potential on its latest and most incredible operating system.
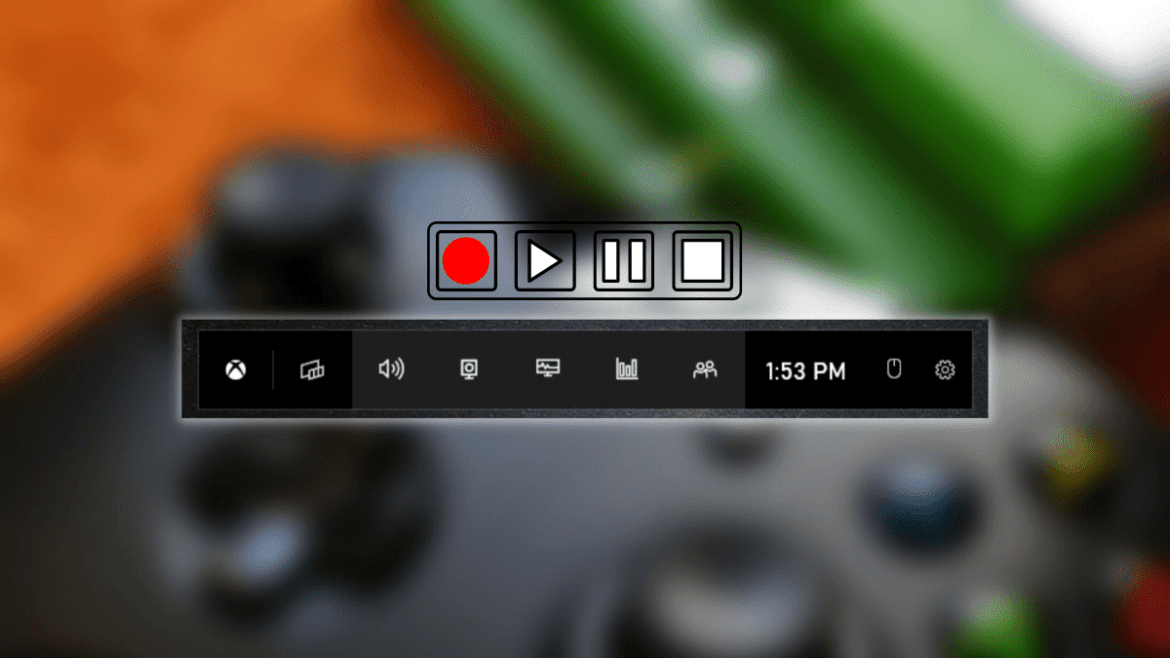
While you’ll find gaming-oriented functionalities to be a substantial part of the best Windows 11 features, there is a feature that has been rocking it ever since the onset of Windows 11, which was released as far back in time as 2015. It’s called Xbox Game Bar, and it’s the operating system’s built-in suite for helping gamers record their gameplay. It’s capable of much more than that, actually, but its primary purpose is to record the screen whenever a game is being played on the PC.
This article will talk about everything there is to know regarding the Xbox Game Bar feature, including how you can record your gameplay with it. Then, stick around for an in-depth tutorial that will fill you in on this helpful functionality. Without wasting any further time, let’s get started.
- Similar Read: Avast Game Mode: Everything you need to know.
What is Xbox Game Bar?
Think of Xbox Game Bar as a facilitating application that helps gamers record their gameplay. Talk about never missing that no-scope headshot in Fallout 4 being recorded and making sure all of your greatest moments in gaming are caught on camera. Xbox Game Bar even comprises excellent social networking features.
If you have subscribed to the proprietary subscription Xbox Game Pass and frequently play games on this platform on your Windows PC, Xbox Game Bar can help you take your experience to the next level. It allows you to talk in real-time with your Xbox social friends, indulge in text messaging, and even enjoy voice chat functionality.
Apart from that, Game Bar paves the way for you to experience a “Performance” section where it monitors your CPU’s performance on the fly. You’ll get multiple metrics along with this chart-styled display that will show you how your system resources are doing, including RAM, VRAM, GPU, and even FPS when you’re in a game.
It makes you keep track of your device’s performance and evaluate if something is hindering the PC from reaching its true potential. Other than that, there are just many convenient features that Xbox Game Bar provides to curious players. For instance, you can add widgets to the screen to revamp your gameplay experience like never before.
The widgets include the likes of Spotify and other useful game-related features like Xbox Achievements. You can pin these features in the form of separate tabs to any side of the screen to make sure whatever is essential to you always stays within your sights.
All right, let’s not talk about Xbox Game Bar in terms of gaming for a moment. At its core, this functionality is a native method of capturing your screen by taking a screenshot and even recording it. You input a particular shortcut key, and the relevant action will follow.
Speaking of which, the settings section of Xbox Game Bar will allow you to tweak what shortcuts you would like to set for each feature. For instance, the basic shortcut command for making the Xbox Game Bar appear on the screen is the “Windows” key followed by pressing the “G” key. However, you’re free to change that to whatever suits you more.
Similarly, shortcut key combinations are incorporated for taking a screenshot and recording a screen. The default shortcut combo for the latter is “Windows,” “Alt,” and “R.” To snap a photo of the screen, you need to press “Windows,” “Alt,” and “Prt Sc” together, and that will do the trick.
Now that you know enough of the Xbox Game Bar, theoretically, let’s jump right into the practicality of this feature and show you how to record your gameplay with it effectively.
- On a side note, read about the Game Mode on Windows PCs and why you should know how to disable it.
How to use Xbox Game Bar to record gameplay
Using the Xbox Game Bar feature to record gameplay is relatively straightforward. The developers have incorporated this feature natively to help users take screenshots and make recordings of the different games they play quickly. To illustrate the process, we will explain everything step-by-step, so you can get the hang of using the Xbox Game Bar without breaking a sweat. Please follow the instructions given below to proceed.
Enabling Xbox Game Bar on Windows 10
Before actually getting to familiarize yourself with the interface of Xbox Game Bar, it’s worth noting that you have to make sure that it’s enabled on your Windows PC first. So go ahead and press the “Windows” key and the “G” key together to see if anything happens when you do that. If you see the screen blacking out and multiple processes appearing, skip this section and continue reading from the next one.
If nothing happens, you need to enable this functionality first on your Windows device. To do this, follow the steps given below.
1. The first step is to fire up the Windows “Settings” application on your device. You can search for it quickly using the Windows Search bar or select it from the Taskbar if you have it pinned there.
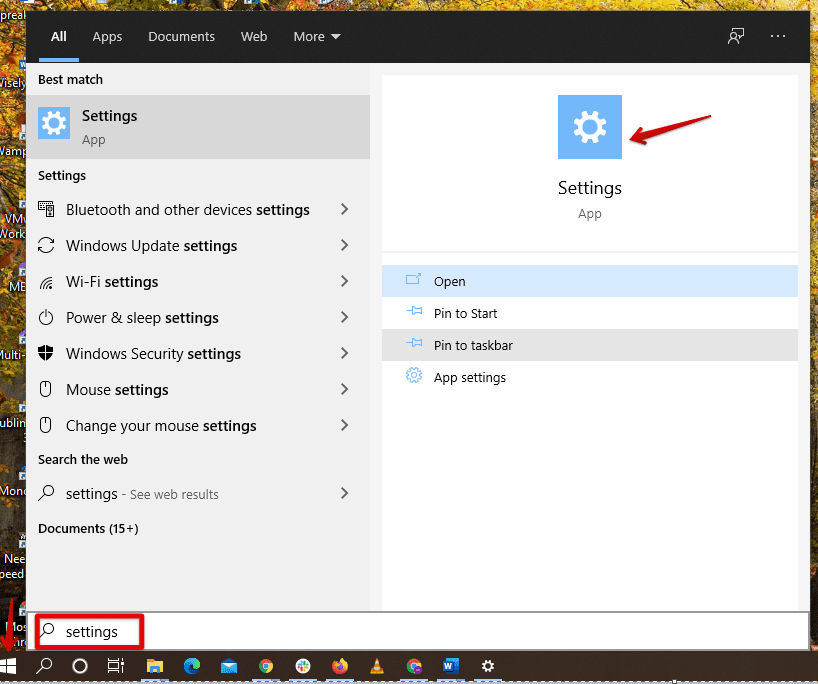
Clicking on Settings
2. Right after that, you will see a window launching on the screen and comprising multiple options. Click on “Gaming” out of the different possibilities to get to the next step.
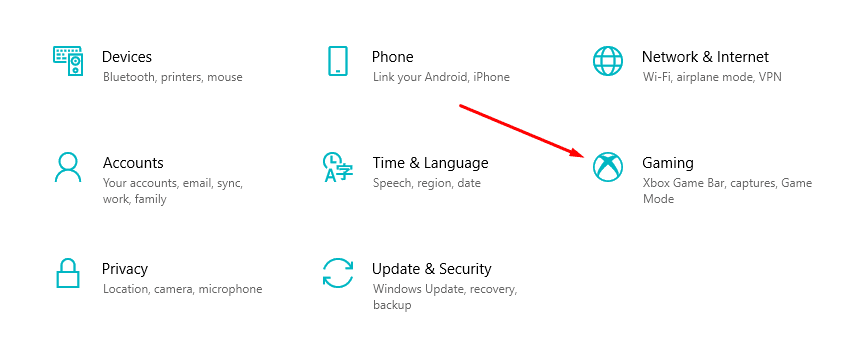
Clicking on Gaming
3. You now have to select “Xbox Game Bar” from the options shown to you on the left side of the screen after clicking on “Gaming.” Once you do that, you will easily confirm if this feature has been disabled on your Windows device.
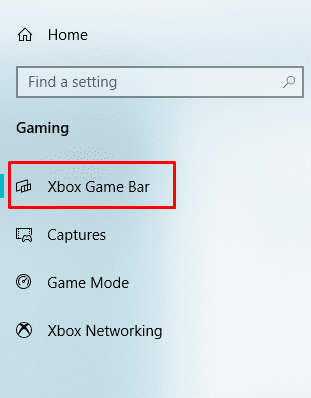
Clicking on “Xbox Game Bar”
4. In this final step, you will confirm whether Xbox Game Bar is running on your device or not. Please check if the toggle right below “Xbox Game Bar’ is enabled. If it is not, click on it to allow the functionality once and for all. If you’ve got an Xbox One or Series X|S controller with you too for gaming, clicking on the “Open Xbox Game Bar using this button on a controller” to switch it on will make things more convenient for you.
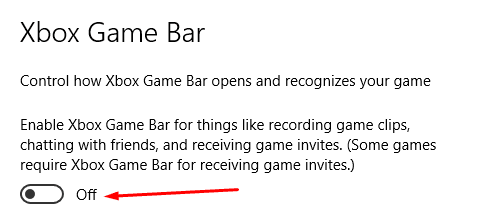
Enabling the Xbox Game Bar feature
Perfect! That’s all about enabling the Xbox Game Bar functionality on your device. You will now be able to record your gameplay through this feature easily, so let’s continue to the section ahead to discuss how to do that.
Recording gameplay with Xbox Game Bar
There are two different ways of getting started with Xbox Game Bar. We’re going to talk about them both one by one. The first method is simply clicking on the Windows Search bar and typing in words “Xbox Game Bar.” The search results that pop up will contain this program, so click on it to launch the feature’s interface right away.
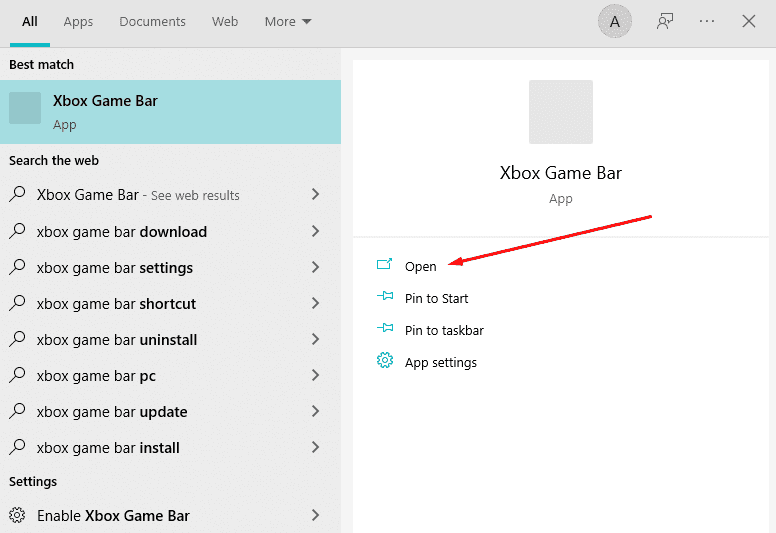
Launching Xbox Game Bar
Another method of doing the same thing is to make the best of the in-built shortcut key combination of launching the Xbox Game Bar feature. Note that you can change what hotkeys you have to press to make the Xbox Game Bar appear on your screen and utilize it. We will get into this later on as well.
As for the pre-determined hotkey, press the “Windows” key and the “G” key on your device’s keyboard to launch Xbox Game Bar. Doing so will definitely black out the rest of the screen and make the Game Bar interface appear in the foreground, allowing you to tweak multiple settings, take a screenshot of the screen with a hotkey, and also record your gameplay. The following is how the graphical user interface of the Xbox Game Bar feature appears on a Windows PC.
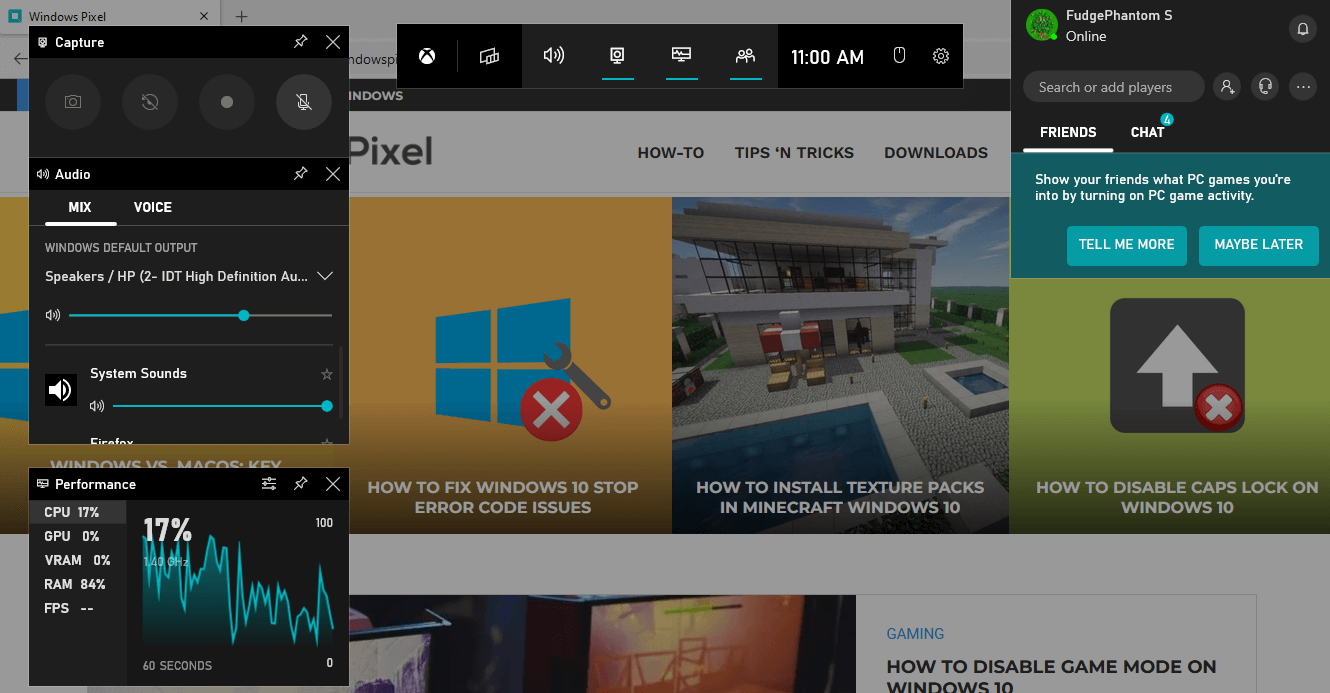
Xbox Game Bar interface
With the Windows Pixel website in the background, you can observe the various interface elements of the Xbox Game Bar feature further out on the screen. To the right, you’ll have your social hub. Here, your Xbox account will be signed in if you have one, and you’ll be guided to set everything up if you’re using Game Bar for the first time. It will be easy for you to voice chat with your Xbox friends using this hub, not to mention text chatting and checking out each other’s achievements.
You’ll find speaker and mic controls to the extreme left of the Xbox Game Bar interface. You can tweak how much volume you want your games to be at and adjust the audio of other processes. For instance, if you have the Chrome browser opened, you can change its volume using Xbox Game Bar’s interface. In addition to that, you can choose which device to use as your default communications output and input.
This is a fully decked-out suite that will enhance your gameplay experiences like never before. We found it quite handy when we used it to play Rocket League through the Epic Games Launcher. However, to come back to the topic at hand, which is about recording gameplay, you have to focus on the element at the top of the Xbox Game Bar interface. This is the control center of the functionality that comprises multiple different functions.
The main options of this control center are given below:
- Widget Menu
- Audio
- Capture
- Performance
- Xbox Social
- Enable Click-Through
- Settings

Xbox Game bar main control center
We’ll get straight to the point here. To record gameplay, you will have to click on the “Capture” button, which is the one in the middle of the interface, right between the Xbox logo and the time. Doing so will enable the “Capture” widget to be displayed on the screen for you. Once done, you will be able to click on the “Record” button to start recording your game. This is precisely how you use Xbox Game Bar to record your gameplay.
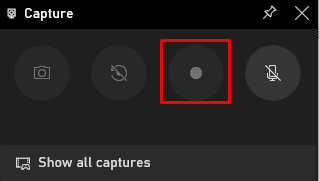
Clicking on the “Record” button
To talk about some features improving the accessibility of the “Capture’ widget, you can click on the “Pin” button right beside the “X” mark to make the feature appear on the screen even when you’re out of the Xbox Game Bar interface.
In addition to that, it is interesting to know that you can automatically start recording your gameplay through Xbox Game Bar by using a shortcut key combination.
Whenever you want to stop recording, you can click on the square-shaped button in place of the original round-shaped button to do that.
Now, the default hotkeys for recording your gameplay through Xbox Game Bar are “Windows,” “Alt,” and “R.” By pressing the three together, you will be promoting the Xbox Game Bar feature to start recording the screen automatically.
If you want to change the hotkey to something else, you will need to go into the “Settings” of Xbox Game Bar. To do that, use the regular hotkey of “Windows” and “G” to bring the feature up. After that, click on the “Settings” icon to continue.

Opening Xbox Game Bar settings
Right after that, a drop-down section will appear from right below the main Xbox Game Bar control hub. From there, you will have to select “Shortcuts” to get to the next step.
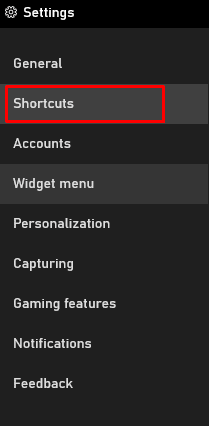
Selecting the “Shortcuts” setting
Right after that, you will be able to specify the shortcut that you need to employ in place of the original “Windows,” “Alt,” and “R” hotkeys. You are free to choose something simpler in this regard. We are going with “Ctrl” and “Spacebar” since it’s much more directly accessible.
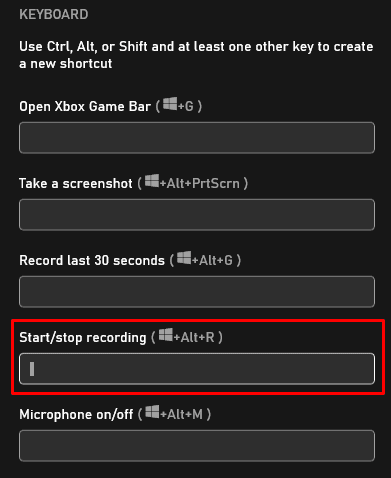
Specifying shortcut for gameplay recording
When you are done here, click on the “Save” button to store your settings for Xbox Game Bar.
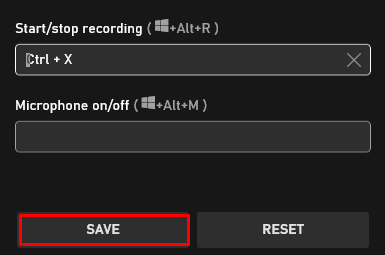
Saving settings
Therefore, that is how you alter the hotkey for recording your gameplay through Xbox Game Bar. You are free to check out what else you can tweak in the “Shortcut” section, among other settings. Experiment with different widgets and see for yourself how you can make the best of them on your Windows PC for gaming. Exploration in this regard can pay off quite nicely.
Conclusion
Becoming a video games streamer holds great potential in the ripe era of 2022. If you are good at gaming, especially first-person competitive shooters, you can let others join in on the fun and allow them to watch your expertise in action. However, all this can happen only when you have a high-quality screen recorder by your side, especially if you want to upload your videos to a platform like YouTube.
Xbox Game Bar can help you achieve your goals by painlessly recording your gameplay and taking in-game screenshots. Other than that, it can display helpful information about your PC’s various performance metrics, including CPU, GPU, Memory, and even FPS. You can benefit significantly from this feature if you know how to use it correctly.
In this detailed guide, we’ve discussed how to utilize the Xbox Game Bar feature on a Windows PC. Everything important related to it, including how to enable it, record your gameplay, and even alter its functions’ hotkeys, has been penned down, so you should have no further trouble getting started with this great functionality. Please let us know in the comments section if you’ve found this article helpful.
We’d be delighted to read your feedback!
