Table of Contents
When a critical system process dies while displaying the bug check error code 0x000000EF or a blue screen error occurs, it is referred to as CRITICAL_PROCESS_DIED. The operating system will suffer if a crucial system fails to work correctly. As a result, it will crash and display errors on your Windows 10 OS.
This stop code appears in Windows 10 when the process necessary to boot the operating system ends unexpectedly for unclear reasons. This problem usually happens after a Windows 10 system upgrade or when a new Windows is installed on a PC.
Most individuals prefer to update to Windows 10 because of its benefits. However, various issues may arise due to this upgrade, such as partition loss, delayed startup performance, etc. Compatibility issues, RAM issues, corrupted or updated system files, faulty sectors, and other factors might cause the 0x000000EF problem or BSOD halt code to appear during or after a successful Windows upgrade.
When a critical component of Windows recognizes that data has been updated when it should not have been, the Critical process died issue occurs.

Blue Screen of Death
This element could be a faulty driver, a memory problem, or something else. This problem happens unexpectedly when people work on their computers most of the time.
Fix critical process died error in Window 10
What should you do if a critical process in Windows 10 has died after an update? Have you been asking yourself this question? Then get all the responses and answers in this article guide.
1. Restart the computer in safe mode
In general, this problem will render your desktop or laptop inoperable, requiring you to restart it. This problem arises every time you restart your Windows 10 PC. In this case, you can resume the computer in safe mode. This is a quick way to start your computer’s Windows system, and it may prevent you from obtaining this problem during the startup process. To restart to safe mode, follow the procedures provided herein:
1. Restart Windows 10.
2. Before Windows 10 starts booting, use Shift + F8 to force it into recovery mode, from which you can select to boot into Safe Mode.
3. To start your computer, navigate to Advanced Boot Options and select Safe Mode as the boot mode option.

Safe mode
Safe mode can also be accessed using alternative methods. For instance, you can use an installation drive to boot to WinRE. A much stupid but efficient way of booting into safe mode is by restarting your PC continuously. Choose Advanced Troubleshooting Options. Restart the computer from the Troubleshoot menu.
2. Upgrade all drivers
One of the most prevalent causes of the stop code is bad or faulty drivers. As a result, it is a good idea to double-check that your drivers are always up to date.
After you restart your computer in Safe Mode, check if device drivers have any issues. Many Critical Process Died Stop errors are caused by hardware or drivers’ conflicts. Please tail the instructions below to check if your device has any problems:
Fire up the Device Manager by hitting Win + X keyboard combination simultaneously.
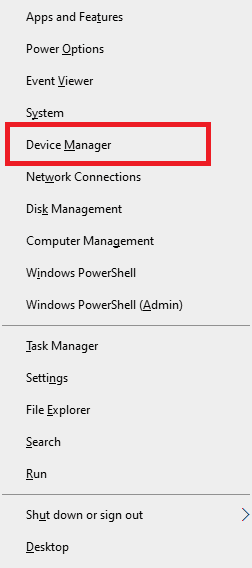
Device Manager
Begin by checking all of your drivers. If you see a yellow exclamation mark next to a driver, it signifies the driver is broken or faulty. Therefore, you ought to fix the driver by uninstalling and installing it.
Furthermore, it is possible that following an upgrade, your hardware drivers are no longer compatible with your Windows system. As a result, all drivers must be updated by right-clicking a driver and selecting the “Update Driver” option.
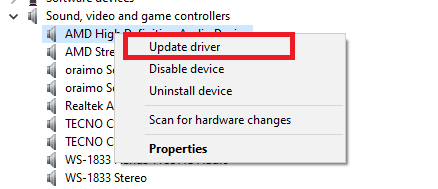
Update Driver
Windows will automatically check for the driver updates and perform upgrades if there are any.
3. Run the hardware and device troubleshooting tool
Windows now come with a comprehensive set of troubleshooting tools. One of them is dedicated to concerns with hardware and devices. It is an essential troubleshooting step in the 0x000000EF problem code.
You will require to fire up the “Command Prompt” as an administrator to run the checker. The simplest method is to type cmd into the search box, right-click on the result, and choose the “Run as administrator” option.
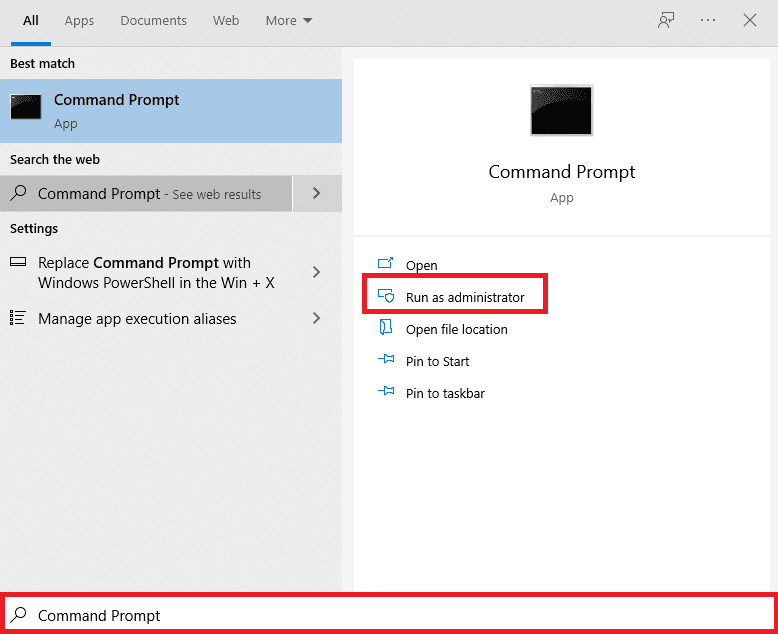
Run Command Prompt as Admin
Type the code below into Command Prompt and press Enter.
sfc /scannow
Output:

Scan
The procedure may take a long time to finish.
When finished, you will see a list of any issues and the scan’s measures to fix them on the screen.
Before continuing to work, make sure you restart your computer.
This also aids in the resolution of the Bad System Config Info error.
4. Run an antivirus scan
Malware on your machine could also be the source of the stop code. It can corrupt system files and processes, rendering them unusable.
You can use Windows Defender or your preferred third-party antivirus program. Just be sure to conduct a thorough, full-system scan to ensure you are free from malware and any virus attacks. Also, it is a decent practice to use Antiviruses such as Avast.
5. Uninstall recent Windows Updates
If your problem is new, a recent Windows update may be at fault. Thankfully, uninstalling recent updates is simple, so you can test whether your problem goes away.
To uninstall an update, click to Update & Security > Windows Update > Update History > Uninstall Updates in the Settings App.
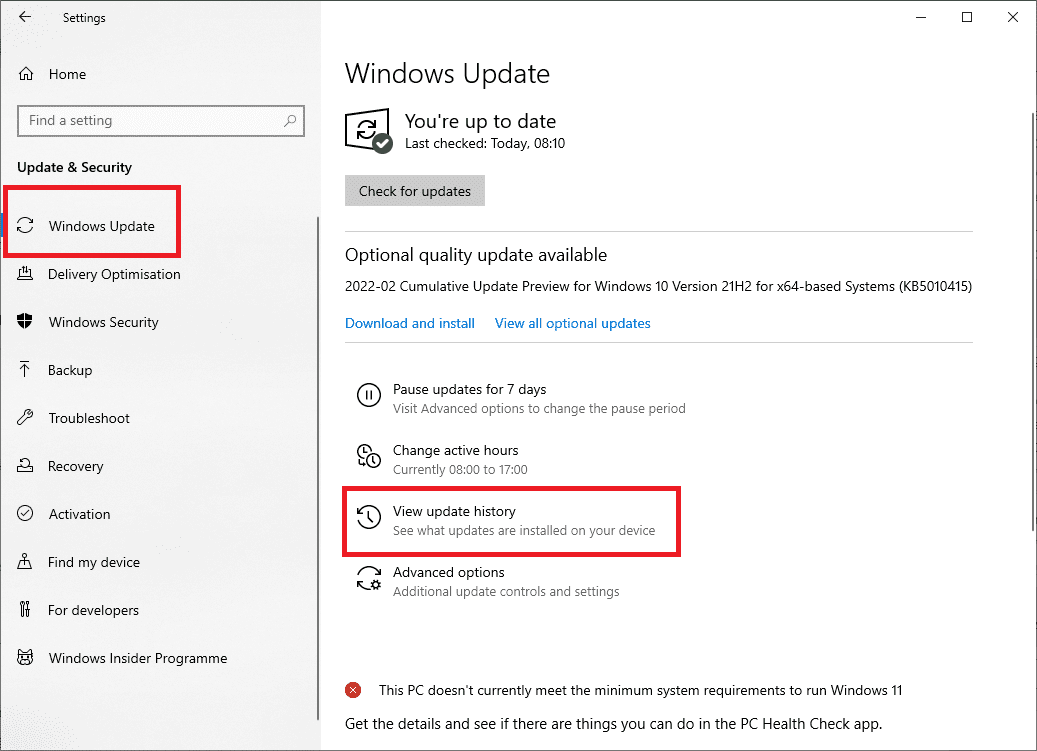
Update History
Select the update from your system that you wish to uninstall, then click the Uninstall button at the top of the window.

Uninstall updates
Some consumers discovered that the recent Windows 10 updates are the source of the Critical process died error and that the only way to cure it is to uninstall the offending update.
All previously released updates are included in cumulative updates. When you get a new cumulative update from Microsoft, you will also get an update that you will have to remove because it triggered BSoDs.
6. Restore your system
You can use the system restore utility to restore your computer to an initial state if the error has appeared only recently. This option is only available if you permit the creation of restore points before the onset of your stop code issues.
To restore the system, go to Settings > Update & Security > Recovery > Reset this PC > Get Started > Keep Files and follow the on-screen directions to utilize the System Restore utility.
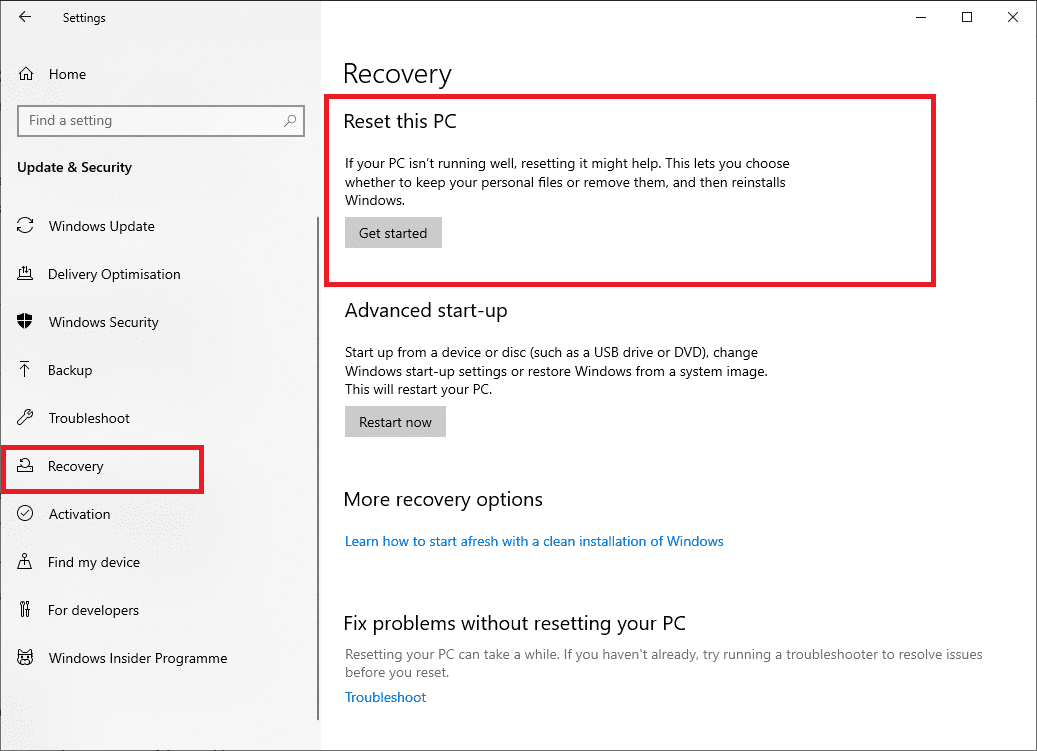
Recovery
7. Perform a Clean Boot
A clean boot is a startup mode in which the bare minimum of drivers, processes, and programs are used. Once your PC is fired up and running, you can begin loading the missing processes in an attempt to pinpoint the source of the problem.
You can perform a clean boot in Safe Mode if you get a BSOD Critical Process Died Windows 10 error. To open the System Configuration window, press Win+R and type the command below into the Run box:
msconfig
Output:
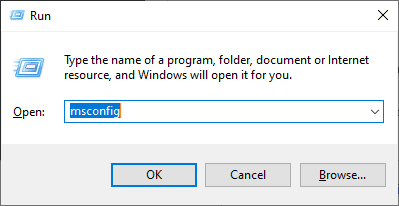
MSConfig
8. When there are corrupt sectors, use MiniTool partition wizard
We can carry out several practices in this sector to fix the Critical Process Died Stop error. Below are some of the notable and widely used techniques:
1. Check bad errors in the hard drive
Another common cause of this stop error is the presence of defective disk blocks. If your hard drive has faulty sectors, the Windows halt code Critical Process Died on startup may appear. You will need to inspect your disk for any bad sectors in this situation.
The best way to go about this is by using MiniTool Partition Wizard, a professional partition and disk management software that is highly recommended for checking disk issues with simple steps. In Windows 10/8/7/XP/Vista, this partition manager includes the Surface Test feature, which scans all sectors on the disk by reading all data from each sector.
Windows 10 will not boot if the Critical Process Died 0x00000ef problem arises. To begin, install MiniTool Partition Wizard Pro Edition on your computer and use its Bootable Media option to make a bootable disc or USB drive. Then, boot your PC into MiniTool Recovery Environment to check for disk errors from the bootable device.
Note: Using the MiniTool Partition Wizard might incur some costs. Therefore, if you don’t intend to incur additional charges, you can try any methods already mentioned in this article guide.
2. Repair Bad Sectors
If there are any faulty sectors after the disk test, you must shield them. You can find some beneficial solutions or movies by searching for “disk faulty sector repair” on Google. Follow them to keep the bad blocks at bay.
3. Create a disk backup for important data in Windows 10
After you have finished inspecting the disk, you can see some terrible errors. In this scenario, you should backup all your vital data on the hard drive after protecting the faulty sectors to limit the danger of data loss.
To create a backup, follow the simple steps highlighted herein:
Step 1: By choosing backup in the toolbar, you can get straight to the backup page. Then select whatever you want to back up and where you want to save the backup image by clicking the Source module and Destination module. It’s also a good idea to do it with an external hard disk.
Step 2: After you’ve decided on a backup destination and source, there are three things you should keep in mind.
- MiniTool ShadowMaker is an automatic backup solution that allows you to manage backup matters regularly to give better safety for your computer and data. To proceed, all you have to do is click the Schedule button.
- MiniTool ShadowMaker comes with three backup options. The Incremental backup option is selected by default, but you can change it by clicking the scheme.
- MiniTool ShadowMaker also has several additional backup options, which you may set by clicking the Options button.
Step 3: To complete all actions, click backup Now.
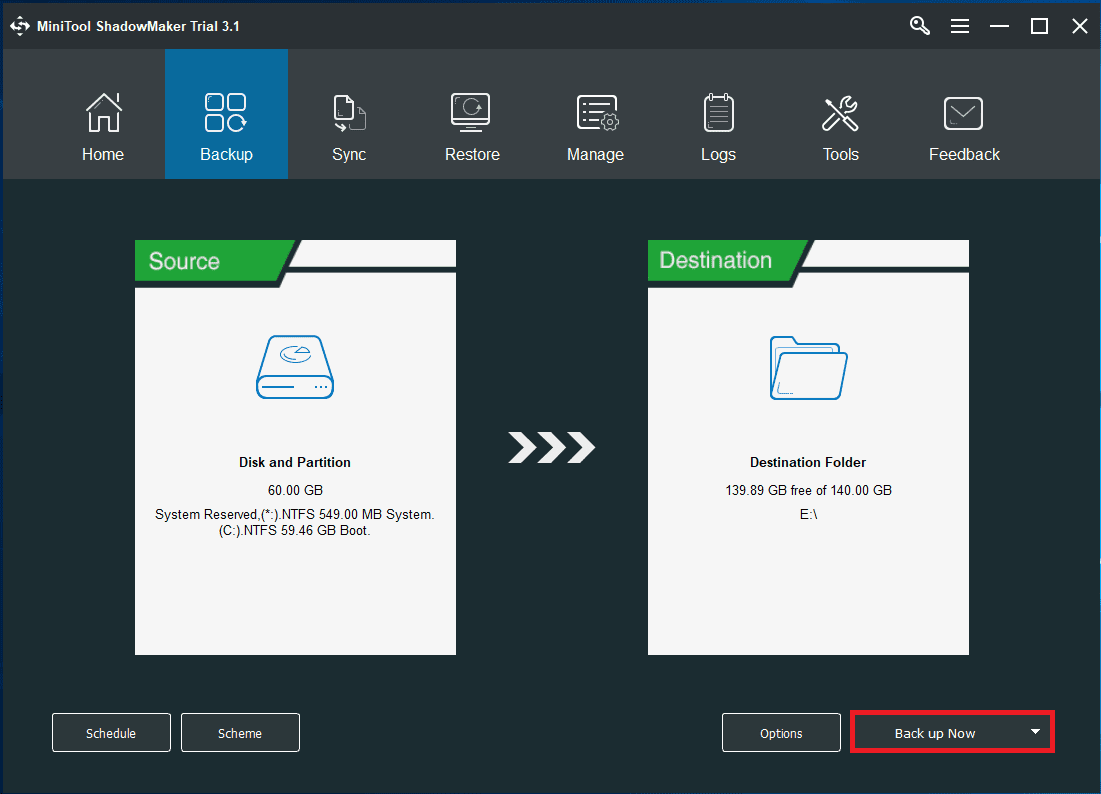
windows backup
Step 4: Now restore your computer or perform a clean boot to fix the Critical Process Died Stop error.
That’s all. The methods highlighted above will help you fix the Critical Process Died Stop error on your Windows 10 PC.
Conclusion
The above instructions explain how to fix the Critical Process Died on Stop error on Windows 10. It is now up to you to take action to resolve the problem. If you have any questions, complaints, or recommendations, please contact us via the comments section below.
