Table of Contents
You have a lot of flexibility in modifying Windows PCs and altering them in your behavior. For instance, we have penned down a complete guide on optimizing Windows 10 for gaming that talks about all the different techniques you can use to make your setup more gaming-friendly.
In addition to that, it’s also possible to record your gameplay using the Xbox Game Bar and even emulate Raspberry Pi OS on Windows, which is an entirely different operating system. However, it’s not always an uphill ride on Microsoft Windows. Sometimes, many ingrained features can come together to depreciate the user experience instead of enhancing it, and that’s when you need to tell the difference strategically yourself.
One of these particular services is called SysMain, previously called “SuperFetch” on Windows. This feature is supposedly intended to make the PC perform faster, but that’s not always the case. This guide will cover everything there is to know about the Superfetch service, including how to disable it. Without wasting any further time, let’s begin right away.
What is Superfetch?
Superfetch can come across as one of the most integral Microsoft Windows features that’s right alongside the functioning of RAM in your PC. Its primary purpose is to load applications way before they come into actual use, so when the time comes to launch them, the apps can perform faster and give you a decent output.
This is also called preloading. To give you a little background on this feature, Superfetch has been a part of Windows ever since the release of Windows Vista, which dates way back to 2007. From that time on, each release of Windows, including the relatively recent Windows 11, also packs a ton of other excellent features.
Superfetch is short for Service Host Superfetch and is included in the operating system to keep the performance fast-paced, thus the name “Superfetch.” Microsoft likes to coin this service as something that “maintains and improves system performance over time.” Therefore, Service Host Superfetch is a background process.
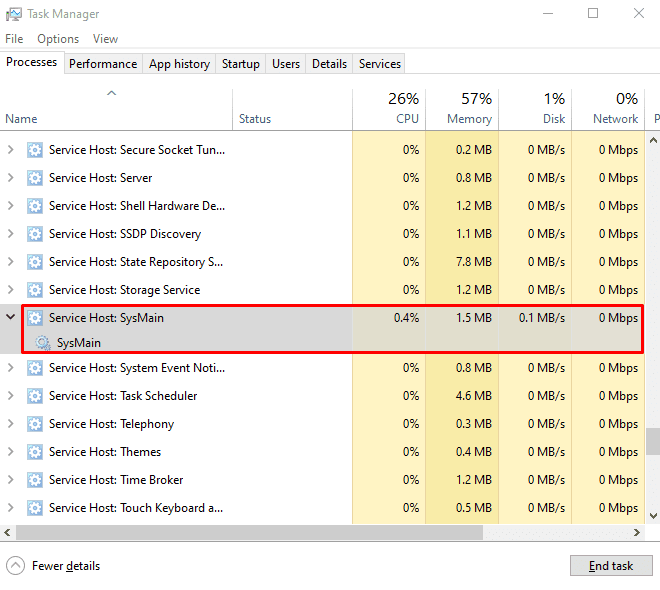
Service Host Superfetch in the Task Manager
It can be seen on the Task Manager app and goes by “Service Host: SysMain.” To get a little in-depth about Superfetch, this program in Windows 10 plays an analyzing role. It watches you (not literally) as you load up applications on your Windows PC and starts connecting the dots regarding which apps you run the most.
Therefore, all those software or programs you frequently run and consistently will gradually speed up. That is the whole purpose of Superfetch. The service will preload whatever software you use, so the next you click on it, the software will launch faster and perform better.
Moreover, Superfetch is not to be confused with Prefetch. The former is a successor of Prefetch—a similar service introduced in previous operating systems. However, Prefetch wasn’t advanced enough to monitor application usage patterns on Windows. This is where Superfetch has come in to shine and presents users with a ton of functionality.
In addition, it’s also worth noting how this feature works. It takes up unused internal memory on your PC and utilizes it for preloading applications. However, when the system requires more RAM, it frees up memory by unloading the ready apps. This exchange keeps taking place in the continuity, and the operating system runs perfectly.
For the most part, Superfetch is an exciting service, but there’s more to this feature than what seems obvious. Certain aspects of its working can be pretty problematic for Windows users, so let’s go over them now.
Why you might need to disable Superfetch on Windows 10
As iterated earlier, Superfetch is an advanced service that plays its part in speeding up system processes and boosting the overall performance of a Windows PC. That’s great and all, but there are specific things of this service that may do more harm than good for your device when it boils down to it. For instance, Superfetch is a background process.
That means that on its own, it’s going to eat up some RAM and CPU as well to function correctly. That’s con number one. Adding to this is the fact that sometimes, the boot times of the Windows PC can be negatively influenced due to Superfetch. In addition, it’s not just about the boot times. The latter is simply a result of another underlying issue caused by this service.
That is to say, the 100% disk usage issue in Windows PCs is a significant cause for concern. You’d be unable to use your PC in several ways if that were to happen. Apart from the unresponsiveness, applications will begin to load very slowly, and you will be left scratching your head in question concerning what to do next.
The Superfetch feature is the service responsible when that happens in most cases. The preload process starts from the hard disk drive or the HDD in the PC and carries over to internal memory or RAM. So if you start up your PC and the Task Manager shows you 100% hard disk usage, this is another incentive that you need to disable Superfetch.
Lastly, if you have a low-end PC with minimal specifications, keeping Host Service Superfetch enabled can be partially beneficial for you. That is because of the way it operates. The service works by preloading applications, so it launches faster when launching the application.
However, when preloading the app, you will start to feel the computer getting slow for a brief amount of time. If you’re doing something resource-intensive at the moment, you’ll significantly feel the preload process. However, your device can also be idle at that time, making the Superfetch service beneficial for you.
These are all the reasons you should know how to disable Host Service Superfetch. However, there’s still good that can come out of the feature, especially if you have a PC with good specifications. You can get quick results with appreciable hardware.
For now, let’s talk about how to disable Superfetch on Windows 10.
How to disable Superfetch on Windows 10
Disabling Superfetch on Windows 10 is a clean and straightforward process. You don’t have to dive into any complications to get done with it. Although there is a direct method to turn it off on your PC, we will cover the matter at hand using two different options. This is only to provide you with flexibility concerning the disabling procedure. So, without further delay, let’s get started with the first option.
Option #1. Using the Command Prompt to disable Superfetch on Windows 10
One of the first recommended ways for disabling Superfetch on Windows 10 is to use the all-powerful Command Prompt. The following steps are going to explain the process in detail.
1. The first step is to open the Command Prompt. This can be done seamlessly with the help of the Windows Start button. Type in “Command Prompt” and click on the application when it pops up. However, please make sure that you’re running the Command Prompt as an administrator for the best results. Otherwise, there’s a chance of running into potential issues.
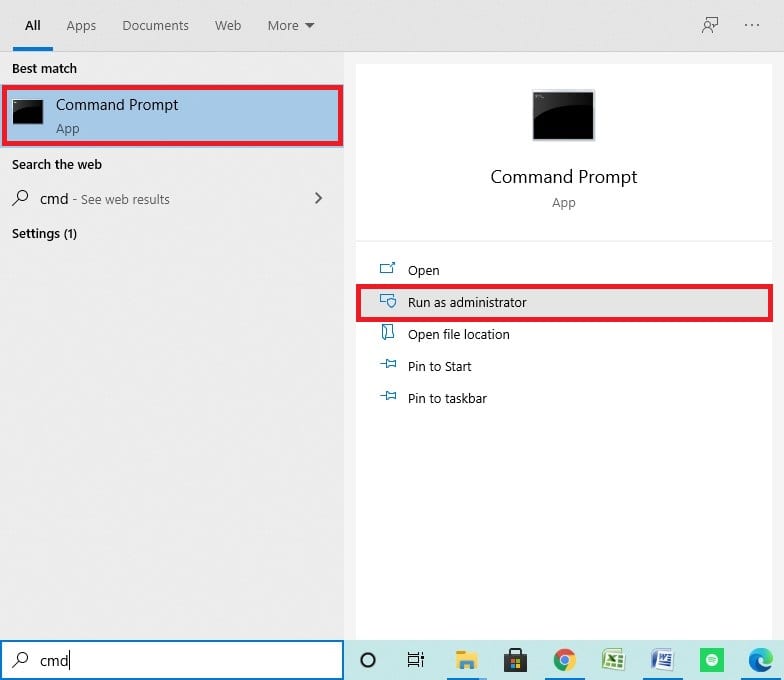
Clicking on “Run as administrator”
2. The next step is to type in the following command into the Command Prompt window. Press the “Enter” key when you’re done to continue.
sc stop "SysMain"

Entering the command
3. As soon as you do that, the system will reply with a series of different options to choose from. Please ignore all that and type the following command into the Command Prompt. That way, you will disable Superfetch on Windows 10 successfully.

Disabling the Superfetch service
That’s about it for the first method that you can use for disabling the Superfetch service on Windows 10. This has been simple, effective, and straightforward, so you shouldn’t be having any issue going with it. For now, let’s talk about another method that you can employ for accomplishing the task at hand.
Option #2. Using the “Services” system app to disable Superfetch on Windows 10
The second method utilized for doing the same thing but differently relates to the “Services” system application. This program houses all system processes and services, working hard to power your Windows PC and ensure its normal functioning. We will also find Host Service Superfetch but not in this name. In the “Services” app, the service will go by the name of “SysMain.”
The instructions below will show you how to access the Services system app effectively and disable Superfetch on Windows 10.
1. The first step is to open the Windows Start menu and type in “Services.” Be sure to run it as an administrator to perform the forthcoming processes with admin privileges. That should prevent us from running into unwanted issues. Alternatively, you can also bring up the “Run” program by pressing the “Windows” and “R” keys together and typing “service.msc.” Go with whatever suits you best.
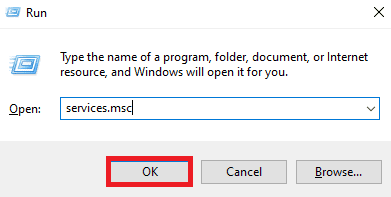
Services
2. After opening up the Services window, you now have to scroll down the list of services until you find “SysMain.” The services are arranged chronologically, so you should see it in the programs area starting with the letter “S.” As soon as you find it, double-click on the service and select “Properties.”
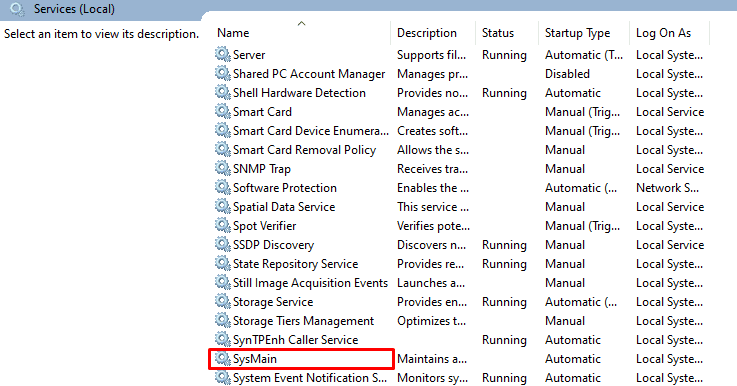
Accessing the properties of SysMain
3. After opening up the SysMain service’s properties, you will be shown a small-scale window. Here, you will be able to disable Superfetch on Windows 10. You have to select now “Startup type” to reveal the extra options dedicated to that section. Doing that will show four different settings for Host Service Superfetch: Automatic (Delayed Start), Automatic, Manual, Disabled. Select “Disabled” from here and click on “OK” to finalize the process.
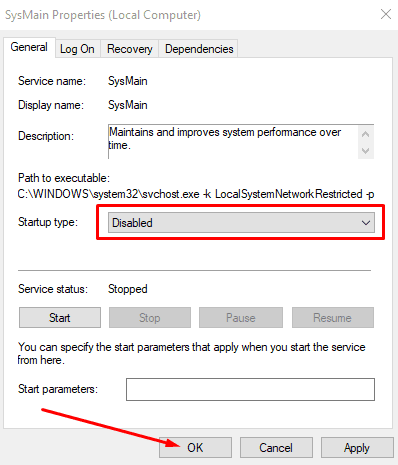
Finalizing the Process
That’s about it for the second method that you have for disabling Superfetch on Windows 10. We’re glad that you made it this far. After clicking on “OK,” it’s recommended to reboot the PC for the best results, but you can also start using the device without doing that just fine.
Conclusion
SuperFetch (SysMain) is a background process that makes it possible for applications to be preloaded and get a good boost in performance. Many people with suitable hardware can see the results Superfetch brings to their rigs.
However, not everything is perfect in life, and the same is the case with the Superfetch feature in Windows 10 and 11. This program can often be detrimental in many instances, especially for people with devices that have low-end technical specifications. In other times, the feature is found causing 100% disk usage in Windows 10, which simply never bodes well for any operating system. That is why we have talked about not only one but two different ways of disabling Superfetch, so you know your options and can proceed comfortably.
Please let us know if you found this guide helpful in the comments section. We would love to read your feedback!
- Do not miss out on these top 10 meme-creating tools for Windows 10 for a fantastic humorous experience online.
