Table of Contents
Windows 11 is the next iteration in the Microsoft Windows family, shaping this operating system’s new generation for years to come ahead. It’s jam-packed with terrific features, has a lot of gaming potential, and is the best version of Windows to date. If you’ve been meaning to discover how to access and use the Startup folder in Windows 11 from the easy-to-understand interface of this whole system, keep on reading for a set of handy instructions.
What is the Startup folder in Windows 11?
The Startup folder in Windows 11 isn’t something you can find at the forefront of your operating system’s screen. You have to make an effort to dig this specialized folder out. That said, it isn’t too hard to locate the Startup folder in Windows 10 and 11, but you will have to follow a bunch of steps, and that’ll be it. As for this directory, the Startup folder contains all those applications and processes starting when you start your PC.
Sounds simple, right? There will be shortcut icons for apps launched by the operating system automatically as soon as it detects the PC is being turned on. Of course, all this hassle is to accommodate users and enhance their Windows experience. If you’ve been using any Torrent-related application, you already know how it starts as soon as your PC boots on. The same is the connection with the Startup folder in Windows 11.
The primary use and the benefit of knowing the location of the Startup folder is worth your time. When you know what applications start alongside your PC, you can choose to remove them and thereby save essential system resources from being used up. You will no longer need to rely on the Task Manager for this purpose afterward, as most users do when they find their PC having boot-up problems, such as the unmountable boot volume error in Windows 10.
In addition, this specific benefit can come across as two-way as well. If there is a particular application that you’d like to add to the Startup folder, you can do that effortlessly as well. Doing so will make that app start up when your Windows 11 PC turns on. However, all of this is possible only when you know where exactly is the Startup folder located on the device. Without any further ado, then, let’s get straight into that.
Locating the Startup folder in Windows 11
The good news is that locating the Startup folder in Windows 11 is a relatively simple process, albeit a long one. We’ll go through it all in the subtitle ahead, so do read until the end for all the necessary information.
Accessing the Startup folder through File Explorer
Follow the steps listed ahead and learn how to get to the Startup folder through the File Explorer system utility on your Windows 11 PC.
1. The first step is to open the File Explorer app on your Windows 11 PC. This should be pretty easy to do. Look for the relevant app icon in the Windows Start area, and you’ll be fine.
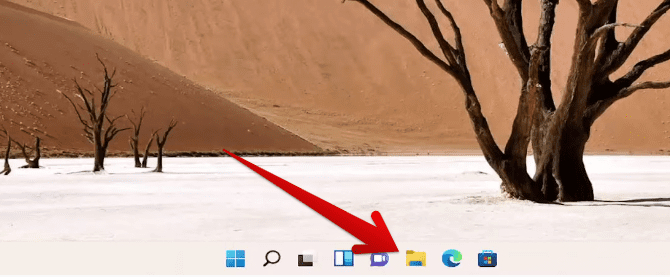
Opening the “File Explorer” app
2. After the Windows Explorer system app is up and ready, click “This PC” in the sidebar to the left and select the hard drive where your operating system has been installed. For most users, this is “Local Disk (C:)” so we’ll go with that.

Clicking on Local Disk (C:)
3. The next step is to select the “Users” folder after getting inside the directory of your hard drive. To continue, choose the username of your Windows 11 PC. This should be reasonably easy to do as your username will be listed in the form of a document. Click on it to proceed ahead.

Clicking on the “Users” folder
4. Follow the process by clicking on the “AppData” folder next. Now, there is a chance that you might not be seeing this folder on your screen at this stage. If that turns out to be the case, you need to enable the “Show hidden files, folders and drives” feature in your Windows Explorer app. Do this by clicking on the three vertical dots button, as shown in the screenshot below, and selecting “Options.”
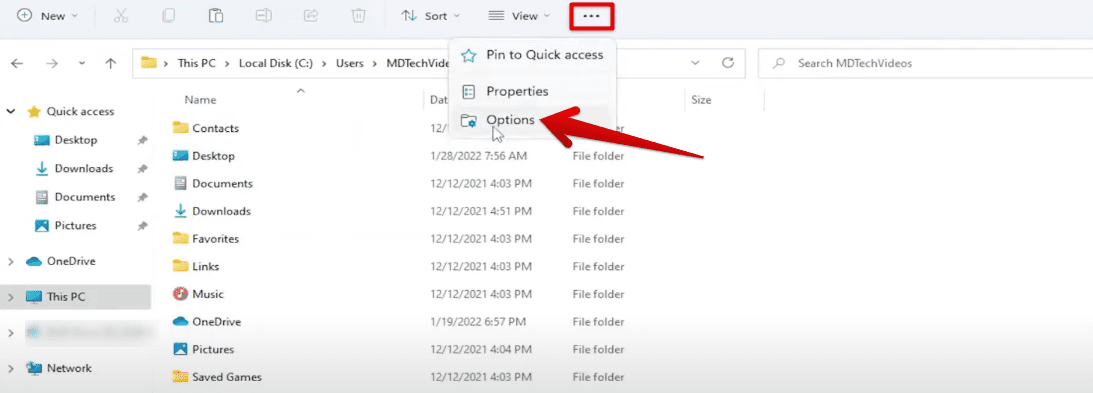
Revealing the options of Windows Explorer
5. After clicking on “Options,” a small window will appear on the screen. Click on the “View” tab and select the toggle beside “Show hidden files, folders, and drives.” Choose “Apply” and finalize by tapping on “OK” when you’re done.
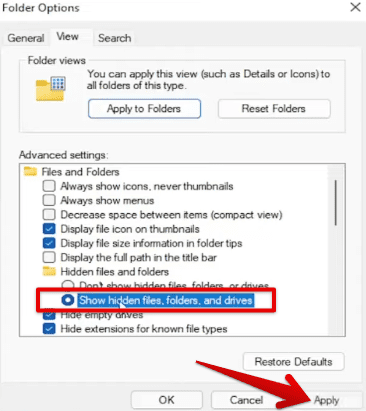
Revealing the hidden files in Windows Explorer
6. Now that you’ve made the necessary change, click on the “AppData” folder, as shown in the screenshot below. It should now appear on the screen for you.

Clicking on the “AppData” folder
7. Select “Roaming” next.

Clicking on the “Roaming” folder
8. Proceed by clicking on “Microsoft” instead of “Adobe.”

Selecting the “Microsoft” folder
9. The next step is to click on the “Windows” folder, as you can see below.

Clicking on “Windows”
10. Continue the process by selecting “Start Menu” inside the “Windows” directory.
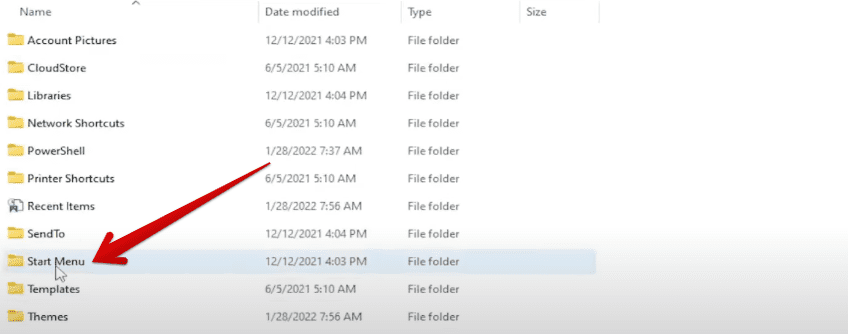
Clicking on “Start Menu”
11. Proceed by clicking on “Programs’ next.

Clicking on “Programs”
12. Finally, click on the “Startup” folder to finalize the process.

Clicking on the “Startup” folder
13. Great going so far! At long last, you’ve now arrived at the “Startup” folder. You can see below that it’s empty for us since we don’t have any programs launching alongside the boot operating of your Windows 11 PC.
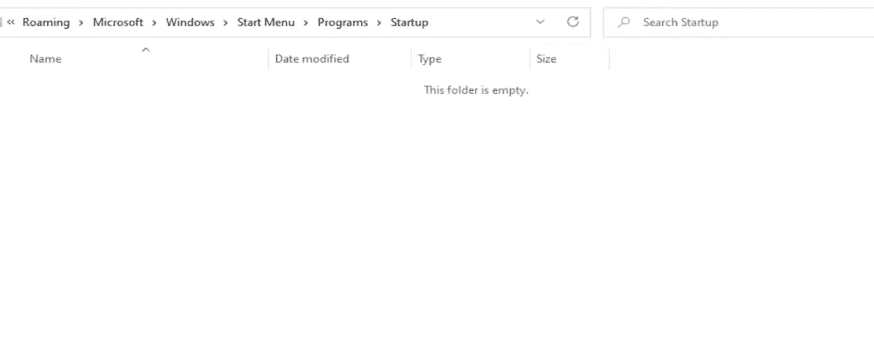
Startup folder arrived
Now that you know how to get to the Startup folder let’s look at how you can use it for the better. The following section will discuss just that, so keep reading for the best results.
How to use the Startup folder in Windows 11
As mentioned earlier, the Startup folder determines what applications you’ll have launched at the start as soon as your device turns on. If you want any processes to replicate this behavior, you’ll need to follow a simple trick. Double-tap anywhere inside the Startup folder on your PC and select “New,” followed by the “Shortcut” button.
Once you do that, feel free to enter the file path of the application you’re trying to enter in the Startup folder. You have to pick what process needs to launch as soon as you turn your PC on at this stage. After that, exit the Startup folder, and you’ll be all done. We told you before that using the Startup folder in Windows 11 is simple, so you don’t have to be confused along any step.
Conclusion
Windows 10 and Windows 11 both comprise Startup folders that allow specific applications to start up alongside the operating system. This is useful in some cases but detrimental in others. For instance, if you want a particular game launcher to load right when the PC boots on, you can achieve this by using the Startup folder.
This will enhance your gaming experience by letting you prioritize the startup of the game launcher so that you can hop into your favorite games at the earliest instance possible. We’ve shown you how to access the Startup folder in this guide to remove those processes you don’t want to launch in the beginning. We hope that you’ve found this helpful guide for your cause.
Do let us know in the comments section what you think of it. We’d love to read your feedback!
