Table of Contents
Whether your operating system has gone corrupt or you want to install another OS on your system, the computer will need the operating system files you want to install or recover. Back in the day, you’d have to use a CD or floppy disk to boot an operating system on your computer. Although that approach worked, USB drives became more popular with time as they could store more data while occupying even less space. Considering this, a lot of people now prefer booting operating systems with the help of USB drives.
Although this approach has become way more common with time, it can still be a tad bit complicated who haven’t installed an operating system before. However, you need not worry as the procedure of doing so is quite simple, and we will thoroughly guide you through it.
Booting from a USB drive in Windows
The first thing you’ll need is a USB drive with a bootable Windows version and a storage capacity of at least 8 GB. This is the bare minimum which might cause some issues going forward, so we recommend you go for a 16 GB USB drive. Once you have that, plug it into any USB port of your running PC and follow the steps given below.
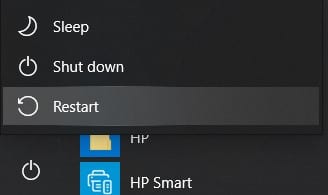
- Click on the Windows Start button located on the bottom left. Now click on the power button.
- Hold the shift key and click on the “Restart” button.

Restarting the PC
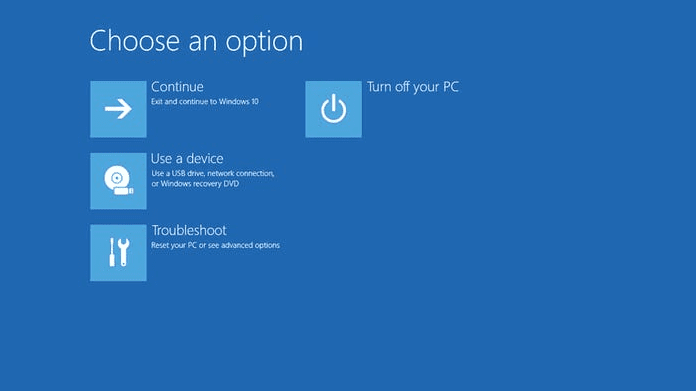
- Your PC will now shut down and restart. Once it launches back, you will be directed to the Advanced Startup Window, where a few options will be displayed on your screen.

Advanced Startup Options screen
- See that “Use a device” option? Click on it. Windows will now ask you to choose from all the plugged-in devices. Choose the USB device that you inserted in the first place.
- The procedure ends here. Windows will now boot from your USB and start up normally.
Changing the BIOS Configuration
If the aforementioned set of steps don’t work for your PC, there’s a high chance that it’s because of BIOS (Basic Input/Output System), and you’ll have to interfere in its settings. The issue arises when the BIOS does not support your booting drive. This problem can be solved too with the help of a few simple steps. With that being said, you’ll have to figure some steps out for yourself since every PC has a different BIOS configuration.
- To begin, you’ll have to restart your PC.
- Once the startup screen appears, press the Esc, F1, F2, F8, or F11 keys. One of these will work depending on your PC’s BIOS.
Note: If these keys don’t work, consider trying other relevant keys or look up your BIOS instructions. Your goal is to make Windows display the boot menu.
- When the boot menu appears, try finding the boot order controls. You’ll find all of the plugged-in devices listed as per their boot priority. Find your USB drive and drag it to the first position.
- Saving your settings after this and restarting your PC would definitely do the job.
Conclusion
There could be cases where you’d have to reinstall your operating system or fix a corrupted one. For this, you’ll normally be needing installation media such as a DVD. However, in recent times, people have jumped ships to a much better USB flash drive alternative. As you could probably tell from our tutorial, creating a bootable USB flash drive isn’t really that difficult. As a matter of fact, all you need to have is a USB flash drive with at least 8 GB of storage space, and you’ll be good to go.
If this tutorial helped you get the job done, sharing it will surely help. Moreover, you shouldn’t run into any issues if you follow our instructions carefully.
