Table of Contents
BIOS is an important specification of a Windows PC that brings us to write this article. BIOS is an acronym that stands for Basic Input Output System. Different PCs have different BIOS versions that can determine the device’s functions and what programs it can install. In this article, we will be talking to you about everything there’s essential to know regarding BIOS, including how to check your PC’s BIOS version and update it. Without any further ado then, let’s jump right into it.
What is BIOS?
BIOS is an acronym that stands for Basic Input Output System. The main purpose of BIOS in any PC operating system is to help it boot and kickstart the initialization services during the startup process. It’s an integral part of a modern-day PC that allows it to turn on. However, the functionality of a BIOS isn’t limited to just the booting procedure, not at all. Its highlighted features extend way beyond that essential operation.
Another critical function that BIOS performs revolves around checking essential device components upon startup and making sure that they are running as intended. The vital components of the device include the graphics or video card, mouse, keyboard, hard disk drive or solid-state drive, CPU, RAM, motherboard, and the chipset your PC currently has. In addition to that, there’s also going to be a thorough analysis of peripheral devices that you’ve attached to the device.
This includes USB drives, external monitors, USB hubs, or other third-party devices. Suppose you’ve multiple operating systems on your PC installed. In that case, you can tweak your BIOS settings to set the boot priority, which means prioritizing the operating system that you’d like to start up first on the device. Once everything has been checked, and the PC has appropriately launched, you can always run the other operating system within the main graphical user interface.
Now that you have a fair idea of what BIOS is and how it plays an utterly essential role in your PC let’s see how you can check what BIOS version you’re currently running on your device. After that, we will also talk about updating it, which is quite an involved process, to iterate the least.
How to check a PC’s BIOS version
You can check your PC’s BIOS version by using not just one but two different ways. There are many more methods of reviewing the currently working BIOS version on your device, but we will only highlight the major ones that are both convenient and easy. Let’s cover them one by one to have an easier time understanding the two methodologies.
Method 1. Using the Command Prompt to check PC’s BIOS version
1. The first step you need to do to check your PC’s BIOS version is to launch the Command Prompt. That can be done in multiple ways, but we recommend using the Windows Search bar and simply looking for the application. The following screenshot depicts what to do. Please make sure that you’re running Command Prompt as an administrator for the best results.
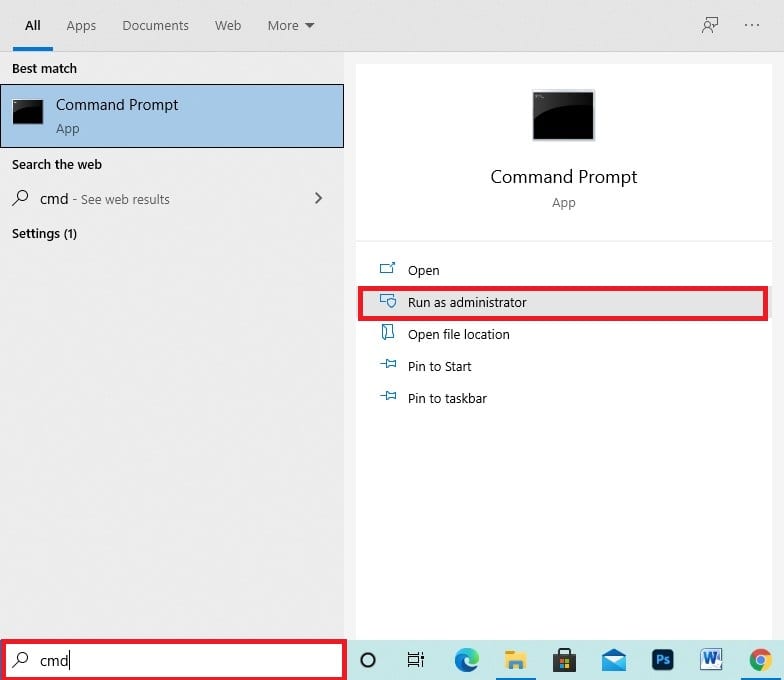
Opening the Command Prompt
2. Once the Command Prompt is up and running, the next step is to enter a command, of course. You will need to type in the following in the application window and press the “Enter” key to continue.
wmic bios get smbiosbiosversion

Entering a command
3. As soon as you press the “Enter” key, you will instantly get a reply from the Command Prompt. You will see the version of BIOS installed on your PC right below the “SMBIOSBIOSVersion” command, as shown in the screenshot below. Please keep in mind that different manufacturers have different BIOS versions installed on their PC. The device we’re using comes from HP, so what you see below is the type of BIOS installed on our machine. Depending on your PC, you may see different results.

PC BIOS version found
That’s about it for the first method regarding checking the BIOS version installed on your PC. As bonus information, you can also use another Command Prompt command to find out the BIOS version. The following is a better way of getting more concise information out of this sleek system feature. We recommend trying it as well, in addition to the command shown above.
wmic bios get biosversion
Let us proceed with the second method of finding out the PC BIOS version.
Method 2. Utilizing the System Info application
The second method of finding the PC BIOS version installed on your specific device is also quite simple and painless to perform. It’s about utilizing the “System Info” app that comprises important information regarding your PC. It won’t be just the BIOS version that you’ll be finding here, but a bunch of other helpful information too. Let’s dive right into the steps needed to complete this method without wasting any further time.
1. The first step is to open the “Run” system application on your Windows PC, as it will make things a lot more easy for us. This can be done by using the shortcut key combination of “Windows” and “R” or by looking for the app with the help of the Windows Search bar. We’re going to go with the latter.
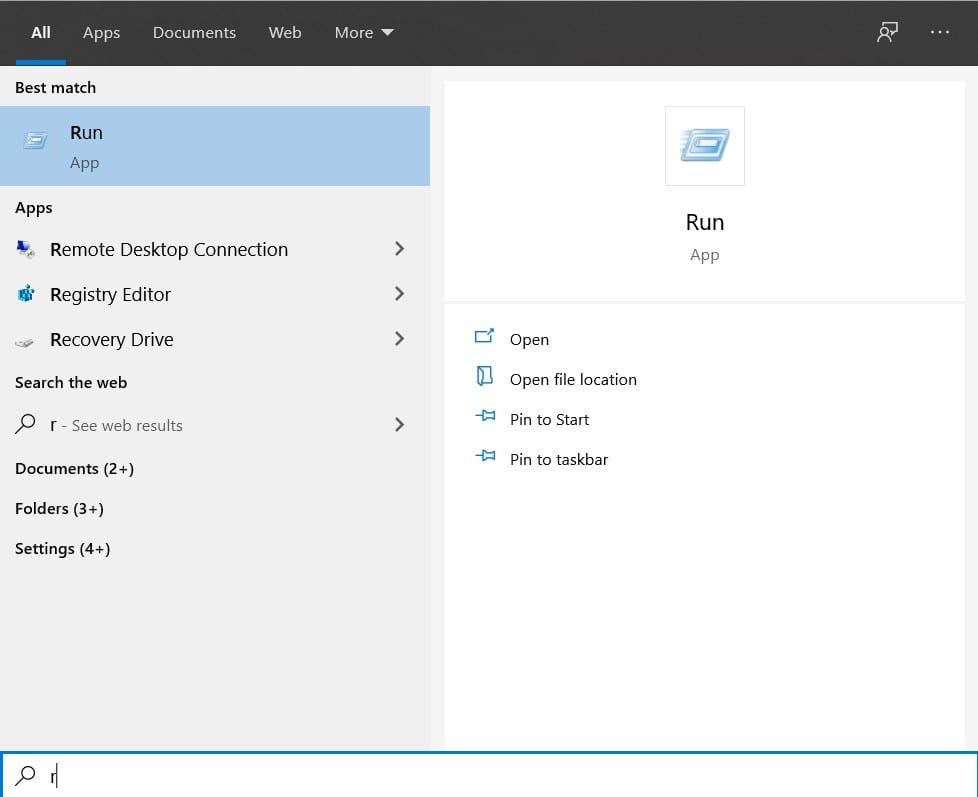
Launching Run program
2. Once the Run application has been launched, you will type in the following and press the “Enter” key. Doing so should automatically launch the “System Information” app
msinfo32

Using a command
3. Good job on making it this far. You should now be seeing the “System Information” application on your Windows PC. There, right beside “System Summary,” you’ll find a list of important processes installed and working on the device you have. Some of these will include OS Name, Device, Version, Processor, System Type, System SKU, and, of course, the BIOS Version/Date as well. The following screenshot gives you an idea of where you’ll find the latter within this app.

BIOS Version/Date
That’s about it for the second method for finding out your PC’s BIOS version. An important tip here is that if you see a two-three year older date of your PC’s BIOS, it probably means that an update has been rolled out during that period. That is why the next section will discuss the update part of your PC’s BIOS.
How to update a PC’s BIOS
Updating the BIOS of a PC is never technically a straightforward process, but it does depend on what type of PC you have and what manufacturer made it. For instance, as Dell has outlined in their official support page regarding updating your BIOS, the whole process is as effortless as downloading the manufacturer’s SupportAssist software tool that automatically detects your device upon installation, scans it for its BIOS version, and also updates and reboots your PC accordingly if required.
If you have a Dell PC, your problem is already solved. If not, you need to follow the steps below to update your PC’s BIOS.
1. The first step is to visit the official website of your PC’s manufacturer and find the page on it that’s related to updating the BIOS. All the major PC brands, including HP, Asus, Lenovo, and Acer, have the necessary arrangements for this, with the latter also comprising a special assistant tool for effortless BIOS updating. Therefore, find your manufacturer online to proceed from the first step.
2. The next step is to find the list of available BIOS downloads on the manufacturer’s website. You’ll have to dig up this specific driver’s download page as we cannot possibly know what PC is it that you’re trying to update the BIOS of. Once you’ve found the list of available BIOS versions, select the latest one, but make sure you cross-check with the BIOS version that you have already installed on your PC to avoid any potential mishaps.
The following screenshot is for reference purposes only. Your PC manufacturer and the download page shown below may significantly differ.

Downloading the latest BIOS version
3. After downloading the latest BIOS version, you need to run it on your PC. The file that HP offers to its users is executable right from the get-go, so you can launch it and go forward with the update process automatically. However, other PC manufacturers may require you to update your BIOS manually. We will also get into that in a separate section later in the article. For now, let’s launch the HP Support Solution Framework.

Installing the HP Support Solution Framework
4. After clicking on the Support Solution Framework setup, the UAC (User Account Control) prompt will appear and ask you to confirm the selection. From there, you will follow the on-screen instructions and install the software on your PC. Once it has been dealt with, you will see the HP Support Solution Framework desktop icon on the device. Click on it to launch the tool.

Launching HP Support Assistant
5. After launching the HP Support Assistant program, you’ll need to head over to the “My devices” section. Once done, you will find the “Updates” button. Click on it to get to the next step.
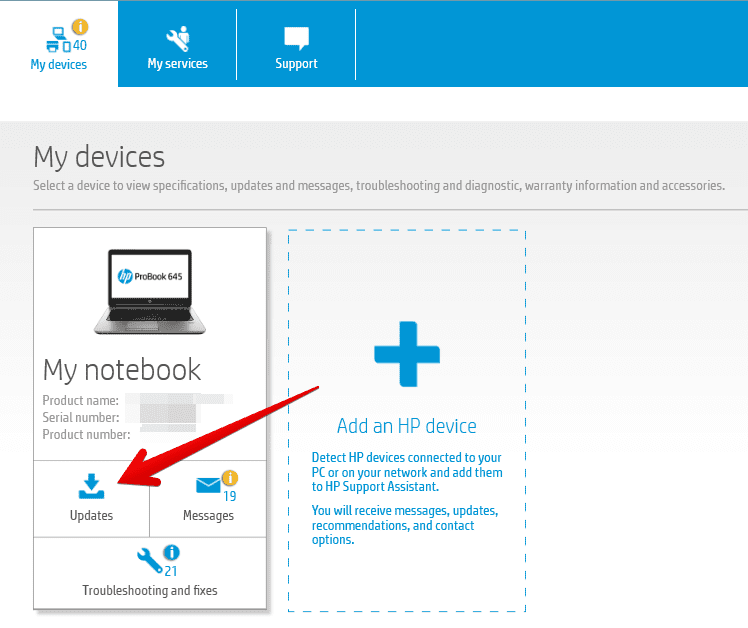
Clicking on the Updates button
6. After clicking on the “Updates” section, the program will start looking for BIOS updates on your PC. It will also look for other important updates that the device can benefit from. Let it run until it reaches the last step of the procedure. Once done, the system will confirm whether you need a BIOS update or not.
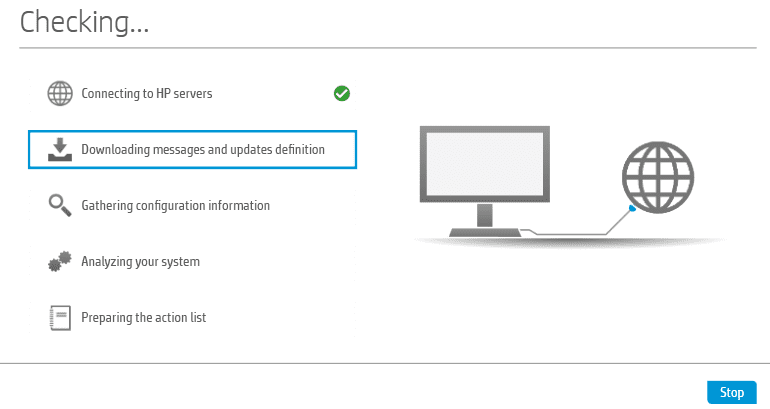
Looking for updates
Our PC’s BIOS was already up to date, so the HP Support Solution Assistant Framework didn’t do anything for us. However, if your PC’s BIOS is outdated, you will be notified of an upcoming update after the process above. Upon selecting to go forward with the BIOS update, the HP Support Solution Assistant Framework will automatically take it from here. Then, it will restart the device itself and carry out the BIOS update on its very own, allowing you to sit back and watch everything unfold effortlessly.
However, all was this was only one side of the story. You also need to learn how to manually update your PC’s BIOS to ensure the best results. We will now look into this in detail, so you know your options and can be flexible with them.
How to manually update a PC’s BIOS
Now that you know how an automatic PC BIOS updating process ensures, it’s only for the best that you are aware of how to update a PC’s BIOS manually. This is because the device that you have may not be from HP, the process of which we’ve outlined above.
In other cases, you have built your PC rig all by yourself, and it isn’t hailing from one specific brand. In that case, you will only need the information on your motherboard, which will be written on either the packaging of the unit or mentioned in the “System Information” application.
Either way, we’ve summed up the process of manually updating your PC’s BIOS to streamline everything and make the ordeal easier for you. However, before we get to that, it’s very well worth putting this out here that updating your BIOS can sometimes be risky for the PC.
Many things could go wrong, especially if you are reckless and somehow turn off your device during the update process. Therefore, we advise you to proceed with caution and have a recovery image of your Windows operating system ready by your side too.
Now that we know the potential dangers let’s get into the steps now.
- As we’ve detailed in the previous section, the first step is to download the latest version of the BIOS of your PC. This will be done by what manufacturer device you have. Whether it’s Asus, Dell, Acer, or Lenovo, find the make of your PC using the “System Information” app. Please note that you may also need more information regarding your PC, such as the serial number or the product number. Make sure you grab all of this from “System Information.” Once you’re ready, please go to the “Support” section of your PC manufacturer’s website and grab the BIOS from there. With some effort, you should find the relevant section for downloading the BIOS.
- The next step is to grab a spare USB drive and paste the downloaded BIOS file there. We said spare because the USB drive will be erased during the update process, so you must format it beforehand and make sure nothing of significant importance is on there. Also, before copying and pasting the BIOS file, make sure that it’s been fully extracted because the BIOS file will probably be downloaded in ZIP format.
- After having the USB or any other flash drive ready, the next step is to reboot your computer. During the reboot process, especially when the PC is just about to startup, you will see a specific statement on the boot-up screen. This statement will tell you what key to press to enable the BIOS or the UEFI screen on your PC. Most commonly, the keys are F9, Delete, F10, or F2. You may have to press another key to boot into the BIOS interface, so look out for that when your PC starts.
- Once you’ve booted into the BIOS screen by pressing the relevant key on your keyboard, you will need to follow the on-screen instructions for updating your BIOS. An option will generally be related to your PC’s BIOS, so accessing it shouldn’t be too much of a hassle.
- The final step is to go forward with the appropriate option for updating your PC’s BIOS and let the system do its thing. It’ll probably take a while before the PC boots back up again, and you can use your PC with a fully updated BIOS, but rest assured because you will get there eventually.
That’s the gist of updating your PC’s BIOS manually. We couldn’t use any screenshots for this guide because the procedure is purely user-specific, so it won’t be pointless to show you something that you cannot replicate on your PC. You need to be aware of the major steps required to update the BIOS manually, so after reading through the whole write-up, you should be good to go now.
However, going through all this hassle beckons the question: Is updating a PC BIOS worth it? Let’s find out.
Should you update your PC’s BIOS?
As discussed above, updating your BIOS can often be very risky. This is because if your computer was to get stuck, freeze up, get shut down unintentionally, or have anything happen to it that would disturb the BIOS updating process, you could be in for the shock of your life. That’s because there is a sizable chance of your device being unable to boot up anymore, otherwise getting “bricked,” which is a term for those electronic devices that cannot start.
Therefore, you must be extremely cautious not to mess up somewhere for the entire duration that your BIOS takes to update. All right, once you tick off the first requirement, you’re now left with the question: Why should you update your BIOS? This program that we’re talking about manages basic instructions for PCs and, of course, the startup process. That’s just about it for the main functionality of BIOS.
Other than that, updating it might not be the best of the available approaches on your Windows PC. It’s not like getting your BIOS up to speed will give you a major performance boost or tons of other features. However, sometimes in the future, a BIOS update may bring you important security tweaks and improvements, but that too needs to be confirmed beforehand when you’re downloading the latest BIOS file from the manufacturer’s website.
If you see that there’s a plausible reason for you to update your BIOS, go for it. If not, it isn’t that you will be missing out on the core functionality of your PC. We leave the decision and the results up to you.
Conclusion
BIOS is an integral hardware component that allows a PC to boot up and perform effectively. It also manages other hardware devices on your computer and makes sure that the memory is allocated correctly for the startup process. Sometimes, you need to update your PC’s BIOS, but that doesn’t hold all the time. So make sure that you’re aware of the results coming in after the BIOS update.
In this article, we’ve told you how to check what version of BIOS your PC is currently running and how to get it up to speed as well if it’s outdated. We hope that you’ve found the instructions listed in the helpful guide. Please let us know in the comments section if you’ve managed to update your PC’s BIOS. We’d be delighted to read your feedback!
