Windows 11 is out, and people are having a great time familiarizing themselves with Microsoft’s next big operating system. The upgrade comes packed with many new features, the gist of which can be viewed here. It’s a much more visually refined operating system that prioritizes simplicity and implements more rounded corners in most facets of the interface. We’re glad that the tech giant has come out with Windows’ next iteration after six whole years.
If you’ve meant to create a Windows 11 installation drive so you can install this operating system on some other device of yours, we have just the guide for you. This article will show you how to quickly get the whole Windows 11 operating system installer on a USB drive. However, if you’d like to know how Windows 11 is installed instead, we highly recommend checking out this article.
Creating a Windows 11 installer USB drive
To create a Windows 11 Installer USB, you need to have the following components.
- A stable internet connection.
- USB drive with more than 8GB available space.
- A Windows 11 ISO.
- A free program called Rufus for flashing the Windows 11 ISO to the USB drive.
Now that you know what’s needed let us get into the whole process in detail to follow it accordingly and learn how to create a Windows 11 Installer USB drive.
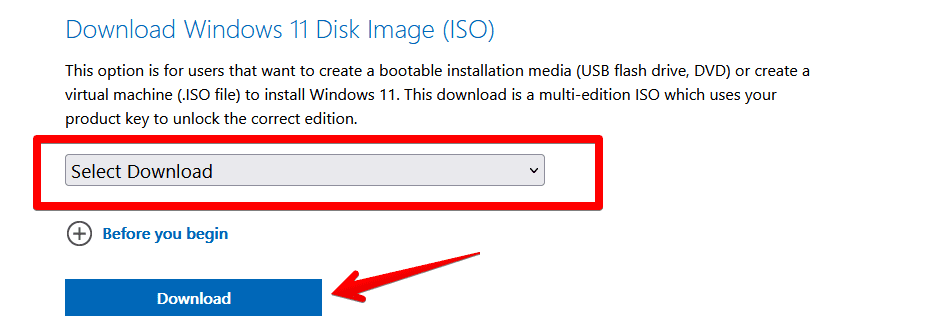
1. The first step is to download the Windows 11 optical disc image (ISO) from Microsoft. This initial step is the most crucial part of the whole process. You can download the Windows 11 ISO directly from the developer’s official website. Here is the link for that. When you arrive at the “Download Windows 11” page, you will have to scroll down to the “Download Windows 11 Disk Image (ISO)” area. Once done, you will have to go through a series of basic selections to make yourself eligible for downloading the disc image. To begin, select your download, which is obviously “Windows 11,” and click on the apparent “Download” button.

Selecting the download
2. The next step is to select the product language. Our preferred lingo is English, so that we will go with that. After that, you can choose the language of your choice.

Selecting product language
3. Next up, all you have to do is click on the “64-bit Download” button, and the Windows 11 ISO file will begin downloading. This is where you’ll have to sit back, grab a coffee, and stay patient for a while. The ISO file size is about 5 GB, so depending on your internet connection, it might be a while until you can proceed to the next step.

Downloading the Windows 11 ISO file
4. After the ISO file has finally been downloaded on your PC; the next step is to grab a program called Rufus. This ensures that you can quickly flash your recently downloaded ISO to your flash drive and prepare the Windows 11 installer that way. Rufus is a 100% free, incredibly lightweight software that gets the job done painlessly. To download Rufus, follow this link. When you’re there, scroll down a little and find the latest version of Rufus to install that’s under the “Download” section.

Downloading Rufus
5. We’ll assume that you know how to proceed with regular software setups, just following the simple on-screen instructions and getting down to the bottom of it all. However, you don’t even have to do any of that with Rufus. Instead, you click on the setup, and the application will launch itself.
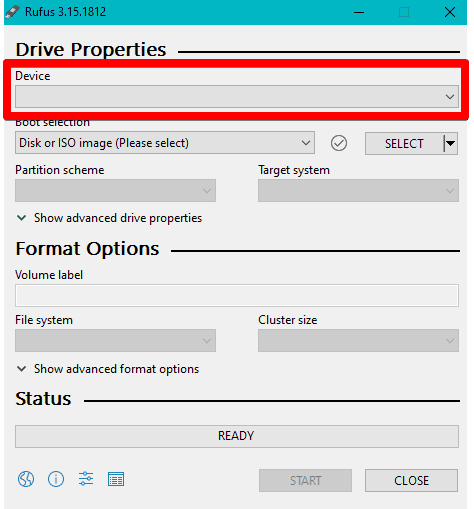
Once you have the application ready and access the interface, it’s time to plug in the USB drive. We remind you again to use a flash drive with at least 8 GB of free storage. In addition, all drive contents will be deleted in this process, so also back up anything important beforehand. Once you’ve inserted the drive, select it using the “Device” drop-down menu in Rufus’s interface.

Selecting the device in Rufus
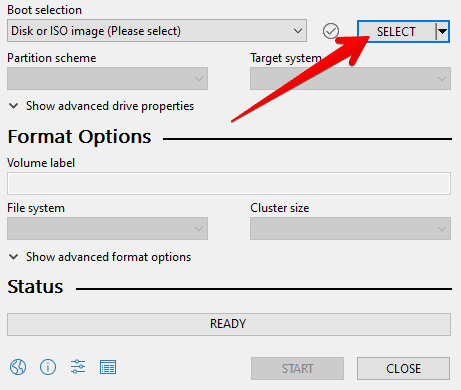
6. After you have your USB inserted in and selected, the next step is to ensure that your “Boot selection” is chosen for “Disk or ISO image,” which is the default setting. After doing that, you will click on “Select” to open up your device’s local storage in another window and select your downloaded Windows 11 ISO file.

Selecting the Windows 11 ISO in Rufus
7. When everything’s done and dealt with, your final step is to click on the Start button so Rufus can do its thing and prepare the USB drive. This process is relatively much quicker and will take about 10-20 minutes, depending on your device’s specifications.

Starting the flashing process
After the process concludes, you will be prompted to take out the USB flash drive. Now, you have successfully created a Windows 11 Installer USB. It’s totally up to you how you wish to use it. You can create a failsafe backup option for installing Windows 11 on your PC or boot up this new operating system on another PC. Whatever it is that you choose to do, there will be no stopping you.
Conclusion
Windows 11 has just been launched all across the globe, and people cannot wait to try it out on their system. If your PC passes the required specifications, then you’re very much in luck. In this article, we have shown you how to create a full-fledged USB drive for installing Windows 11 on a PC, or in other terms, a Windows 11 Installer USB drive. By following the listed instructions carefully, you can easily go through the process without running into any errors. Keep following Windows Pixel for more tutorials like these. In addition, we would love to hear from you in the comments below.
