Microsoft is one of the biggest companies globally, focusing on providing tech-related solutions for companies worldwide. What we currently use on our PC is an operating system defined by this tech giant called Microsoft Windows. Furthermore, the company has created a suite of desktop productivity applications called Microsoft Office and Microsoft 365. To find out how those two differ, consider reading our guide article on the subject.
To talk about one program in specific, Microsoft Word is one of the world’s most used text editors with a range of advanced features for expert users. It comprises a bevy of functionality for people all around the globe, but it sometimes can get complex for those who aren’t technically ingrained. For instance, users often wonder how to create page borders on Microsoft Word because it isn’t quite plain and simple for beginners.
Creating page borders lets you add more depth and versatility to your Microsoft Word document. It would help make your text stand out when applying for a job or doing anything else of that stature. In addition, they can adequately add finishing to each page in your document, which improves readability and makes it possible to leave a commendable, lasting impression.
Let’s talk about creating page borders on Microsoft Word without wasting time anymore.
Creating page borders on Microsoft Word
We will now get into creating page borders on Microsoft Word. Follow the steps listed ahead for an in-depth tutorial.
- The first step is to open your Microsoft Word application on your Windows 10 PC. That can be done through the Microsoft Office suite if you have it installed on the device but not through the browser-based version of Microsoft Word. This is because you cannot create, delete, or modify borders in the web-based version of Microsoft Word.

Opening a new Microsoft Word document
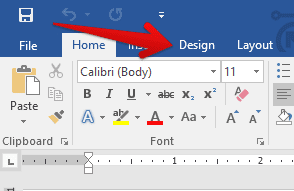
2. The next step after opening Microsoft Word is to click on the “Design” tab. If you’re using an older version of Word, you’ll have to click on the “Page Layout” tab instead. That will display more content on the screen for you near the top toolbar area. Let’s talk about it in the next step.

Clicking on the Design tab in MS Word
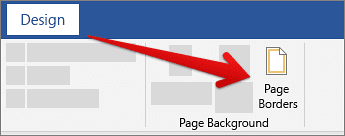
3. It’s straightforward to proceed from here on out. All you have to do is click on “Page Borders” next which is right above the “Page Background” section under the “Design” tab. This is going to open up a small-scale window for you now. Let’s talk about it in the next step.

Selecting Page Borders in Microsoft Word
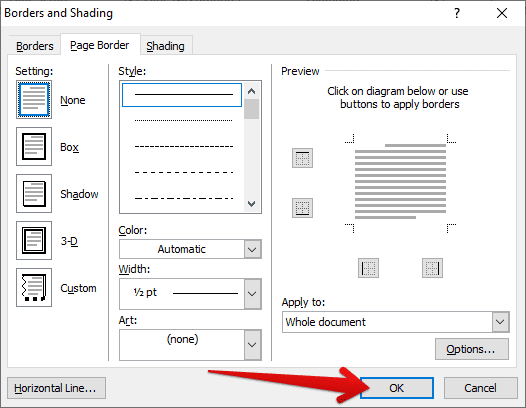
4. This is the step we’ve been aiming to get to. First off, when the window launches, your primary task is to select the “Page Border” tab, as you can see in the image below. There’s a good chance that it has been chosen already, though. Next, it all boils down to deciding what page border you would like to go with. You can create a Box, Shadow, 3-D page border and even customize further to your heart’s content in this regard. It would help if you took your time in this window to yield the best results. You also have the “Style” section that depicts the bordering used on your page. Lastly, you will be given the option of choosing the color, width, and even the art style of the border. Once you’re done with everything, click on “OK,” and the page border will be inserted.

Finalizing the Page Borders selection
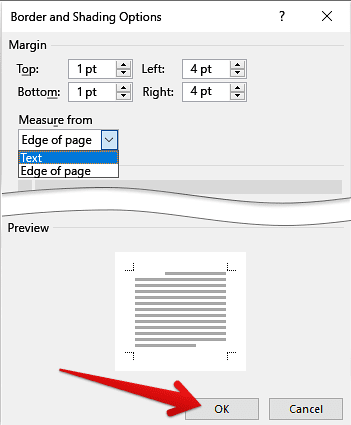
Extra Step: You can also click on “Options” in the window you see on your screen to modify the bordering used further. Here, you can seamlessly tweak the margins of your borders from the top and bottom and the left and right as well. In addition, there will be a setting called “Measure from” that gives you two options: “Text” and “Edge of page.” Choose whatever suits you the best by assessing the “Preview” area and then click on “OK” to finalize the modification of the Page Bordering.

Customizing Page Bordering options
You’re finally done now! You’ve successfully learned how to create page borders in Microsoft Word. You can expect your documents to go from one level to the next after implementing this fantastic technique. As a default measure, your selected settings will now apply to all of the pages you’ve created on your Microsoft Word document. We hope that you’ve found this guide helpful for knowing how to create page borders.
- It’s also crucial that you know how to remove page borders in Microsoft Word. Doing that is equally easy. You go back to the “Design” tab, click on “Page Borders” to bring up the required settings. After that, you will easily choose “None” and click on “OK.” This should restore your Microsoft Word document to how it just was. If you ever need to create new borders again, you can follow the above guide.
Conclusion
Microsoft Word is a top-quality program that lets users have one of the best text editors in the world. You will need a premium subscription to Office 365, or you need to purchase Microsoft Office together to get a hold of some premium features of the text editor. One of those advanced tools includes Page Borders, which we’ve talked about precisely in this article.
We’ve shown using images how a user, even a very beginner-level one, can utilize the convenience put forth by Page Borders and decorate their documents like never before. Of course, the system gives you a lot of flexibility to implement when using the Page Borders feature for more depth and clarity. This includes the Art Style. If you’ve found this helpful guide, we would be genuinely thrilled to read your comments down in the comments section.
