Table of Contents
A virtual machine allows the user to create an environment within their operating system that behaves like a totally separate and distinct computer system itself. The virtual environment operates as a normal process in a window on your host operating system. This environment can then be used to boot up another operating system, which exists within your host OS. The virtual machine OS is known as the guest.
The guest OS usually occupies a storage room on a multi-gigabyte “virtual” hard drive. This virtual storage space is presented to the virtual machine as a real hard drive and saves the user the hassle of partitioning and other hard drive complications.
Now that we have covered some ground on what virtual machines are, let’s try to understand why you may need one or what you can use it for.
You can use virtual machines to dual boot your system with different operating systems, to learn and play around with different environments, run software that wouldn’t normally function on your host OS, try experimenting with apps and data that you don’t want on your main system, and so forth.
Plus, there are many virtual machine applications out there that are free, easy to use, and convenient. With the advancements made in the field of VMs, it has become quite easy for everybody to get their hands on one and use it. All you will need is a VM app and installation media for whichever OS you want to install.
Finding the Right VM App for Yourself
If you’re looking to get a virtual machine up and running on your system, getting the right app is important. Listed below are some that I recommend:
1. VMware Player
You can run VMware Player on both Linux and Windows as a basic and free virtual machine application. It’s a great option for beginners, but some advanced features are only available in the paid version.
2. Microsoft Hyper-V
An integrated virtual machine app offered by Microsoft is their Hyper-V. It is a decent choice for experienced users, but the interface is not quite user-friendly.
3. VirtualBox
The most popular and my personal preference, VirtualBox, is a completely free and open-source VM solution. When using VirtualBox, you get the full package with all the features since they don’t have a paid version. It’s also great for beginners and works well, especially on Linux and Windows. I will be using VirtualBox throughout this tutorial as well. You can get VirtualBox for free from the official Oracle website.
Creating your Virtual Machine on Windows
After having downloaded and installed VirtualBox. Go ahead and open it. You should see a “New” button in the window; click it.
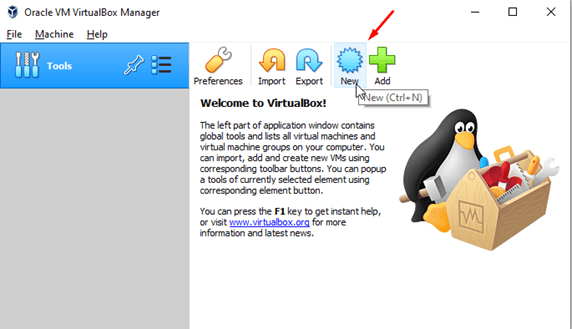
Creating a New Virtual Machine
Next up, an installation wizard will start to guide you through creating your VM. Firstly, it will ask you which OS you want to install. Please type in the OS’s name, and the app would automatically guess which one it is that you want. If it gets the version wrong or something of the sort, you can use the dropdown menus to select the items you need.
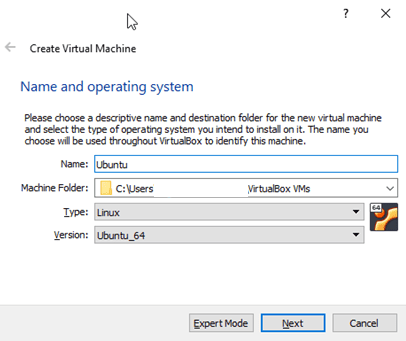
Selecting Your OS
The wizard will next ask you how much space you want to allocate for your virtual machine. Now, don’t panic if you are a beginner and don’t know what to select since VirtualBox has most of such settings preselected by default. The size you allot to the VM mainly depends upon the OS you want to install. So, go ahead and click “Next” if you want to go with the default value or change it to your preference. Also, you will later still be able to change this value.
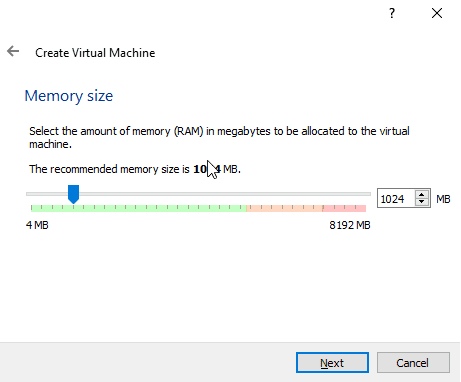
VM Memory Size
In the next step, the wizard is going to create a virtual hard drive for your VM. If you already happen to have a virtual hard drive, you can select one of the three options, which says “use an existing one.” If you don’t have a pre-existing virtual hard drive, select ‘Create a virtual hard disk now’ and hit “Create.”
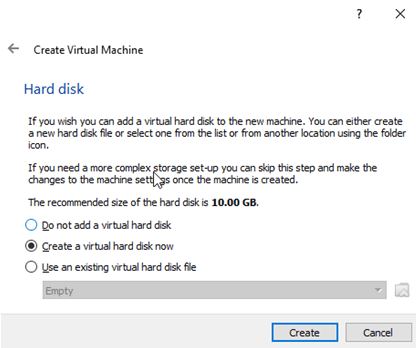
Creating Virtual Hard Drive
Now, the wizard will ask you which file-type you want to have for the virtual hard drive. For beginners, it’s best to leave this setting unchanged and move on.
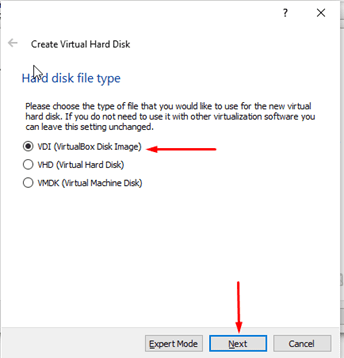
Setting Hard Disk File Type
You will also be asked whether you want a fixed-size disk or a dynamically allocated one. In a dynamically allotted size disk, you set a maximum value for the VM, and the file grows to that size when it needs to. However, in a fixed-size disk, you will still adjust the size of the disk, but the file will consume that much more than its creation.
I would recommend using a fixed size disk because their performance is top-notch despite them using a bit more space. They make your virtual machine more responsive, and you will always know how much storage space your VM has used.
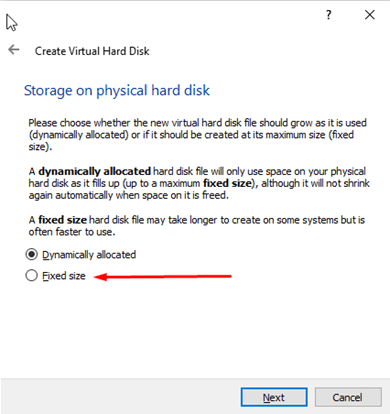
Storage Type of Virtual Hard Drive
Moving on, you will now be asked to set a size and a location for your fixed size virtual hard disk. You can either change it to any number of your preference or go with the default value that VirtualBox has already preselected for you.
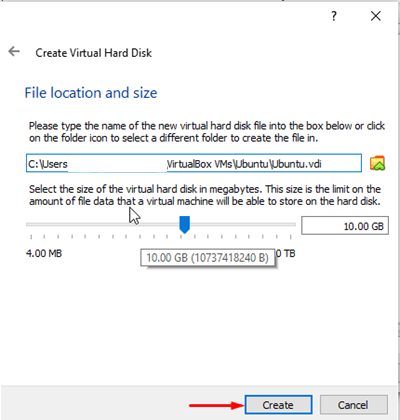
Setting the File Location and Size
You have almost completed the process of creating your virtual machine. Go ahead and click “Create.” A loading box should open; give it some time until it configures everything and installs your VM.
Now, to install the operating system of your choice in the VM, you must direct VirtualBox to an .ISO file of the installation media or a real drive, which you can select through the VM’s settings.
After having done that, you are ready to run your newborn virtual machine. Go ahead and select your OS, and click “Start.”
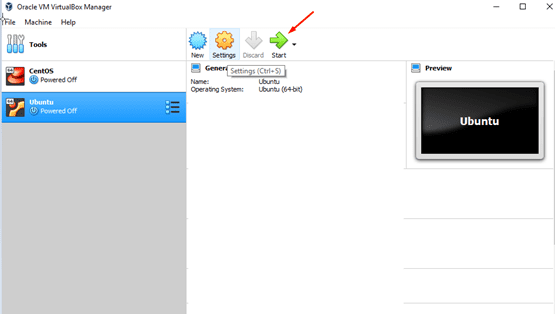
Running Your New VM
If you have done everything correctly, your VM should now be up and running. From this point on, you have a guest operating system on your PC, and it is totally your playground. You can fiddle around with the settings if you need to, install software that won’t run on your host OS, and so forth.
Conclusion
With that being said, we’ve covered pretty much everything on how you can create a virtual machine on Windows and use it. I used VirtualBox in this tutorial as it is my favorite VM app to use, but you are free to test and experiment with others. All-in-all, VMs provide the user more options and possibilities of what they can do on their computer, and we hope you can too now!
