
Table of Contents
Kali Linux recently released its new version of penetration testing platform Kali Linux v2021.2 which has unique features. On the other hand, Microsoft released its most advanced final version of the Windows 10 series. In this article, we are going to learn how to dual boot these two operating systems.
A “Dual Boot” means running two separate operating systems installed in the same Hard drive. Before starting the tutorial, we shall first review the essential things we should do before dual-booting Kali Linux with Windows 10.
Things to do before dual booting Linux with Windows
People love Linux, but most of them want to keep their windows operating system too. So, they usually opt for dual booting the two operating systems to avoid losing any of them. Absolute beginners could have lots of doubts about dual-booting Linux with windows. The majority of them face installation trouble while they try to dual boot Linux with windows. This usually occurs when they forget to do basic settings before dual booting. Five things need to be done before dual booting these two Operating systems, as highlighted below:
1. Disable Secure boot
This is the most crucial step that you have to do before dual booting Linux with windows. Secure boot makes sure that your PC boot uses only firmware trusted by the manufacturer, which usually only supports Microsoft Windows 8.1 and higher. Therefore, disabling secure boot is essential to run some PC graphics cards, hardware, or operating systems such as Linux or previous versions of windows.
All you have to do to disable Secure boot is to open the PC BIOS menu. To access this menu, press ESC or F1, F2, F12 (depending on your device model) during the boot-up process. Next, find the Secure Boot setting and set it to Disabled.
You can also disable Secure Boot without entering BIOS in windows 10. Instead, you hold the SHIFT key while selecting Restarting.
Next, go to Troubleshoot, then choose Advanced Options:
Next, select UEFI Firmware Settings and choose Disable option for secure boot settings.
Note: In some cases, you may need to change other settings in the firmware, such as enabling Compatibility Support Module (CSM) to disable Secure boot. To use a CSM, you may need to reformat the hard drive using the Master Boot Record (MBR) format and then reinstall windows.
2. Disable Fast Startup
Most people forget to disable fast boot or fast startup before dual booting, which results in the system booting into Windows after Linux installation without showing the GRUB menu. Fast startup is a setting that helps the PC to start faster after shut down, and by default, it is enabled in windows.
To disable this feature, go into Power Options in Control Panel. Click Choose what the power buttons do
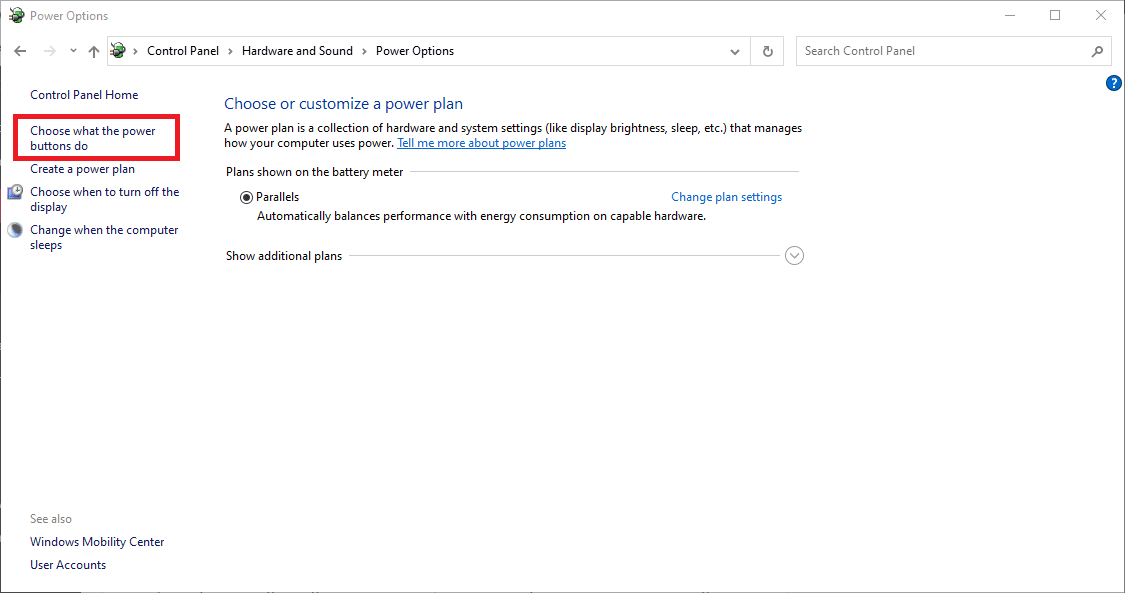
control panel power options
Then choose Change settings that are currently unavailable.
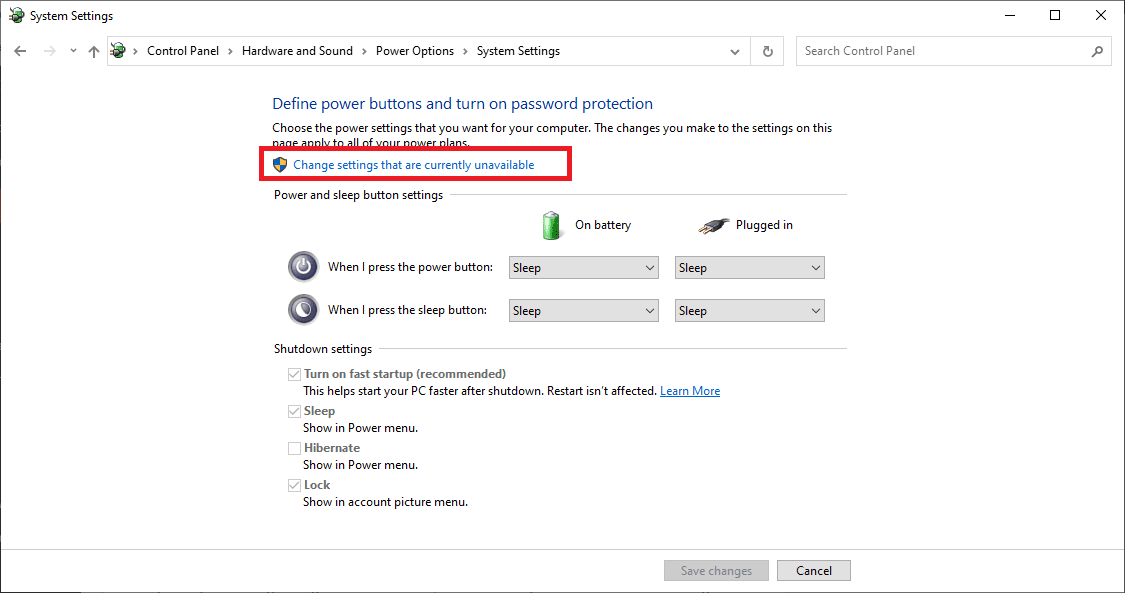
change settings that are currently unavailable
Scroll down to Shutdown settings and uncheck. Turn on fast startup. When done, click Save changes.
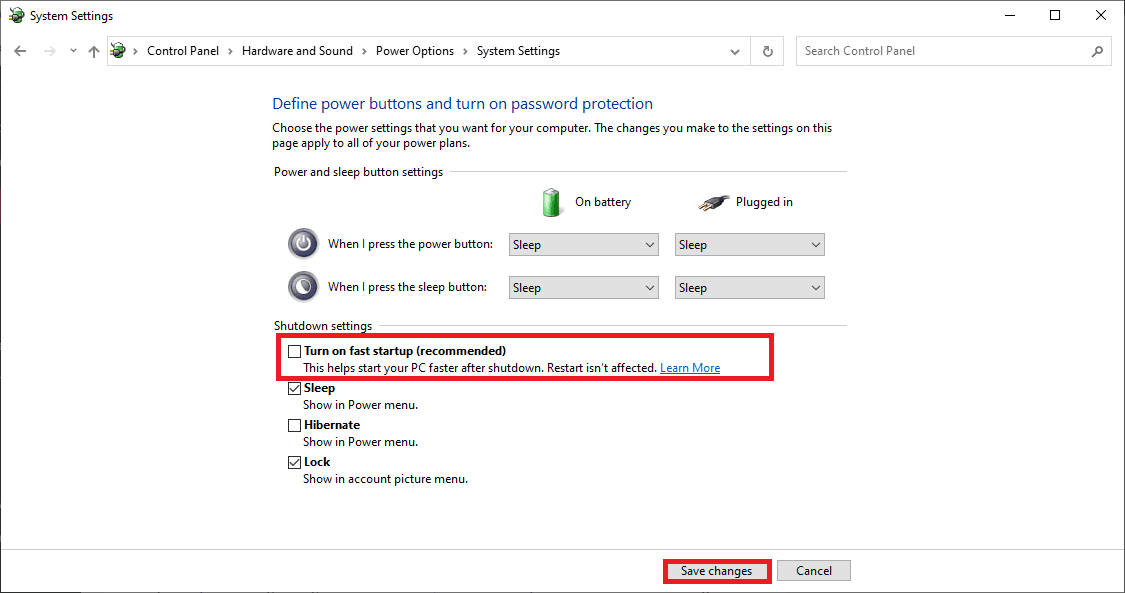
uncheck turn on fast startup (recommended)
3. Create a new partition for Linux
This step is not essential, but it would be better to create a separate partition for Linux before installing. Although it can be created during the installation process, you may wipe your hard disk if you accidentally mess up with partitioning during installation. Always create a new partition before dual booting Linux with windows.
4. Install windows first
You can install Linux and windows in any order, but it is advisable to install windows first. This is because setting up the windows boot loader to load Linux is a challenging task. After installation, windows completely overwrite any boot loader that is already there. If you have Linux installed already, you can no longer boot Linux without playing around for a long time or reinstalling Grub from a boot CD.
It would be better and less complicated if you install Linux after windows because most of the popular Linux distributions automatically add windows Installation to its GRUB loader so that you can choose either Linux or windows during system startup.
5. Live boot, then install
Linux has an interesting, unique feature that allows you to try the software without installing it on your hard drive. If you are new to Linux, you could be confused not knowing what Linux distribution to choose during the installation process. After creating a bootable Linux USB drive of your Linux distribution and live boot to look up the features of that Linux distribution before installing it alongside Windows 10.
Once you have installed a Linux distribution along with windows and do not like its features, it will be a headache to uninstall the Linux distribution without messing with the Windows Master Boot Record (MBR). Always live boot to choose the suitable Linux distribution for you.
Before starting the Dual booting tutorial, the five mentioned steps are critical to allow you to dual boot Kali Linux and Windows 10 operating systems. The steps covers are also vital as they help you evade the errors you might encounter during the dual-booting process.
Requirements:
- A PC or Laptop,
- 4GB pen drive (minimum),
- At least Dual-core (either Intel or AMD)
- A minimum of 1GB of RAM,
- Windows 10 (already installed),
- Kali Linux (latest version) and
- Rufus.
Dual boot Kali Linux with Windows
Step 1: Download the latest version of Kali Linux, either 32 bit or 64 bit from this link. After downloading Kali Linux, the next step is to create a bootable USB. For that to happen, we need Rufus, a utility that helps create bootable USB flash drives. Download Rufus then install it.
Step 2: To make a bootable USB, connect the USB to your PC’s USB drive. As we said earlier, we need a minimum of 4GB memory pen drive.
Note: We recommend plugging your USB drive into a USB port 3.0
Run Rufus, then follow the following step to create a bootable USB.
Check if your USB drive is selected, then click the “Select” option. Locate the Kali Linux ISO file that you had downloaded earlier. Click Start and wait for the process to complete.
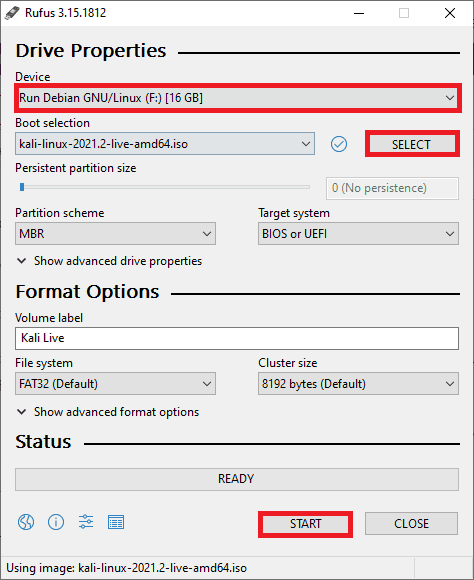
Rufus create a Kali Linux bootable drive.
After the process is complete, click on the “Close” button to exit the Rufus window. The USB drive is now bootable.
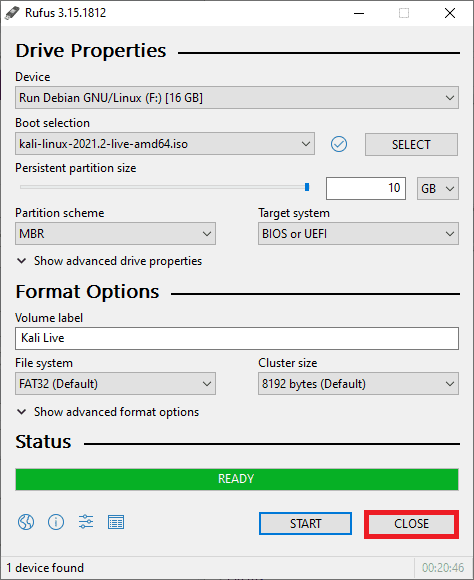
Rufus click close
Note: Apart from dual-booting Kali Linux with windows, the bootable USB drive can also be used to live boot Kali Linux. Live booting will have limited features and functions.
Step 3: We will now create a separate partition for the Kali Linux installation. To do this, open your Disk management settings or run the “diskmgmt.msc” command in windows.
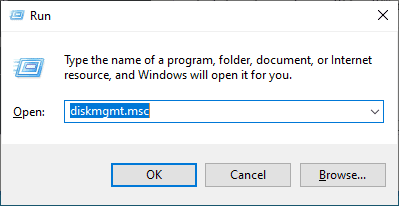
open disk management using run
Create a new partition of size about 15 to 20 GB minimum by shrinking the existing volume.
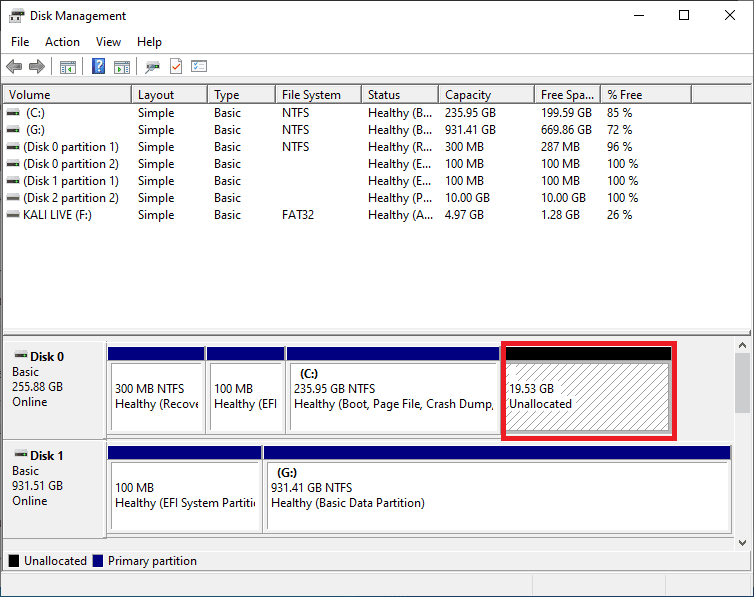
shrink 20GB of space
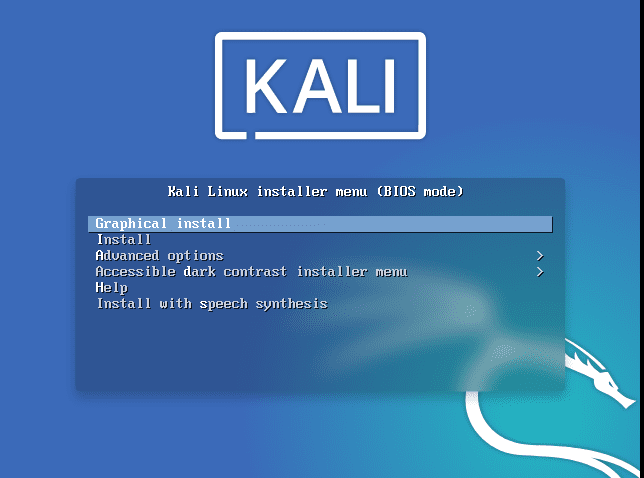
Step 4: Now restart your PC and go to the boot manager and select the option “Boot from USB.” From this point, you will see the installation window of Kali Linux. On the window, you will see other options for installing Kali Linux. Again, keep in mind that the options will be different depending on your laptop or computer brand.
- Choose Graphical Install.

select graphical install
- Choose the language you will use during the installation process, and then press Continue.
Kali Linux selecting a language
- Choose your country and continue the process.
Kali Linux select location
- On the next screen, choose the type of keyboard layout you will be using.
Kali Linux configure the keyboard.
- The next step is setting the IP configurations. Network configurations can be done automatically or manually.
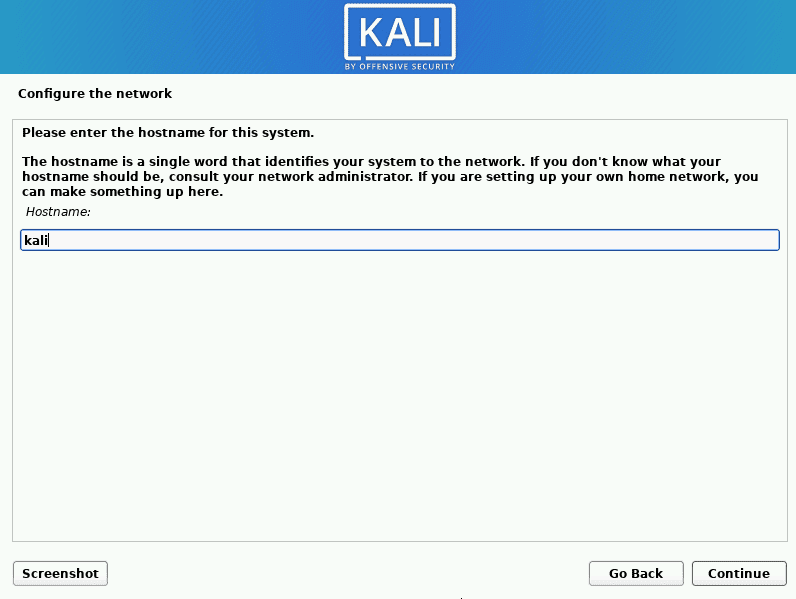
- The installation will ask for a hostname. Set any name you desire. For the sake of this tutorial, we shall use the default hostname “kali.”
Kali Linux configure the hostname.
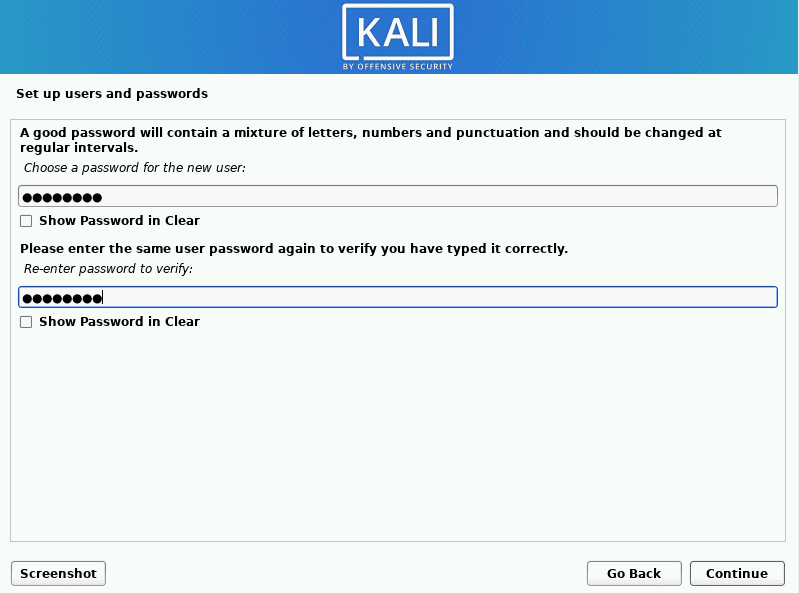
- Next, you have to enter a password for “root user.” Click continue after entering the password.
Kali Linux set up a password.
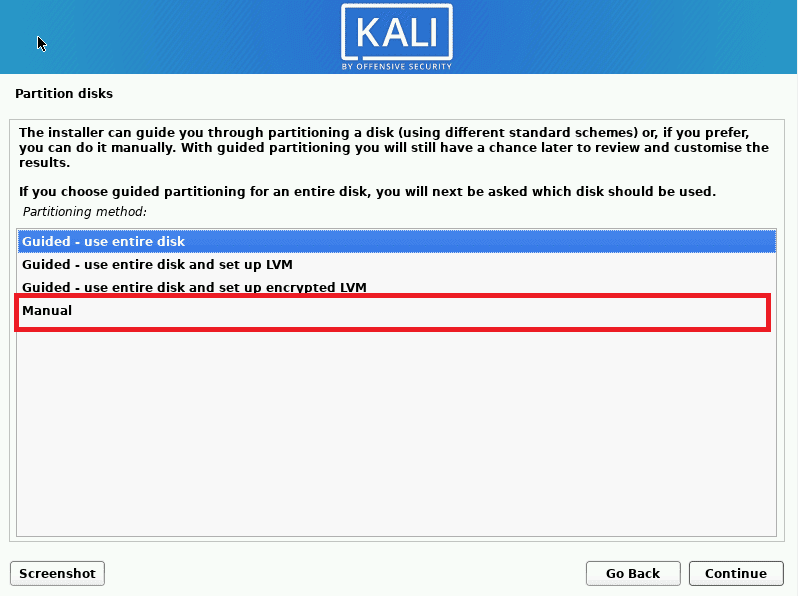
- On the next screen, choose the partitioning method as “manual.”
Kali Linux select partitioning method
- In this step, you have to be very careful not to select the wrong partition. Only choose the partition that we created earlier for the Kali installation, then press “continue.”
- Next, select the option Delete the partition and click continue.
- After the previous step, you will see that the kali installation partition is shown as FREE SPACE. Choose that free space partition, then click continue.
- You will now be asked how to use this free space. First, choose Automatically partition the free space, then continue.
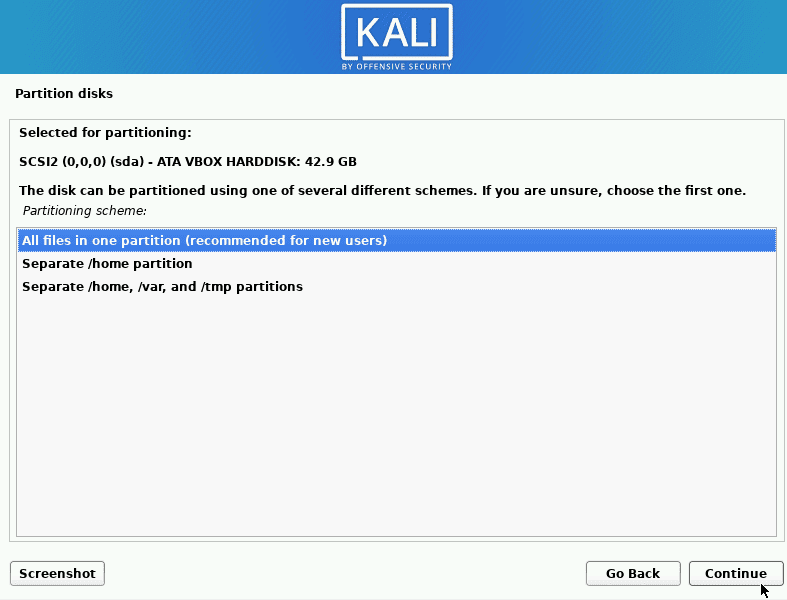
- Next, choose the “All files in one partition” option. This is recommended for new users, then press continue.
Kali Linux select the partitioning scheme.
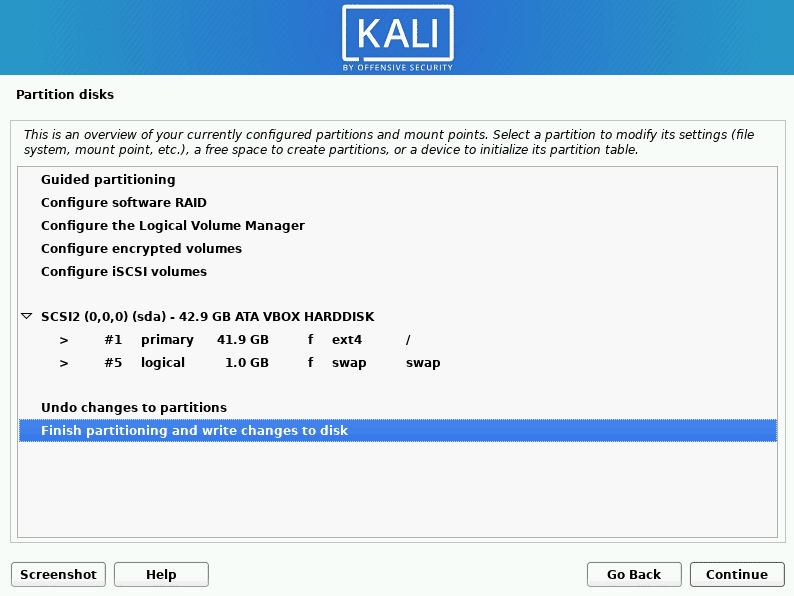
- Finally, select Finish partitioning and write changes to disk.
Kali Linux finish partitioning and write changes to the disk
- You will be asked for permission to write changes in the disk. Choose yes and continue.
- The installation process for Kali Linux will begin. Wait for a while to complete the installation. In the middle of the installation, it will ask for the network mirror. Choose “no.” this setting is about an update option. We recommend that you choose no now so as you can enable it later.
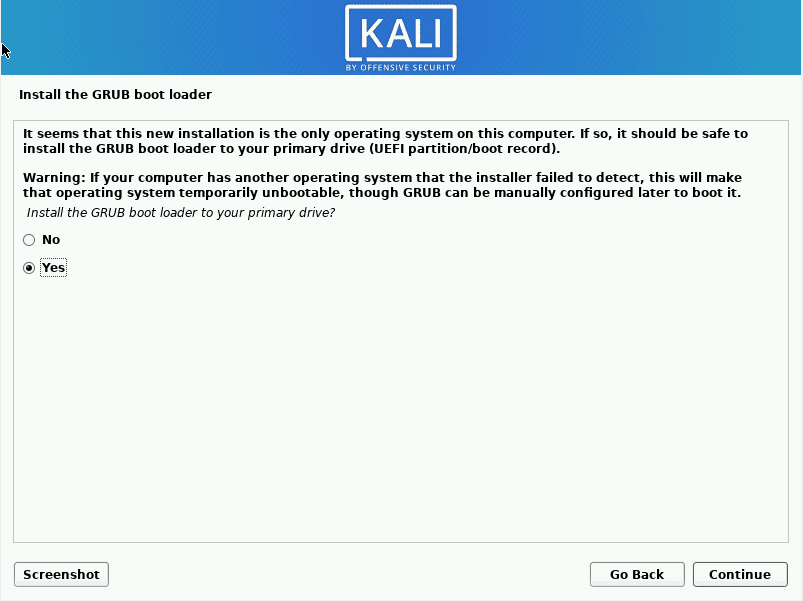
- The next step will ask for installing the GRUB boot loader, choose yes, then continue.
Kali Linux install grub bootloader.
- Next, it will ask where to install the Kali GRUB boot loader. Choose your hard disk. Keep in mind to only choose the hard disk to install the GRUB. Otherwise, after installation, your system will not display the option to select the Operating system on startup.
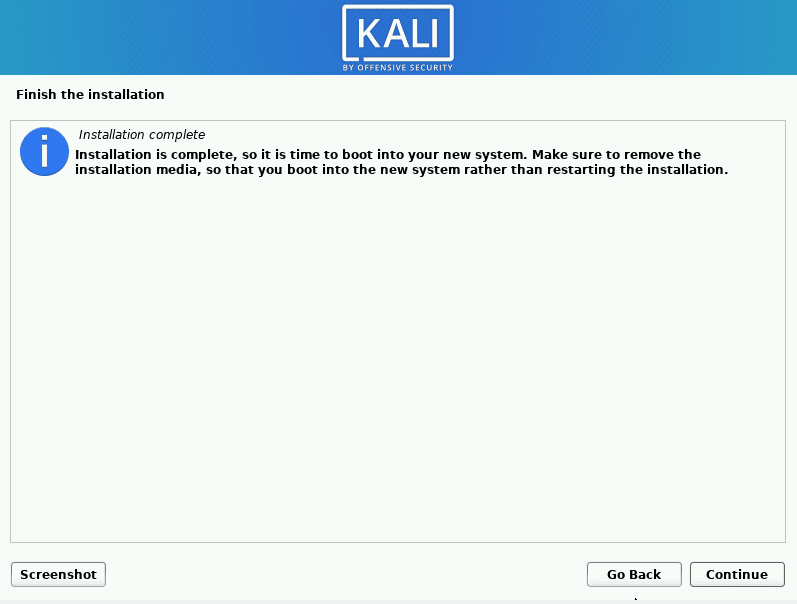
- Next, a screen will appear requesting you remove the installation media and reboot to complete the installation. Next, remove the bootable USB drive, then click “Continue.”
Kali Linux complete installation


Step 6: Now, you can eject the USB drive and restart your system. During the startup, you will see the GRUB loader of Kali Linux. Once you are here, you can choose Kali GNU/Linux to boot your PC with the new Kali Linux or Windows 10 to boot into Windows 10
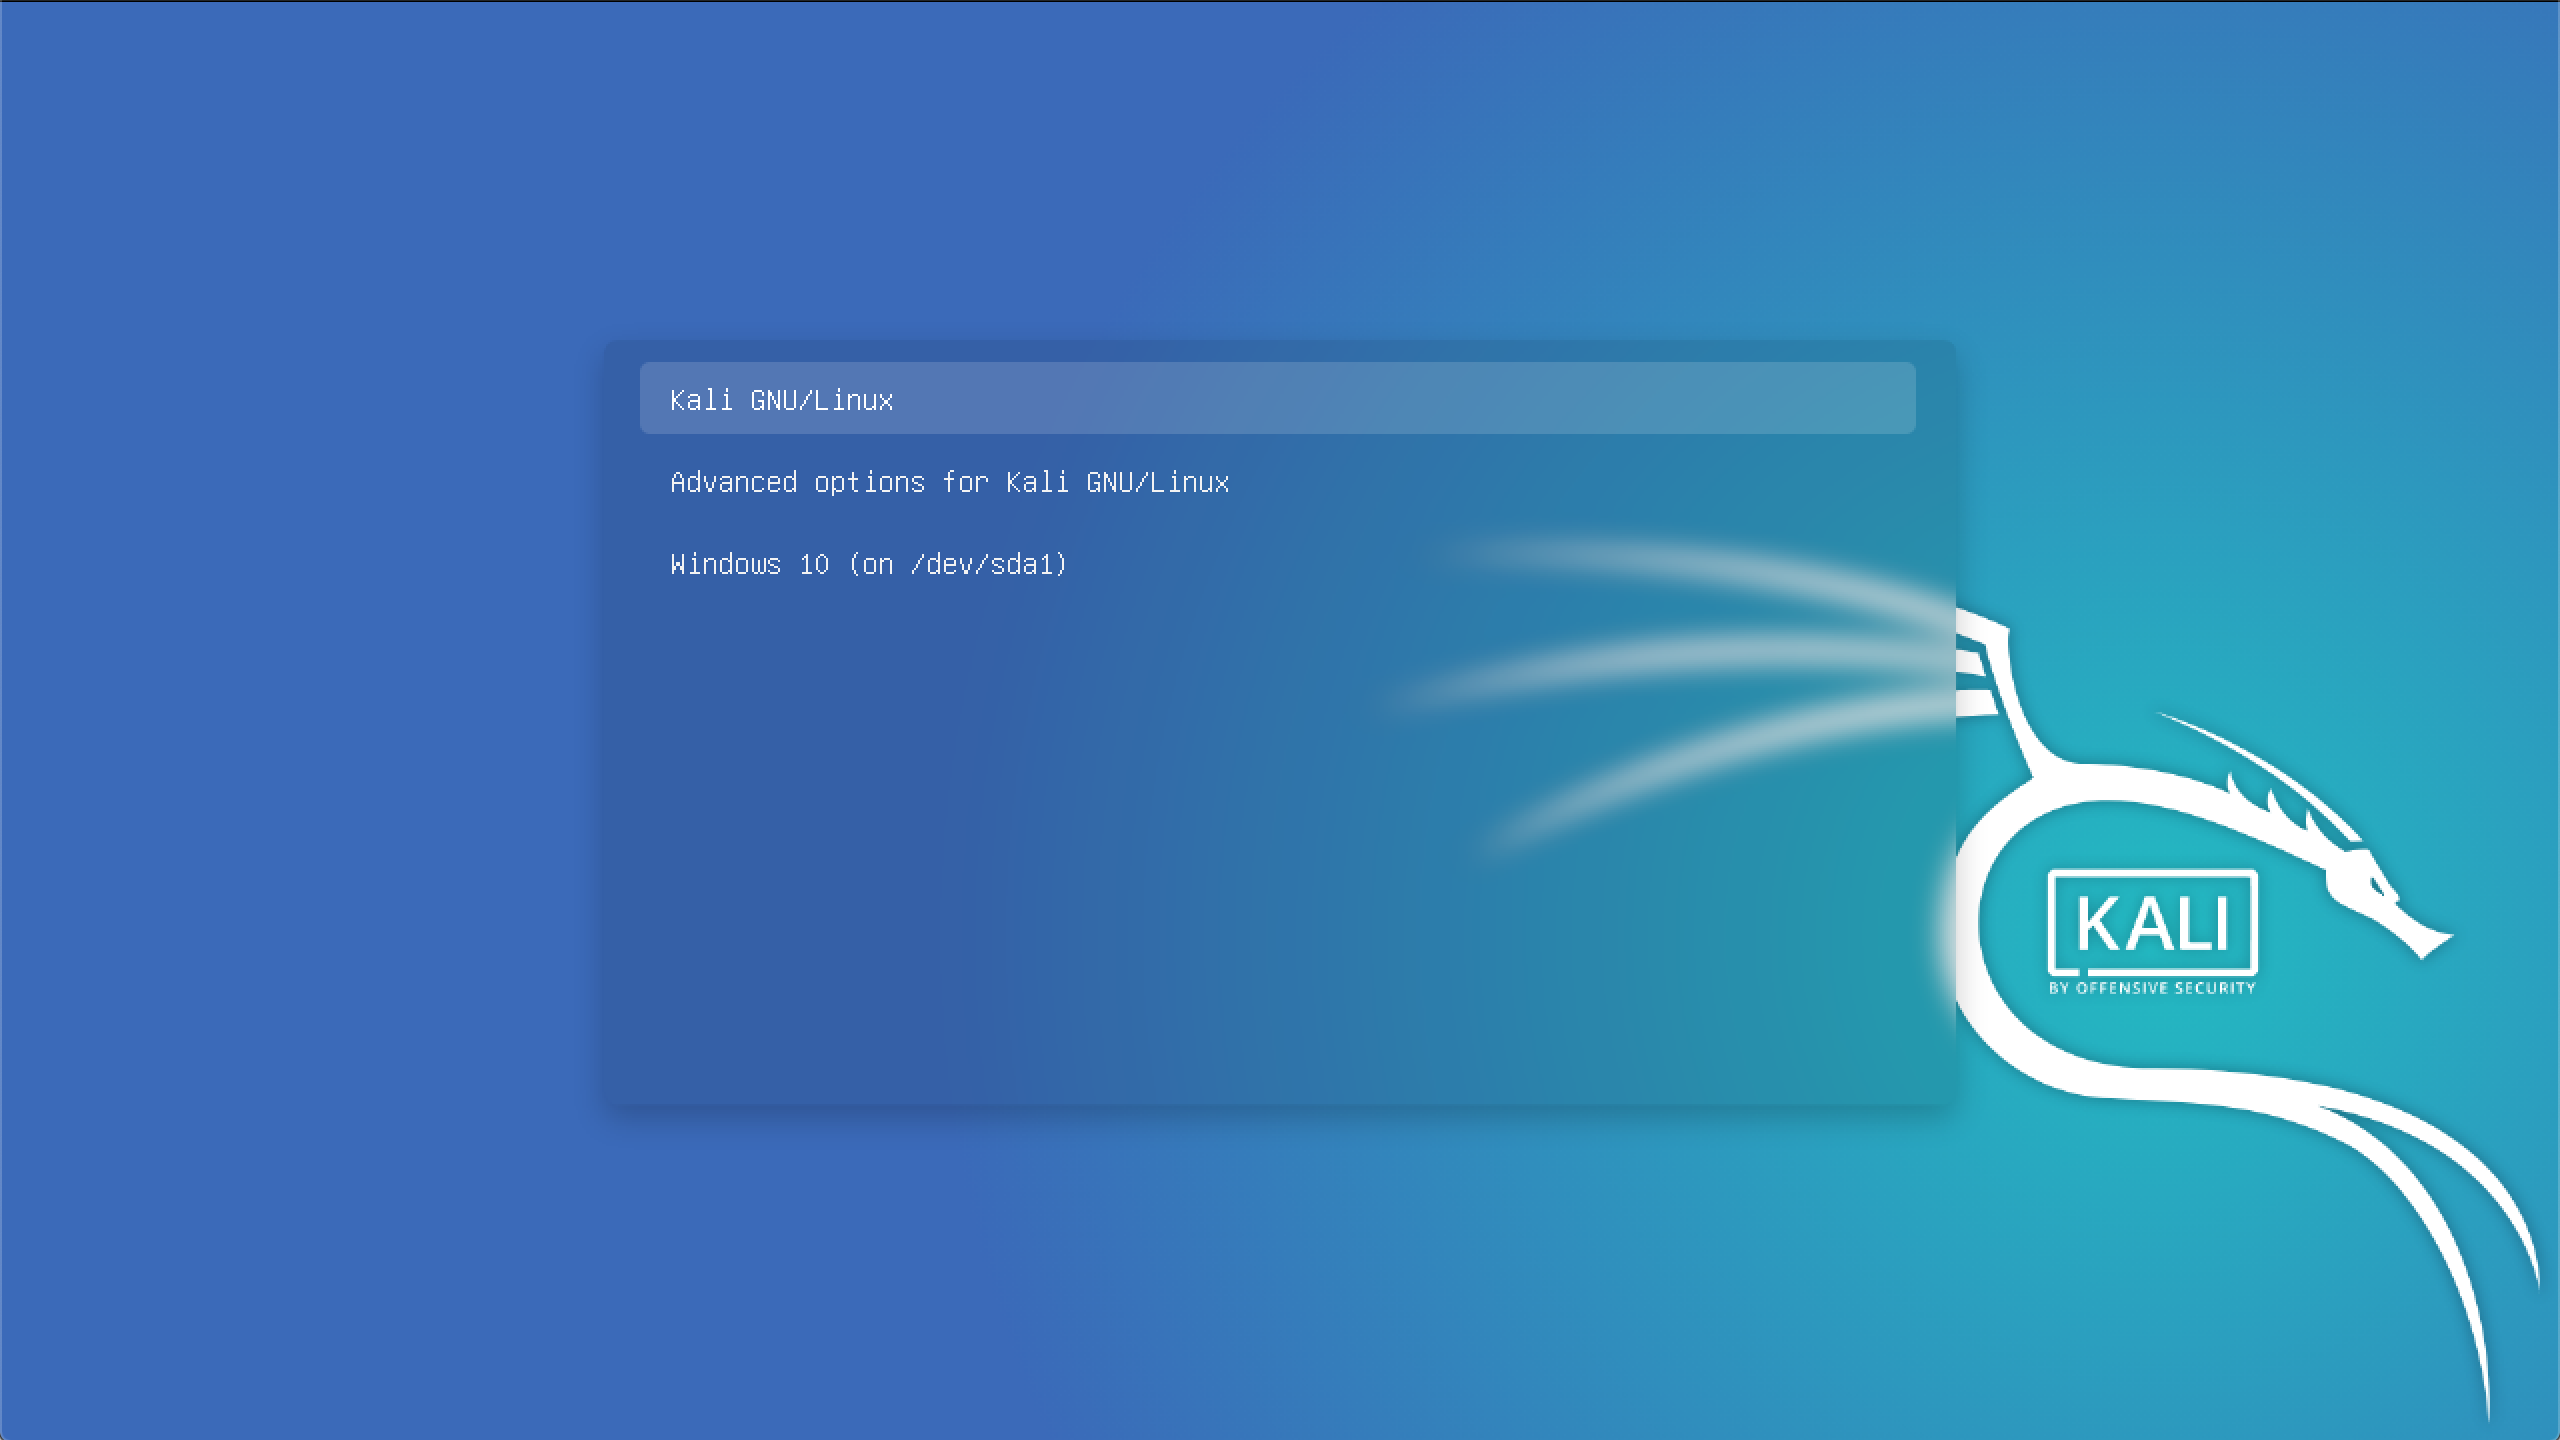
Kali Linux and Windows 10 dual boot grub menu
Conclusion
This article has discussed in detail how to Dual boot Kali Linux with Windows 10. It has comprehensively gone through the essential things that need to be considered before dual booting kali Linux with windows 10. The steps provided help evade errors while installing the operating systems.