Table of Contents
Have you been experiencing problems when you boot your Windows PC or issues that indicate your system is corrupt? Then don’t beat yourself up anymore. The Windows startup repair tool is there to help you fix these complications. The Windows startup repair tool can be a simple diagnostic and repair tool that fixes problems related to booting up. It scans your computer to check for the problem and then tries to fix it automatically.
Note: The Windows startup repair tool cannot be used to repair hardware related issues
The startup repair, also known as automatic repair fix, helps combat issues like missing or damaged system files, which leads to a fast repair of Windows startup problems. The fixed startup files are responsible for the computer bootup process. If they are damaged, you will not access your Windows operating system.
The primary concern with the startup repair feature is that it does not show you what is causing the issue, preventing your PC from powering on properly. It also cannot detect or fix hardware problems and help one recover private files and documents. The startup repair tool offers no help regarding virus attacks and their damages. Therefore, it is crucial to understand what this tool does before diving deep into fixing startup issues on your Windows PC.
The startup repair feature is primarily known to fix startup-related issues, and it is effortless to use. This article will show you how to effectively use the Windows startup repair tool on Windows 7, Windows Vista, Windows 10, and Windows 8. We will start using the tool on Windows Vista and Windows 7 since the procedure for those different operating system versions is similar.
The startup repair tool cannot be opened by pressing a single button. This is because you can only use this software whenever your Windows operating system has encountered errors and cannot boot up properly. This section will provide you with a general idea of how to access the Windows startup repair tool using the methods mentioned below:
The first method you could use to access the windows startup repair tool is to open it when your pc automatically brings up the Windows error recovery screen. This method helps you to access the repair tool quickly. If this method does not work, then try out other ways. For instance, you can use Advanced Boot Options to open the Windows startup repair tool. Besides, you can open the Windows startup repair tool using a Windows Installer Disk or a Bootable Windows USB Pen drive.
Effectively use the Window Startup Repair Tool
Now that we have seen all the different methods we could use to access the Windows startup repair tool, let us dive into how to use the methods mentioned above effectively.
Method 1: Use the Windows Error Recovery screen
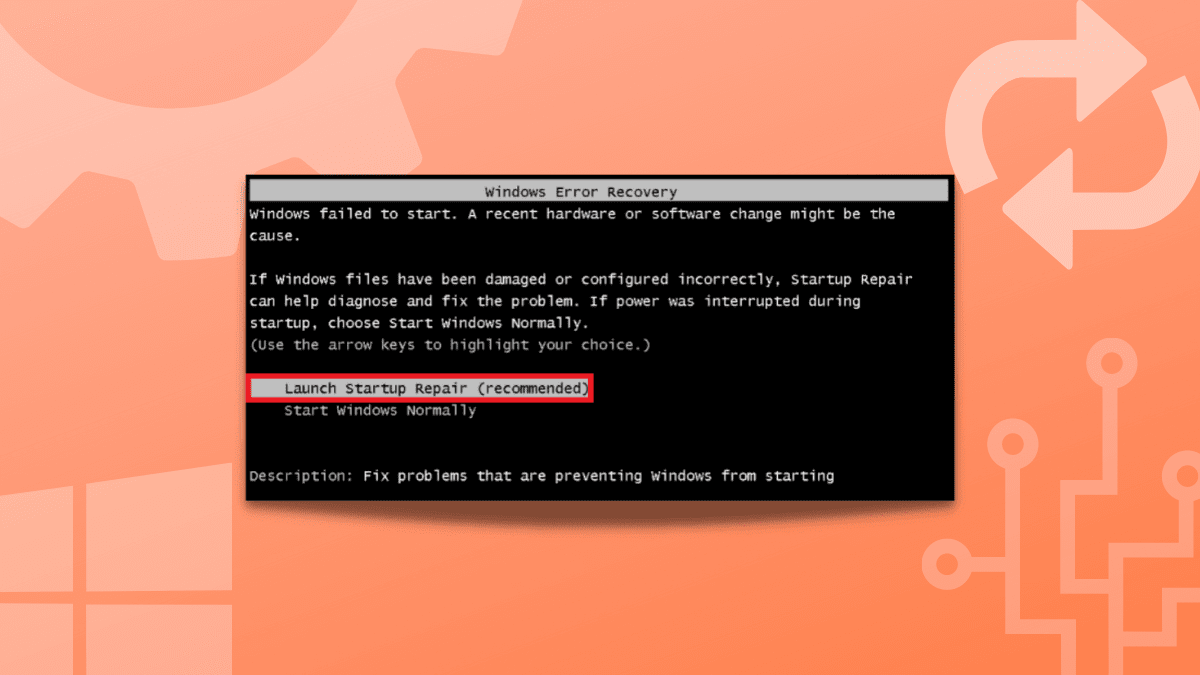
Windows Vista and Windows 7 have an inbuilt mechanism that shows you a Windows error recovery screen when your operating system is experiencing problems causing it not to start up as it usually should.
The dialogue box that pops up (the Windows Error Recovery Screen) will show you two options. That is “Launch Startup Repair (Recommended)” and “Start Windows Normally.”
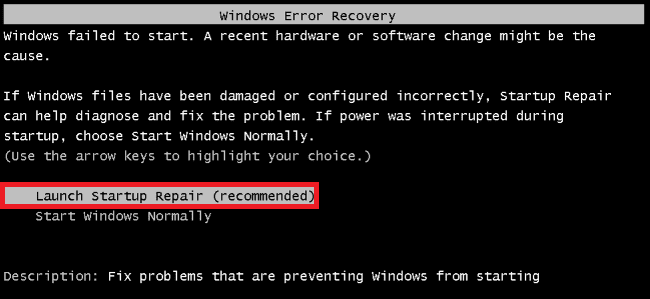
Launch Startup repair
Please select the first option that will directly open the startup repair process. After that, your PC automatically begins to repair itself, and you do not have to do anything during this process. If prompted to do a system restore, then press “OK” since it shows up when the standard fix-up fails to work.
If you do not see any option relating to the above, that is, the Windows Error Recovery Screen does not appear, then you can manually open it using method two below.
Method 2: Use the Advanced Boot options
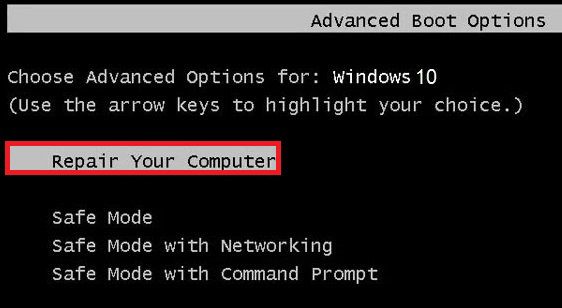
The Advanced Boot Options display lets you open your Windows advanced troubleshooting features. Use the first option in the boot screen option, “Repair your computer.” To access the advanced boot options, do the following:
First, shut down your PC, then power it up. In the middle of the power-up session, keep clicking the F8 key over and over again until you see the Advanced Boot Options screen.
Note: depending on your manufacturer, the hotkey to access the advanced boot options might change. Therefore, to be on the same page, ensure you consult manufacturers.
Once you have gotten to the advanced boot options screen successfully, choose the first option titled “Repair your computer.”
Advanced options
After showing you the Windows files loading process, this will take you to the system recovery option. Next, you will be asked to confirm your language and keyboard support. All you are required to do here is to key in the language you use and the type of keyboard you are using. If you have no idea what keyboard you are using, click on the next button to skip that step with the default setting.
After choosing your language and keyboard options, you will be met with your second option to select your “user account name.” Select the one you want to repair, then press next. (This option only shows up if you have more than one user account). Otherwise, you will be presented with the systems recovery options menu. Choose the startup repair to open it, after which it will automatically fix your computer.
Note that you can be asked to do a system restore in some instances. This will only require you to press the “restore” button since a normal fix-up cannot work on your computer, thus restoring your Windows to the previous time.
If this method does not trick you and you cannot see the Advanced Boot Options, you can move on to the following method.
Method 3: Use the Windows Setup Disk or USB drive
In this method, you must use the bootable disk or pen drive that contains your current operating system. For instance, if you are using Windows 7, use the Windows 7 setup disk and the Windows Vista setup disk if you are using Windows Vista on your PC. To use the bootable pen drive, check out the simple guide below:
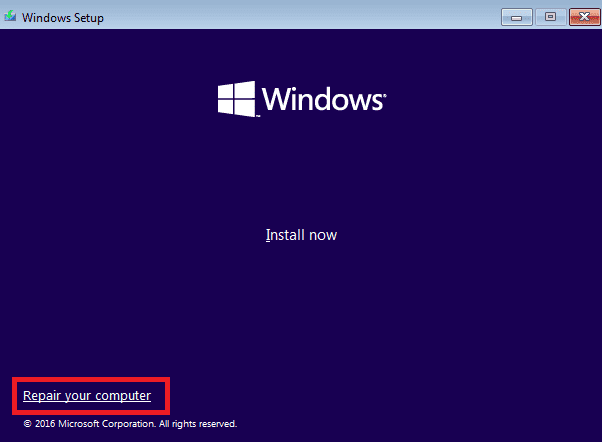
Boot to your Windows disk or USB drive using the boot sequence priority or boot menu. Second, click on “Press any key to boot from CD or DVD” to boot from the USB or your Windows setup disk.
Once the PC has booted from the bootable pen drive, you will see the setup’s first menu option, press “Next,” and then choose the “Repair your computer” option to begin the startup repair process.
Repair now
At this stage in time, the systems recovery options tool starts searching your hard drive to look for any Windows installations, and all you have to do is wait for it to show them automatically. After seeing your Windows installations, please select it and press the “Next” button to continue.
Now, click on the first option, “startup repair,” and it will proceed to fix your computer automatically.
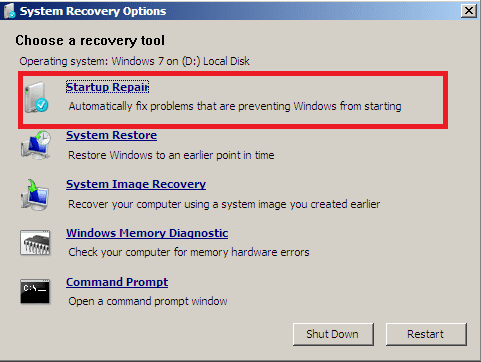
Startup repair
You can sometimes be asked to carry out a system restore. You’ll just hit the “restore” button since a normal fix-up cannot work on your computer and thus the need to restore your Windows to the previous time.
You are all set to use the Windows startup repair tool on Windows 7 and Windows Vista.
How to effectively use the Windows startup repair tool on Windows 8 and 10?
When turning your computer on, quickly press the “shift key” and the F8 key repeatedly when the BIOS logo screen appears. By so doing, you will see the Recovery mode.
Note: This method differs depending on the computer model you are using. Therefore, for efficiency, ensure you consult your manufacturer to know how to access the recovery mode on your PC. If, by any chance, you are unable to open it using shift and F8 keys, then you will have to open it using Windows disk or Windows USB pen drive methods that we already discussed in this article guide.
Always ensure you use the correct pen drive, as already mentioned herein. For instance, if you use Windows 10 Pro edition, ensure you create a Windows 10 Pro bootable pen drive. If you don’t use the same Windows versions, you will encounter many errors and not fix the problem.
Follow these simple steps to use the Windows startup repair tools with the help of a bootable pen drive.
Step one: Boot from your USB or Windows disk by using the boot menu or boot sequence priority.
Step two: After booting, hit on “press any key to boot from CD or DVD” to boot Windows setup disk or USB.
Step three: After completing step two, you will see the setup’s first menu option and, in those options, click Next and then hit “Repair your computer” to begin your startup repair function.
Repair Computer
After that, you’ll be given three choices; click on the second one labeled “Troubleshoot,”
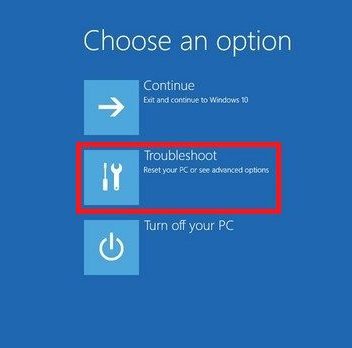
Troubleshoot
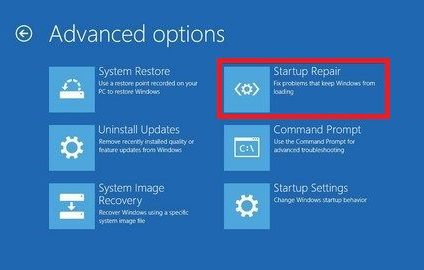
and then right under the troubleshoot menu, choose the third option labeled “Advanced options.”
Now choose startup repair on Windows 10 or Automatic Repair on Windows 8 to repair your PC.
Advanced boot options
Alternatively,
- Press the shift key down at the Windows sign-in screen and hold the power button simultaneously.
- Continue pressing the shift key, then press restart.
- As soon as your computer restarts, you will see a screen with a couple of options. Select Troubleshoot.
- Now, press Advanced options.
- In the Advanced options menu, select Startup Repair.

Advanced boot options
- In the Startup Repair screen, select an account.
Note: You will need an account with administrator privileges to proceed. - Input the password, then click continue.
- Hold on as the Windows startup repair tool runs.
- After the startup repair tool has run, you can restart your PC normally.
Conclusion
This article gives you a detailed and well-laid process for effectively using the Windows startup repair tool in your PC, whether Windows 7,8,10 or Windows Vista operating systems. I hope that it is of help to you. Please leave a remark if you did find this article helpful.