Table of Contents
A Domain Name System (DNS) server is an essential component of the internet. All sites on the internet have domain names, and if users want to access these websites, they will have to type these domain names on their browsers. On the other hand, the browsers need specific IP addresses for these domains to display the websites.
The DNS server is liable for finding the correct IP addresses for these websites so that the browsers may communicate with origin servers to access website information. Basically, a DNS server is a phone book of the internet.
Fixing DNS server not responding on Windows 10
If a DNS server is not responding on Windows 10, change the DNS server settings manually, deactivate your firewall, reset your router and test the connection again. This is the quickest fix for this problem. However, if the problem persists, the following additional troubleshooting methods listed below should be used.
1. Change the DNS Server manually
• Open Network connections by pressing Windows key + X on your keyboard and choose the Network connections option.
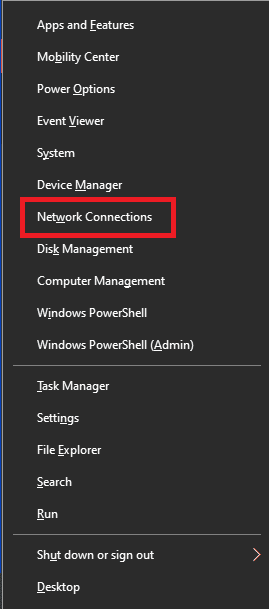
Network connections
• While in the Network & Internet screen under status, scroll down and locate ” Advanced network settings” as shown in the image below:
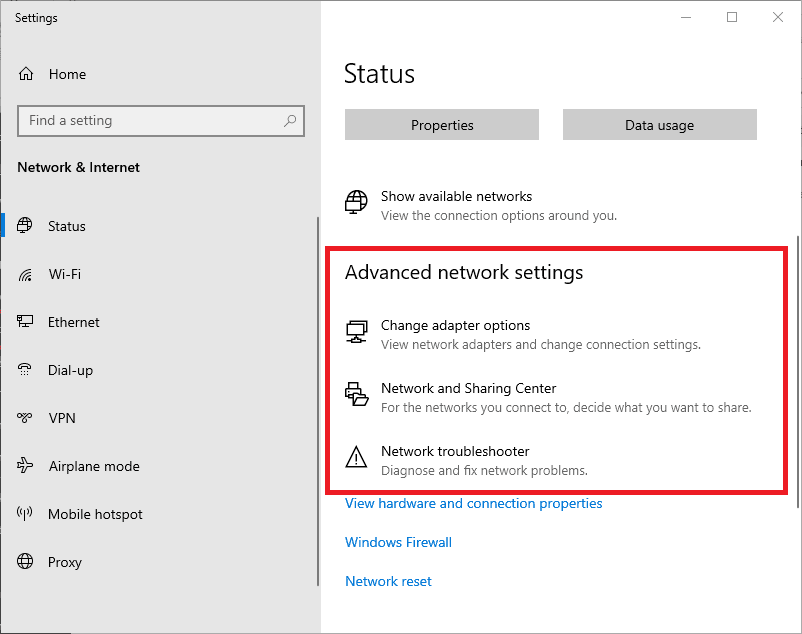
Advanced network settings
• Now select “Change adapter option” beneath the advanced network settings.
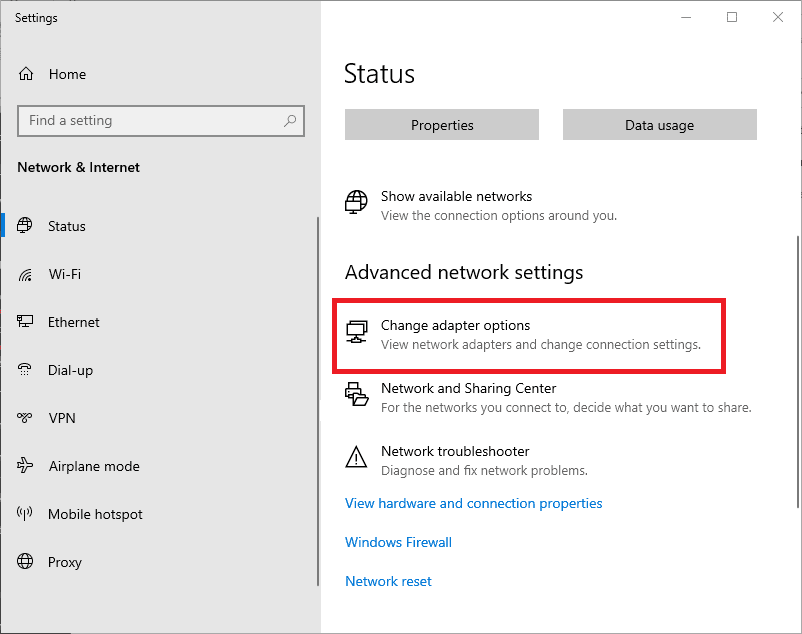
Change adapter options
• Now locate your internet connection name, then right-click and select the property’s option as displayed below:
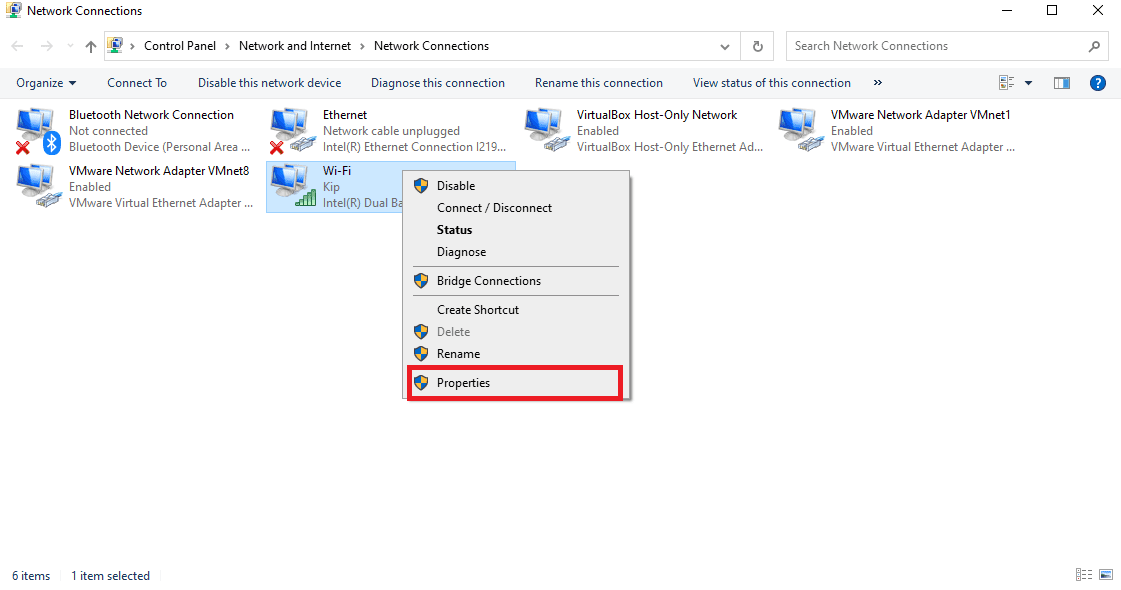
Network connections property
• On the property’s menu, choose “Internet Protocol version 4 (TCP/IPv4).”
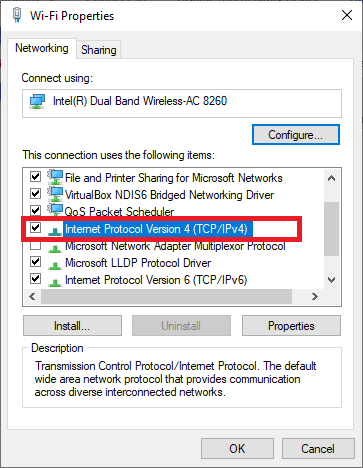
Internet Protocol Version 4
Now click the “Properties button
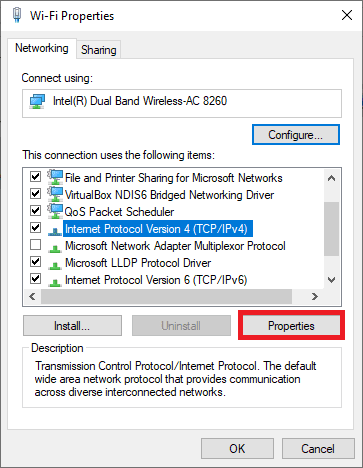
Click Properties button
• Next, select the “Use the following DNS server addresses” selection. By default, most settings are set on ” Obtain DNS server address automatically. However, to change it, you have to switch to the second option, which is “Use the following DNS server addresses:”
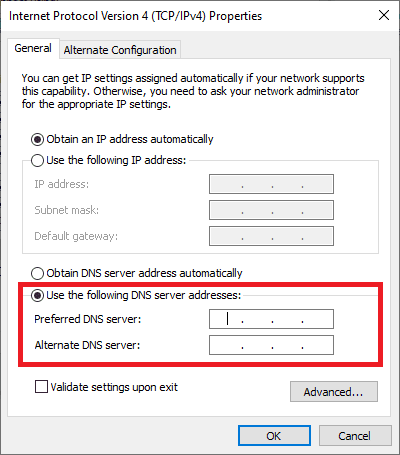
Changing DNS Server Manually
• On the DNS Server section, enter 8.8.8.8. While for the alternate DNS Server, enter 8.8.4.4. Use can also use 208.67.222.222 as preferred and 208.67.220.220 as an Alternate DNS server.
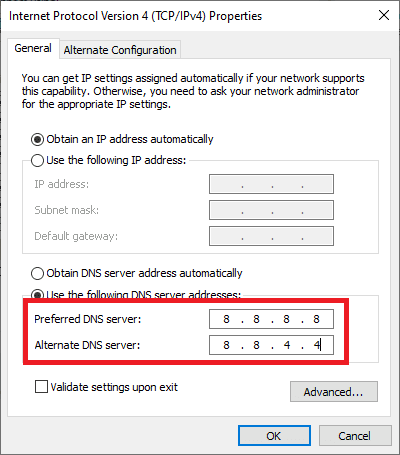
Manually change the Preferred DNS server and the Alternate DNS Server.
• Click OK to save the changes.
• Disconnect from the internet, then connect back again. (Optional)
When accessing a particular website on the internet, you will automatically connect to your ISP s DNS server.
Still, it can happen that your DNS server is not available. If that’s the case, you will see the DNS server not responding error message.
One way to fix this problem is by changing your DNS server to Open DNS or Google DNS by following the above guidelines. After altering the DNS server, check if the problem is solved. Do note that your internet connection might become slightly slower by changing the DNS server depending on your location, so try experimenting with different servers.
2. Install the latest drivers
Update your drivers manually.
• Press Windows key + X, then choose Device Manager from the drop-down list
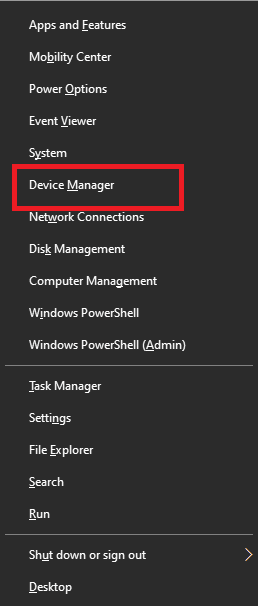
Select Device Manager
• Locate your network adapter by pressing the small forward arrow icon before “Network adapters.” now select your internet adapter, then right-click on it and select “Uninstall device” as shown below:
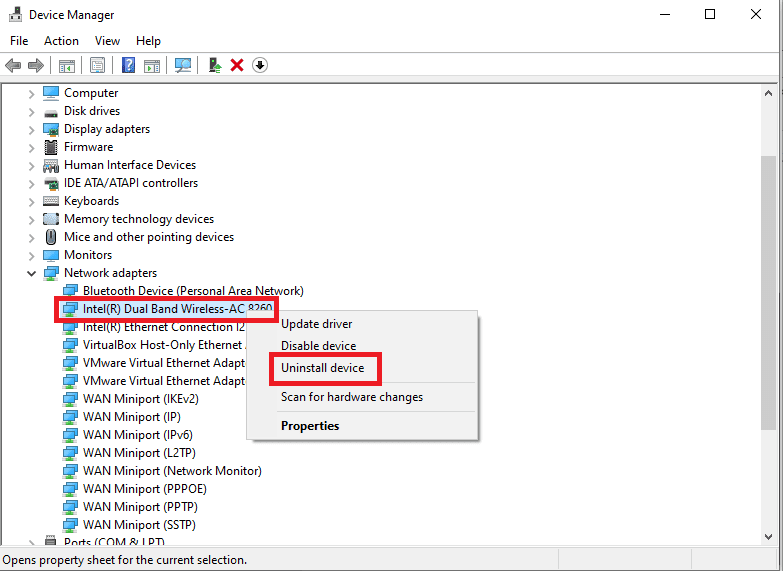
Locate network adapter and uninstall
• A confirmation dialog window will appear. Click “Delete the driver software for this device” and click “Uninstall.”
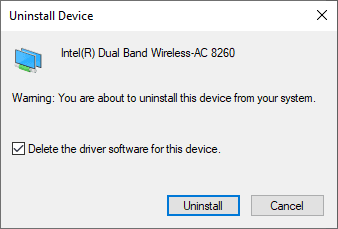
Uninstall Device
• After that, restart your PC. The default network driver will be installed after restarting your pc. Next, check if the problem is solved.
• If not, install the latest drivers for your network device and check if the issue is solved
Network adapters rely on drivers to work correctly. Therefore, problems with network drivers might be due to faulty drivers.
To fix DNS server errors, visit your network adapter manufacturer’s website and download the latest drivers. Install them afterward.
If you have no internet access, the problem might be caused by the DNS server not being available; therefore, download the drivers on a different device then install them on your pc.
Some sources recommend uninstalling your network drivers then install new drivers. If that option works for you, then go ahead and implement it on your pc.
Update drivers automatically
By downloading manually, you might destroy your computer if knowingly or unknowingly you install the wrong driver version. The tool recommended below is very light and will repair or update your drivers with very few clicks.
3. Disable your antivirus and firewall
To protect your pc from malicious users, antivirus and firewall are vital. However, sometimes the antivirus and firewall might interfere with your internet connection. If you encounter such a problem, disable the firewall and antivirus temporarily.
Disable your antivirus and firewall temporarily to fix the DNS server connection on Windows 10. Don’t bother and worry about the security of your computer since windows defender will protect it. If you find out that the problem causing DNS disconnection is the antivirus and firewall, then change its configuration or switch to a different client.
If you use Bit-defender Total Security, go to Firewall settings and disable the Block internet connection sharing option. This step might fix this problem.
Avast antivirus can also cause this problem. Fixing it is easy; open Avast settings and disable the Secure DNS.
Also, try disabling your router’s firewall temporarily, but this process is advanced and
dangerous since disabling your router’s firewall will expose your computer and make it vulnerable.
Note: If the problem was your firewall, turn it back on again and check your firewall configurational source of the problem.
4. Update the firmware of your router
Few users report that DNS servers may not be responding when they use wireless networks. Updating your router’s firmware can fix that issue. However, this is an advanced process, so extra cautiousness is needed to avoid unnecessary damages.
Back up the router settings before updating your router. Check your instructions manual to see how to update the firmware correctly. If the DNS server is still not responding, you may need to check the channels you are using.
5. Use the netsh command
Fixing DNS failure can be done by running the commands below on the Command Prompt. These commands, when run, will reset your IP and clear the DNS cache.
Open “Command Prompt” with administrator rights, then enter the commands shown below:
Note: To open the command prompt on Windows 10, click the “Windows” button on the keyboard and type “cmd.” Once the program displays, right-click and choose the “Run as Administrator” option.
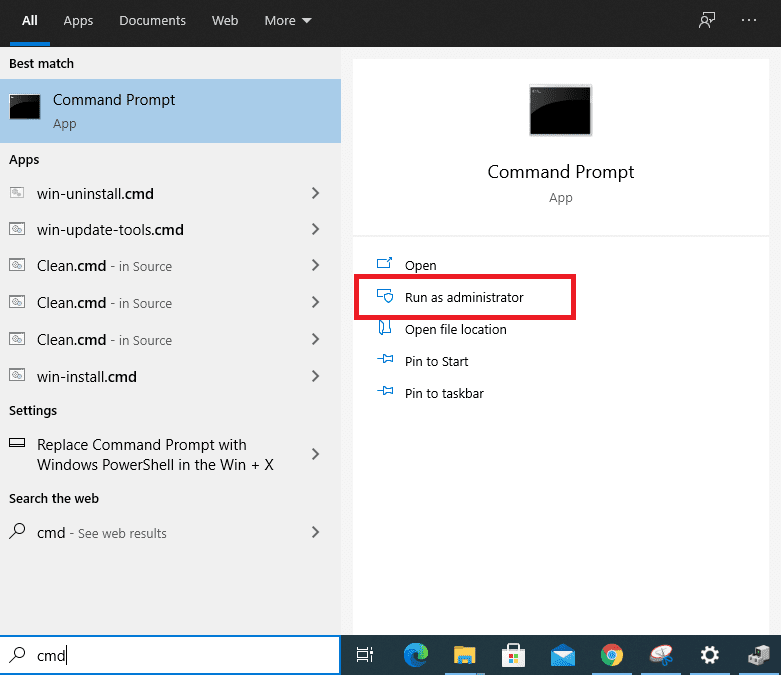
Open Command Prompt as Administrator
netsh int ip reset
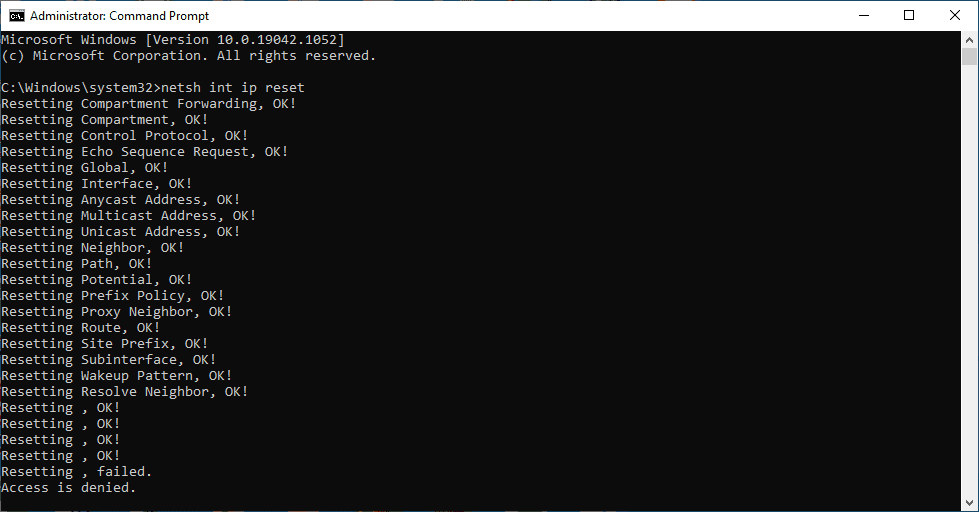
Ip Reset
netsh winsock reset

Winsock Reset
ipconfig/flushdns

Flush DNS
ipconfig/renew
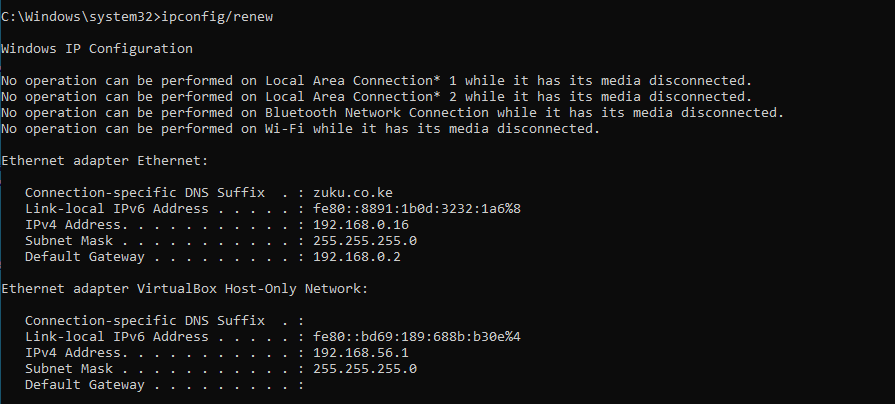
Renew ipconfig
Restart your computer after all the commands are executed.
6. Restart your modem
Another easy method to fix the DNS server not responding error on Windows is by restarting your modem.
Long press the power switch on the modem to turn it off, then wait for thirty seconds afore pressing the power button again to turn it on. Finally, check if the problem persists when the modem is completely turned on.
7. Start your PC in safe mode
The Internet connection can sometimes be interfered with by third-party apps such as VPNs. First, try accessing the internet in safe mode to fix the DNS server not responding error. Safe mode is a mode in windows that runs only with essential software and drivers. When this mode starts, check your internet connectivity if it is working. If no problems are found with your internet connectivity in this mode, then it means third-party software is interfering with your network connection.
Use the following steps to start safe mode;
Open the start menu, then click on the power button. After that, press and hold on to the “Shift key” on your keyboard, then click on restart.
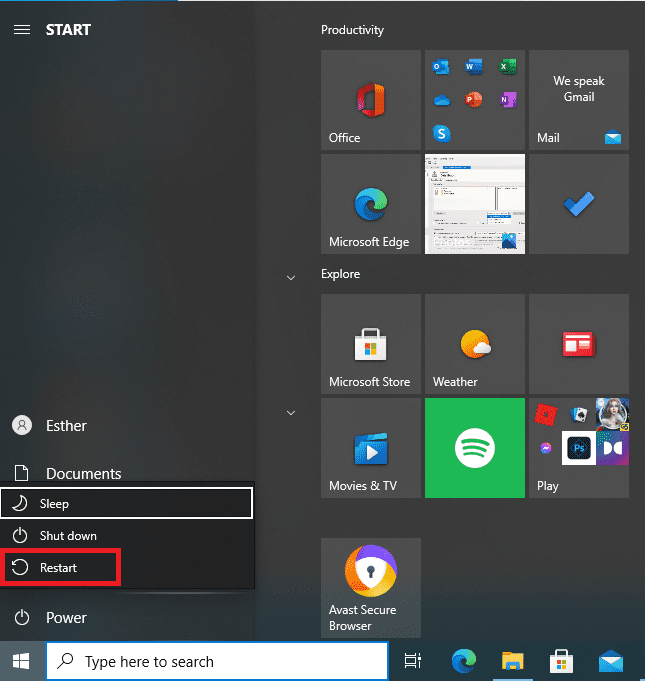
Safe Mode
Three options will appear, choose Troubleshoot.
Choose Advanced Options, then select startup settings and click on restart.
Press F5 when your PC restart to select safe mode with networking. Safe mode will now begin.
8. Disable Microsoft Virtual WiFi Mini Port Adapter
DNS server not responding might be caused by Microsoft Virtual WiFi Mini-port Adapter. Find and disable these adapters using the following steps;
Open “Device Manager,” navigate to view, and select Show hidden devices. For example, find Microsoft virtual WiFi Adapter, then right-click on it. Choose disable.
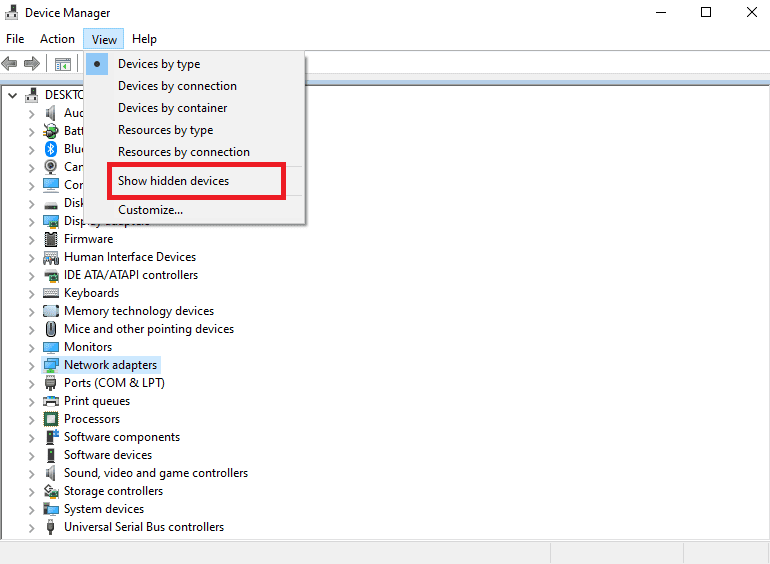
Device Manager Show Hidden Devices
Repeat this step for all the Virtual mini-port adapters, then check if the problem is reserved.
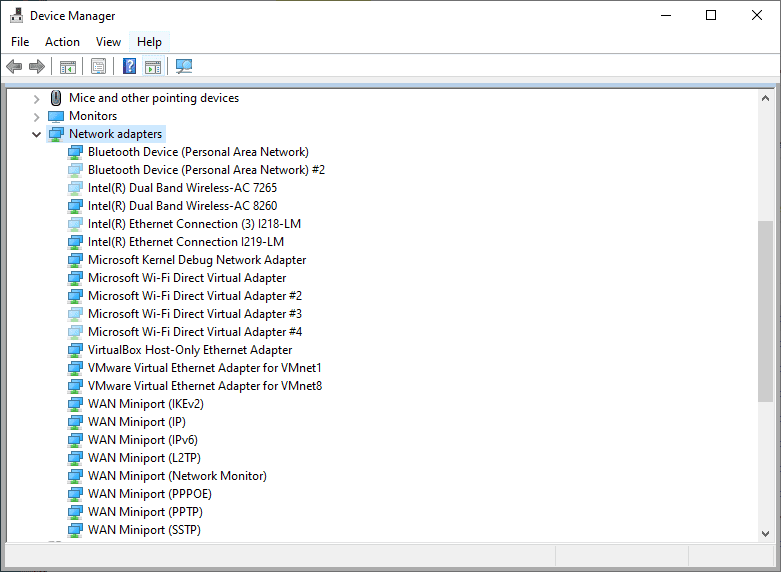
Disable mini-port adapters
9. Disable Internet Protocol Version 6
There are versions of IP addresses; version 4 (v4) and version 6 (v6). Disabling IPv6 will be able to fix the DNS server not responding problem. This action will not affect your PC negatively, but it should fix the issue with the DNS server. Use the following steps to disable IPv6:
Open Network Connections, under advanced options, select change adapter option. Now locate your connection, then right-click it and select properties.
Locate Internet Protocol Version 6 (TCP/IPV6), then disable it by unchecking the checkbox, then save the changes by clicking OK.
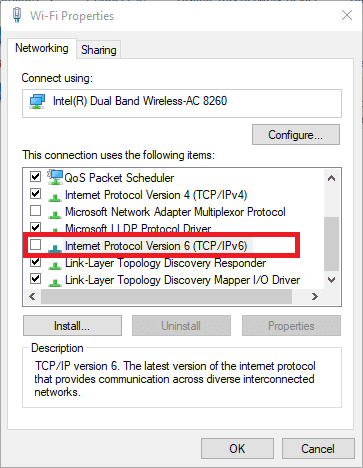
Disable Internet Protocol Version 6
10. Disable all additional connections
Having multiple connections on your PC can sometimes cause DNS server issues while using Wi-Fi connections. It would be best if you disabled these connections to fix this issue by using the steps below;
Open the Network connections and disable all connections except your active connection by right-clicking on the connection you want to disable, then choose Disable from the menu.
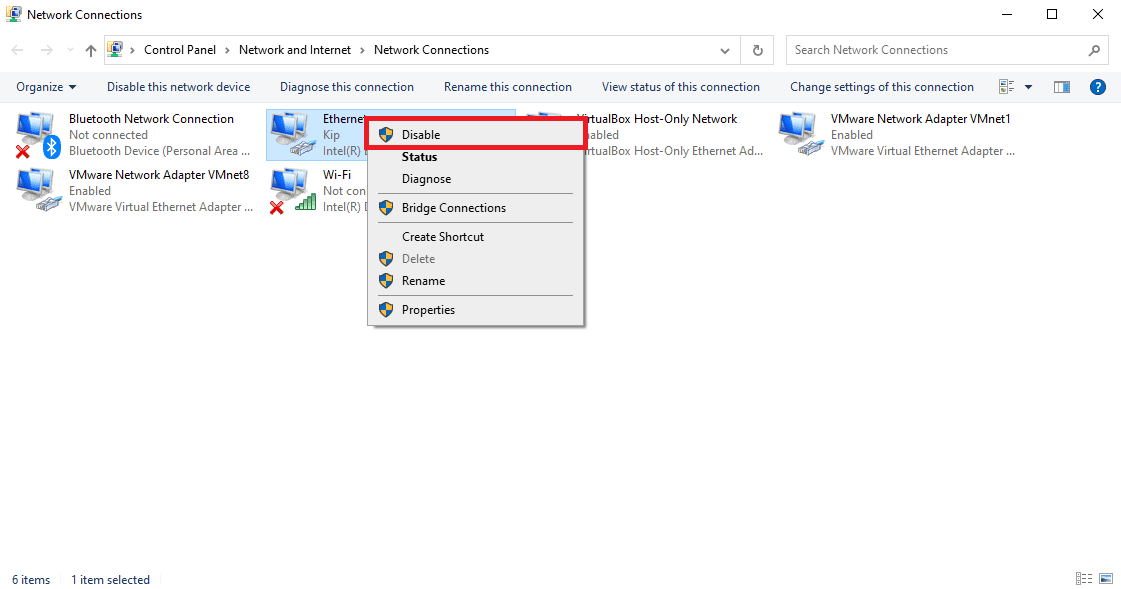
Disable Internet connections
11. Check for third-party applications
Sometimes DNS changes automatically to specific addresses due to third-party applications affecting it. Remember that almost any network-related or security-related application can interfere with your DNS, so monitor all your installed apps.
12. Change the DNS Address on your router
Access the router’s configuration page and search for the DNS settings. Then, on the DNS setting, change the DNS server to Google DNS or Open DNS and check if the problem is resolved.
13. Reset your router
Open your router’s configuration page, select the Reset Option or hold the reset button on the router for a few seconds. You can also export your configuration so that you don’t have to configure wireless networks again. Check your router’s instruction manual to check how to reset your router if you are unsure how to do it. Both methods work so you can choose any of your likings.
14. Turn off the Peer-to-peer update feature
Windows 10 allows you to download windows updates from other users in your area. Although this is a valuable feature, it can sometimes cause DNS failure. A solution for this problem is disabling this feature by following these steps;
Press Windows key + I to open the Settings app.
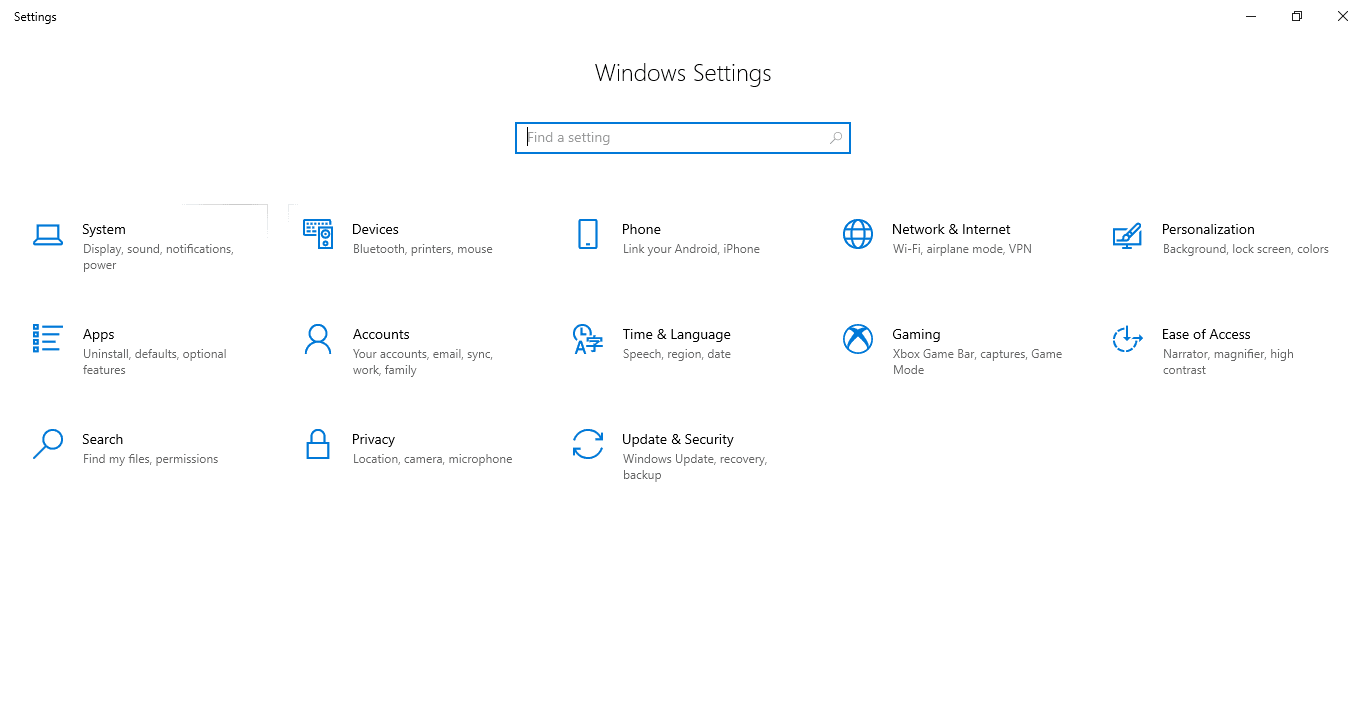
Windows Settings
Scroll to the Update & security section, then click on Advanced options.
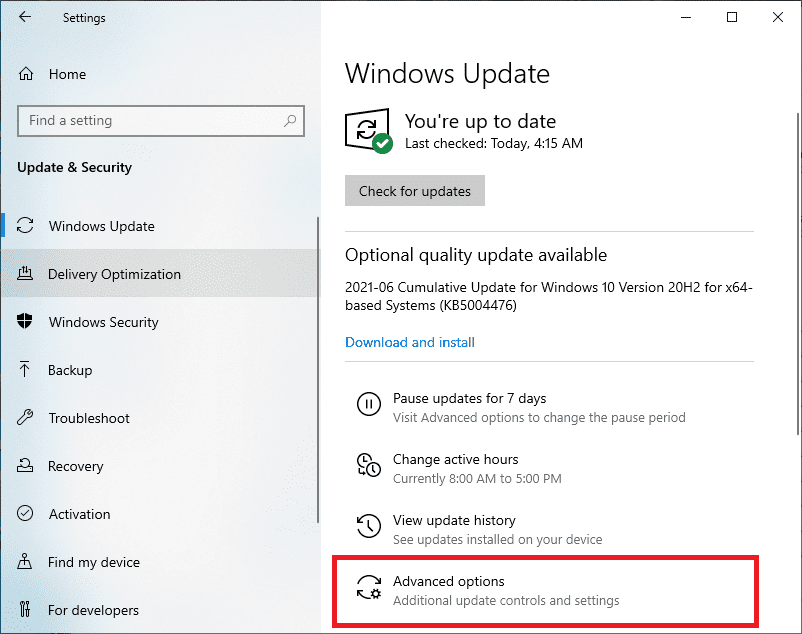
Windows Update Settings
Next, toggle off the ” Receive updates for other Microsoft products when you update Windows” as shown in the image below:
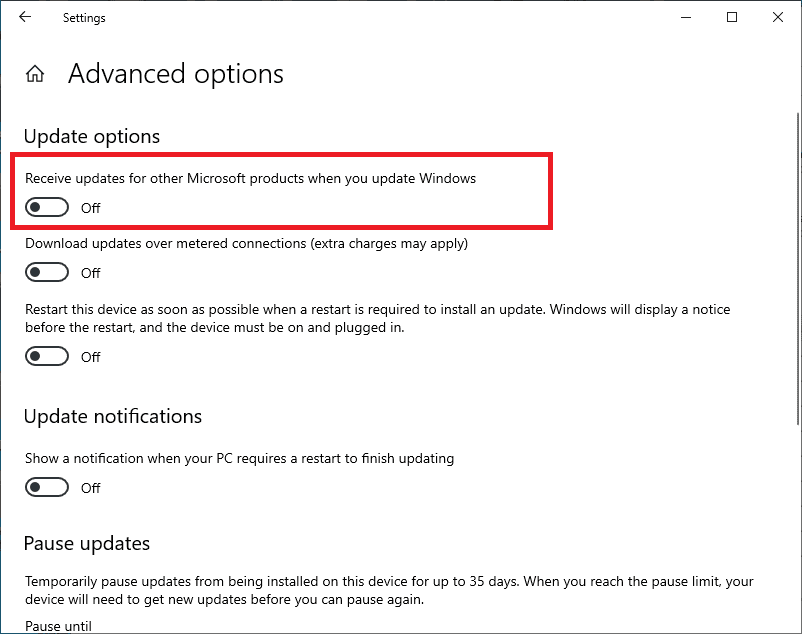
Update Options
15. Wait for your Internet Service provider to fix this problem
Sometimes DNS service not responding is caused by ISPs. ISPs may encounter problems, and you may have to wait for some time for your internet providers to fix this issue.
16. Fix Comcast DNS server not responding
Go to GW Graphic User Interface, then select Troubleshooting and the reset/restore Gateway. After that, reset your Wi-Fi router, then check if the problem persists.
Conclusion
This article has covered some common fixes you can apply when encountering the DNS not responding error on your Windows 10 operating system. If you are a victim of a DNS server not responding, you can try out the fixes we covered in this article. Nevertheless, feel free to interact with us via the comment section to help with any complications regarding the above subject matter. Thanks for reading
