Table of Contents
Many Windows users often encounter some bugs and issues when trying to update their system. One such issue occurs when you check for Windows updates. An error message pops up on your screen saying: “Windows Update cannot currently check for updates because the service is not running. You may need to restart your system.”
The worst thing is even after restarting the PC, many users still face this error. And, in the end, they are unable to download updates for their system. This is indeed an irritating scenario because no one wants to work on an un-updated operating system.
Well, if you have been facing the Windows Update service error for some time now, it’s high time to fix it. Fortunately, we have found some methods to fix this stubborn error. So, read the complete guide to know how you can easily fix this error in Windows 7, 8, and 10.
Fix Windows Update Service Not Running Error in Windows
If restarting your computer doesn’t fix the Windows update error. Try these fixes instead. The following methods have worked for plenty of Windows users. Hopefully, they will work for you as well. So, let’s begin:
Fix #1 – Run the Troubleshooter
The first and easiest way to remove the Windows update error in Windows 10 is to run the troubleshooter on your system. Windows has an in-built troubleshooter for nearly every app and feature that helps you to resolve some common errors quickly. Follow the following steps to run the troubleshooter on your Windows 10 PC:
- After pressing the Windows key, type “Troubleshoot” on the Windows search bar.
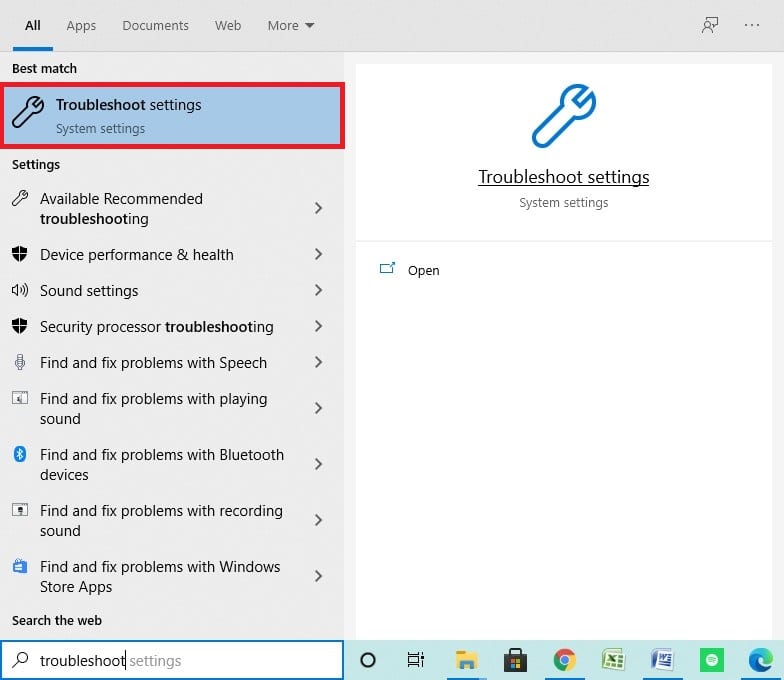
Opening the Troubleshoot Settings
- Open the “Troubleshoot Settings” and click on “Additional troubleshooters”.
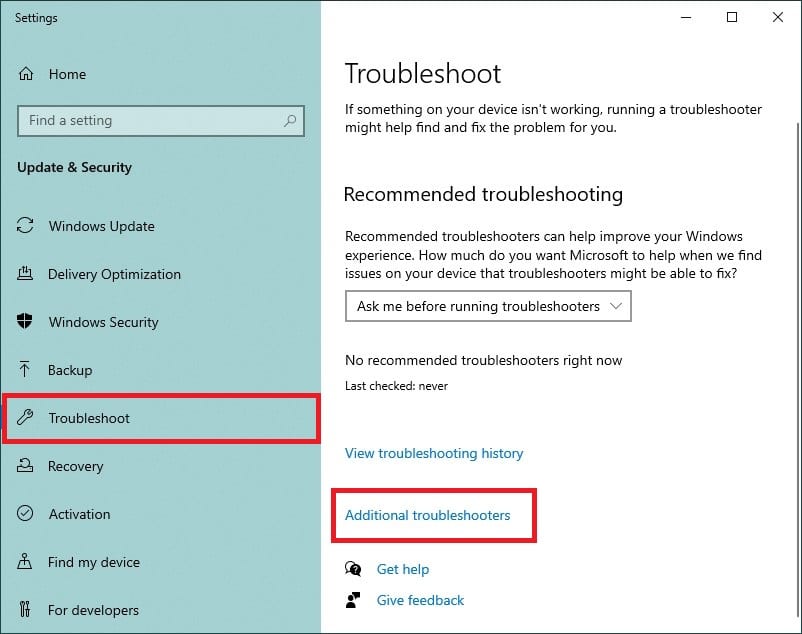
Clicking Additional troubleshooters
- Tap on “Windows Update” and then on the “Run the troubleshooter” option.
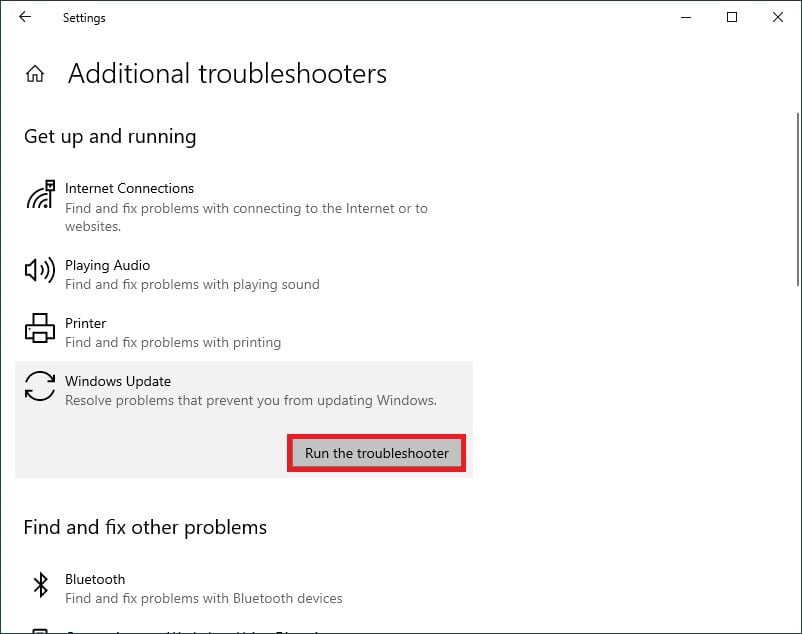
Running the Troubleshooter
- Restart your PC and check whether this fix worked for you or not.
Fix #2 – Clean the Software Distribution folder
One of the reasons for getting Windows update errors might be corrupted temporary files. Deleting those corrupted files can effectively resolve this issue. Since Windows saves all the files on the Software distribution folder, you can easily remove them in one go.
Follow these steps to find and clean the software distribution folder in Windows 7, 8, and 10.
- Press the Windows + R keys to open the Run utility.
- Type “services.msc” on the run box and click “OK.”
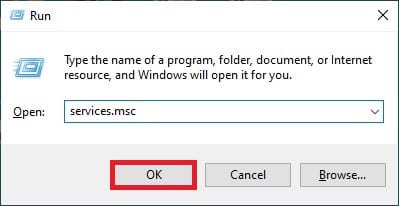
Typing command in Run box
- Find and click on “Windows update” in the right section of the window and tap on “Stop (the service).”
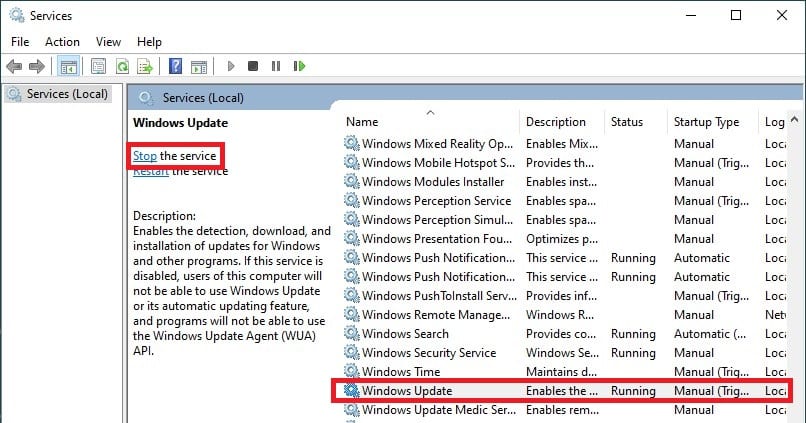
Clicking on Windows Update
- Now, press Windows + E keys on your keyboard to open “File Explorer”.
- Copy and paste the command “C:\Windows\SoftwareDistribution” on quick access and delete all the files and folders present there.
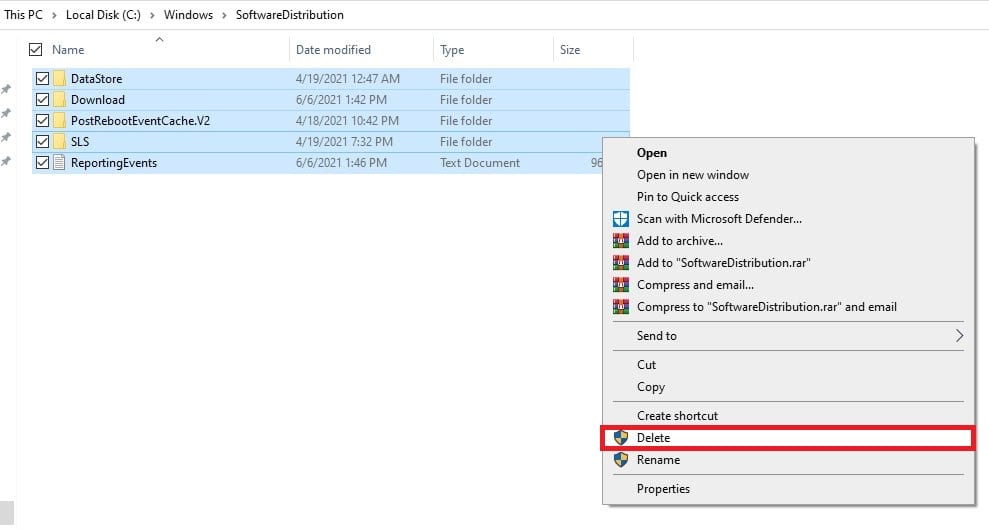
Deleting files & folders from the SoftwareDistribution folder
- Again visit the “Services” utility like you did in step#2 and click on “Start (the service)”.
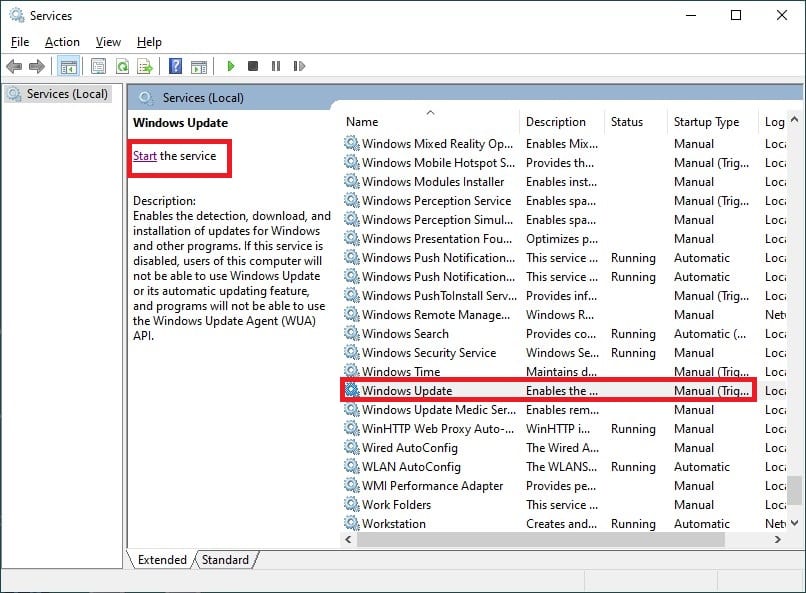
Starting the Service
- Restart your system, and this should have fixed the Windows update error in Windows.
Fix #3 – Restart Windows Update Services
If you are still getting the error, it may be because the Update services on your system are disabled. Hence, your system is unable to install new programs. You can fix this error by restarting those disabled services and see if that helps.
- Open the Run box by pressing Windows + R buttons. Type or paste “services.msc” to open the Services app.

Typing command in Run box
- Find and Double-click on “Background Intelligent Transfer Service”.
- Set the startup type to “Automatic”.
- Now, click on the “Start” button and then on “OK” to enable this service. If the service is already enabled, click on the “Stop” button and then on the “Start” button to restart the service.
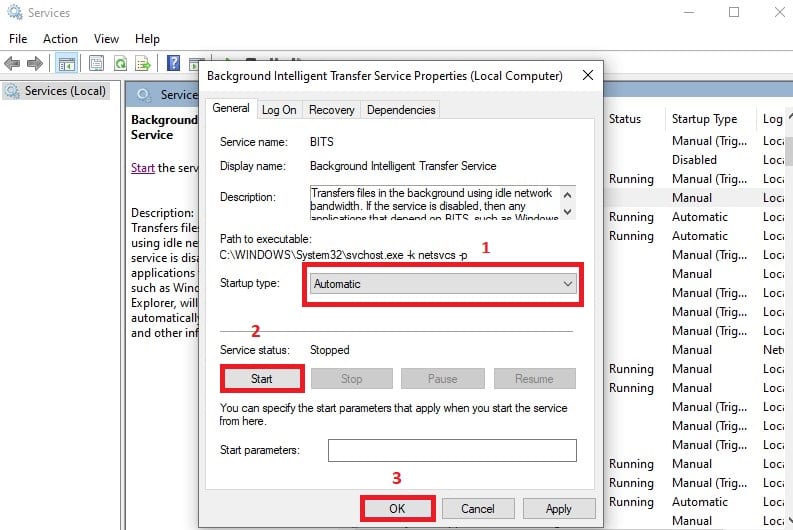
Setting the Startup to Automatic and Clicking the Start Button
- Next, find and double-click on “Cryptographic Services “and Set the Startup type to “Automatic”.
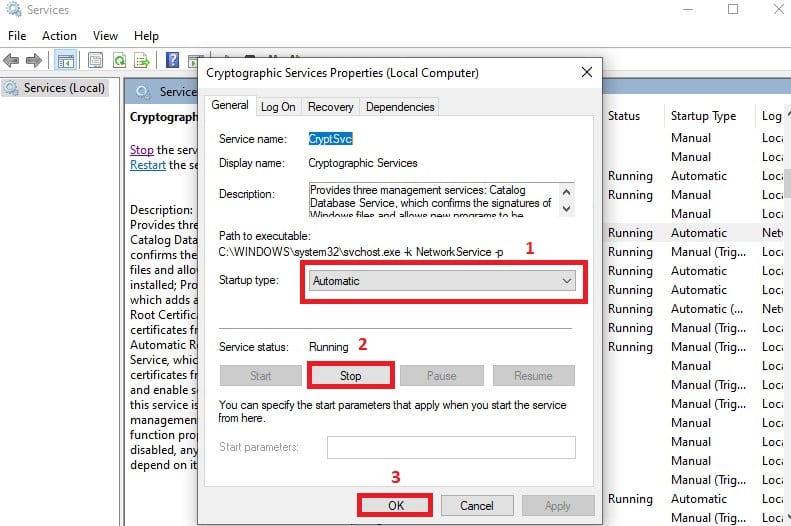
Setting the Startup to Automatic and Clicking the Stop Button
- Click on the “Start” button and then on “OK” to enable this service. If the service is already enabled, click on the “Stop” button and then on the “Start” button to restart the service.
- The last part of this fix is to double-click on the “Windows update” and stop and start the service as you did in Steps 4 and 6.
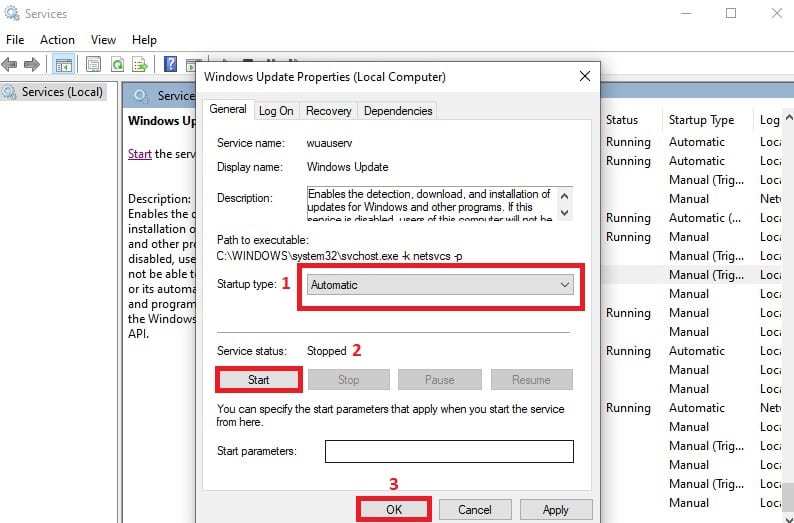
Clicking on the Start button on Windows Update Properties
- Restart your PC and check if you can run Windows Update or not.
Fix #4 – Rename SoftwareDistribution Folder
Renaming the SoftwareDistribution folder can also resolve this issue. Follow these steps to rename the SoftwareDistribution folder in Windows:
- After pressing the Windows key, type “cmd” on the search bar.
- Click on “Run as administrator” to open the Command Prompt.
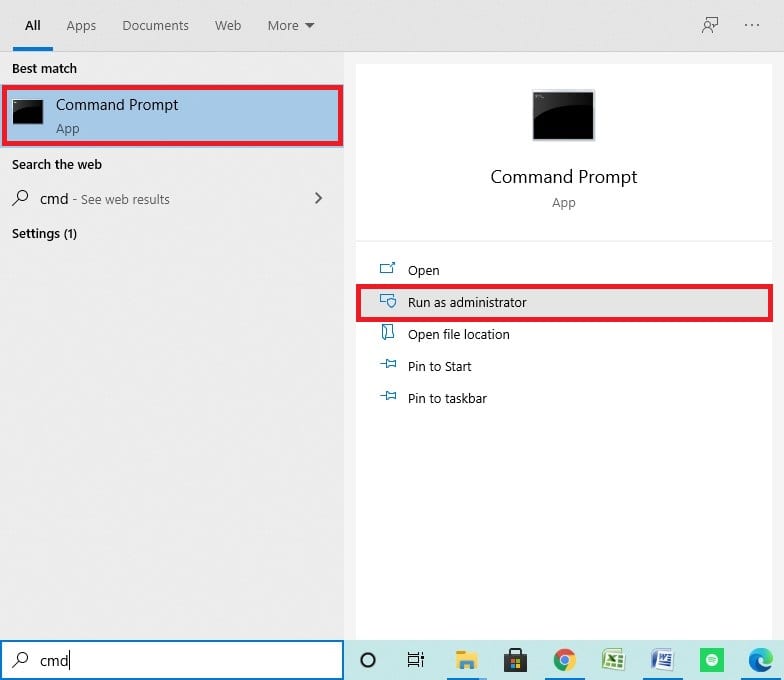
Clicking on Run as administrator
- Type or paste the following commands on the command prompt and hit “Enter”. (Don’t close the prompt).
- net stops wuauserv
- net stops bits
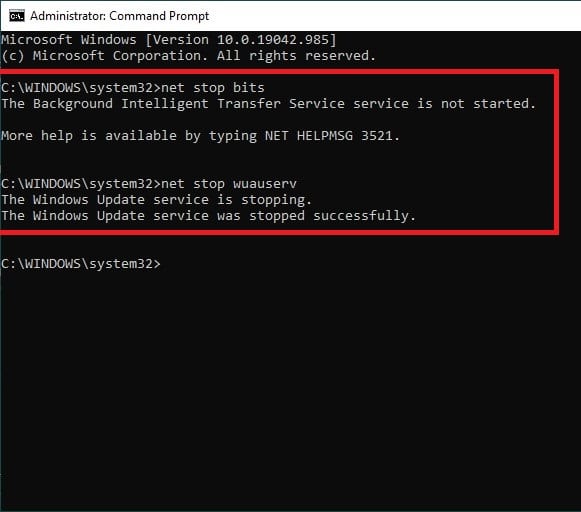
Typing Stop commands in Command Prompt
- Hold Windows + E keys to open “File Explorer” and type “%WINDIR%” on the quick access tab.
- Find and Rename SoftwareDistribution folder to “SoftwareDistribution.old”.
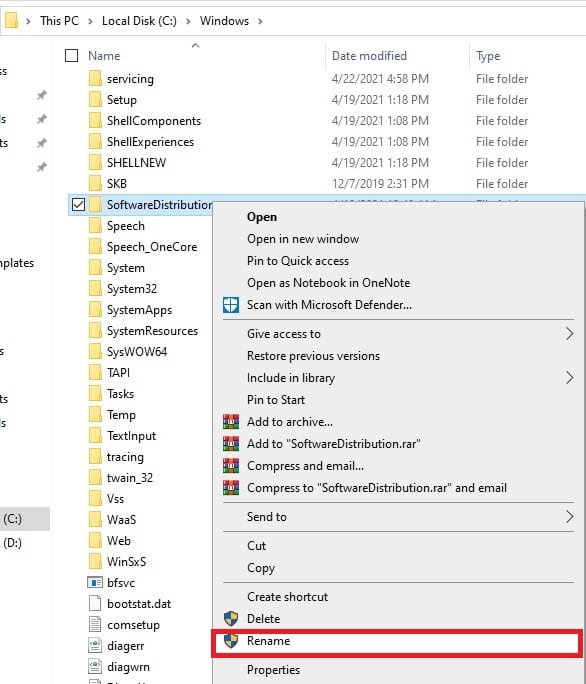
Renaming the SoftwareDistribution folder
- On the previously opened command prompt, type the following commands and click “Enter”.
- net start wuauserv
- net start bits
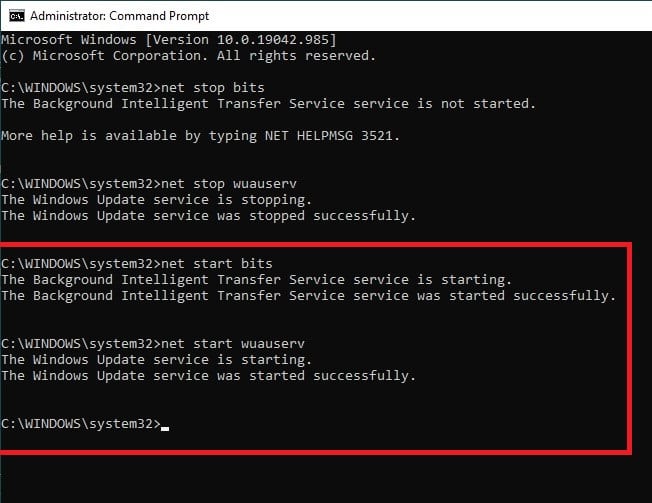
Typing Start commands in Command Prompt
- Finally, restart your computer and run Windows Update.
Fix #5 – Update your RST Driver
If you are still getting the Windows update error, it might be due to an outdated or corrupted RST driver. You can easily update your driver by downloading the correct driver from the official Intel website. Make sure to choose the driver that is suitable for the Windows version you are using.
Although it will take a lot of time updating drivers, it will be an effective fix for many Windows errors.
Conclusion
Windows Update errors are probably the worst type of errors encountered by Windows users. They may be due to various reasons like corrupted or missing files, outdated drivers, or many others. Well, whatever the reason might be, fixing them is the only way to rerun Windows update.
This article featured the five best fixes to resolve the Windows Update Service not running error. Do give them a try and see which fix works the best for you!
