
Table of Contents
The gaming industry is advancing quite nicely in 2021. More and more games are coming out for PC players, and the release of the PlayStation 5 and Xbox Series X and S have made several advances in this space. Modern-day gaming involves consoles, VR technology, and, of course, PC. However, gaming wasn’t always at a level like this. To everything in this world, some precursors lay the foundation for further improvements to be laid upon. The same is the case with PC gaming.
There was once a time when some classic games were basic in their working but allowed for hours of fun. Many people have grown playing these old but gold games on their Windows XP and Windows 7 PCs, so it’s not surprising to revisit these titles from time to time and relive the golden memories. We won’t go that far back into the days of Windows XP, but we will tell you everything there is to know about Windows 7 games being played on Windows 10.
In this article, we will walk you through the process of installing classic Windows 7 games on your Windows 10 PC in simple-to-understand terms. This will ensure that you can play some of the most iconic games that ever came out for Windows 7. So without any further ado, then, let’s jump right into this guide.
How to install classic Windows 7 games on Windows 10 PCs
One primary reason people have turned towards classic Windows 7 games on Windows 10 PCs is the lack of built-in games on Windows 10. This wasn’t the case on previous iterations of Windows, as each release did come out with a handful of enjoyable games. However, there’s no use crying over spilled milk, especially when you’ve got a solution right at your disposal. So follow the steps listed below to find out how to get Windows 7 games on Windows 10 quickly. We’ll make sure to enlist the steps as thoroughly as possible for the best understanding.
For this, we will need to download a specification program that will allow us to play Windows 7 classics. After that, it’s smooth sailing. We run the program and let it do its thing. The following steps are going to take it from here.
1. Click on this direct link to get straight to the download page of the program we’re trying to install. Once you are there, scroll down a little and click on “Download” to begin the process.
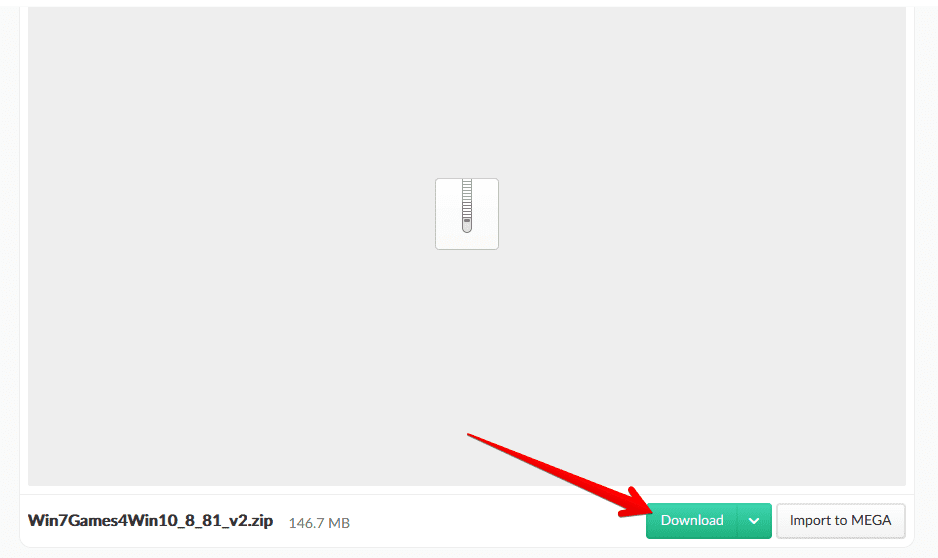
Downloading the Application
2. Once you’ve got the setup downloaded, go to the “File Explorer” application and select the setup file. The file will be arriving on your desktop in ZIP format, so we should extract it first for the best results. Right-click on the “Win7Games4Win10_8_81_v2” folder and click on “Extract” to continue. The extraction process will begin by itself, so don’t worry about doing anything in this respect.
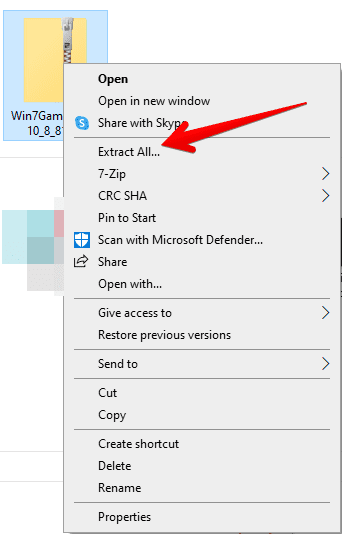
Extracting the contents of the ZIP folder
3. Once the folder contents have been extracted; the next step is to click on the “Windows 7 Games for Windows 10 and 8” executable file and run it as an administrator to avoid any potential problems. Do that by performing a right-click on the app and selecting “Run as administrator.”
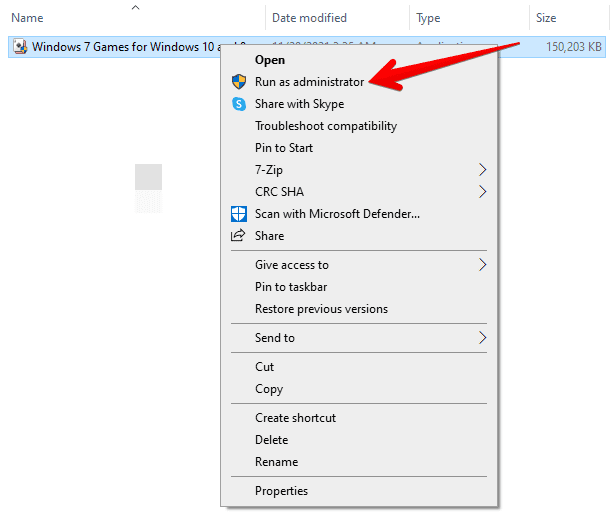
Running the application as an administrator
4. As soon as you attempt to launch the application, a confirmation prompt will appear while blacking out the rest of your screen. The system will ask you whether you want to allow this app to make changes to your computer. Select “Yes” to continue. After that, the app window will launch and ask you to select your preferred language. For us, it’s English, so we’ll go with that. Once you have made your decision, click on “OK” to continue to the next step.
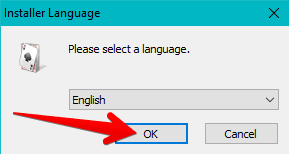
Confirming the language
5. After doing that, wait until another window appears on the desktop while the language-preference one closes. Once it pops up, click on “Continue” to proceed with the installation.

Continuing the process for the Windows 7 games setup wizard
6. This is probably the most fun part of the entire tutorial. At this stage, you will select all those classic Windows 7 games that you want to play on your Windows 10 PC. The list of games includes Chess, FreeCell, Hearts, Mahjong, the ever-favorite Minesweeper, Purble Place, Solitaire, SpiderSolitaire, and more. You can also scroll down a little for the whole list. Once you have selected the games of your choice, click on the ” Install” button to move forward. Please note that you will require at least 335 MB of free space for the successful installation of Windows 7 games.
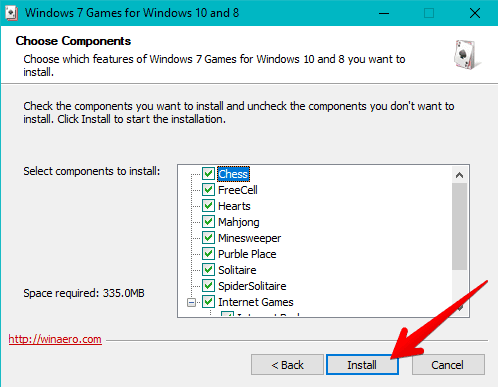
Selecting the games of choice for installation
7. Clicking on “Install” will begin the process. That won’t take long at all, so prepare yourself to get right into gaming. Once the installation concludes, you’ll be shown a different page on the setup wizard. Here, you will be able to click on “Finish” and end the whole process for good.
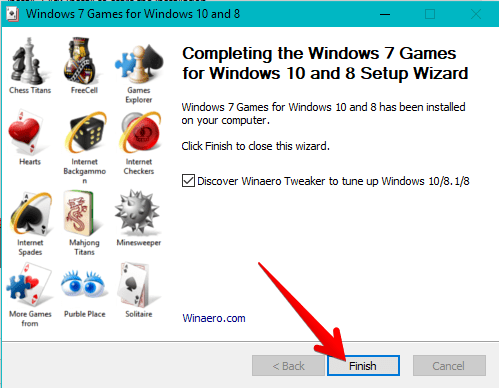
Finishing the process
8. Now that you’ve gone through the whole installation and no other screen has popped up for you yet, you’re probably wondering where all your games are. Without delving into any complexity here, you’ll straight away click on the Windows Start button and check out the “Recently Added” section. This is where all the recently installed games will appear and allow you to launch them. Don’t forget to click on “Expand” to make all of the titles appear. Other than that, you can also search for each game independently using the Windows Search bar. This will help you find your games after a while has passed.
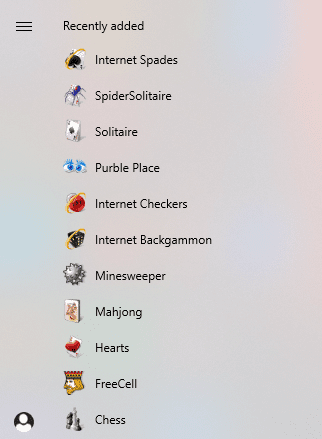
Windows 7 games installed on Windows 10 PC
That’s about it for the tutorial! You’ve successfully learned how to download Windows 7 games on your Windows 10 PC, and it’s fair to assume that the process wasn’t complicated. Now that you’ve already installed those games, let’s get into the process of playing some of those games so you know how they operate on a modern-day Windows 10 PC.
How to play classic Windows 7 games on Windows 10
We’re going to take Minesweeper as an example here, which is nothing but an all-time classic. To launch this game, click on its app icon in the “Recently added” section or search for it explicitly using the Windows search bar. We’re going to go with the first option since it’s a lot easier.
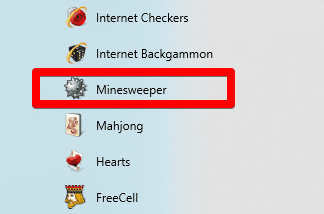
Launching Minesweeper
Once you click on Minesweeper, the game window will launch instantly on your Windows 10 desktop. First off, it’ll ask you the difficulty level on which you’d like to play on. There are three of those in the game: Beginner, Intermediate, and Advanced. Choose the difficulty setting according to your preference to get to the next step.
Once you’re done with that, you’ll be thrown into the central part of the game. This is where you play. The goal of Minesweeper is to check all the boxes that don’t have mines in them. This is both a bit of luck- and the skill-based game where you have to take calculated risks and guesses sometimes while relying solely on your strategy and skill for most of the time.
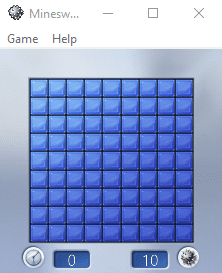
Minesweeper
There are also shortcut keys within the game that quickly let you access the options and appearance settings. You can also play the game in fullscreen mode, but doing so results in a slight resolution drop. Still, it’s pretty admirable how all of these classic Windows 7 games perform on Windows 10. It feels as if they were carefully optimized to run on higher-end machines as well.
We won’t be talking about other games, and their working on a Windows 10 PC, so that’s all up to you to explore them and enjoy. It’s needless to say, but you can use the Windows Search bar to look for any of the installed Windows 7 games on your PC.
Conclusion
Windows 7 had a good run during its time. It was fast, intuitive, and good at getting things done, not to mention the slew of built-in games it came with right out the gate. Windows 10 is also great, but a niche group of users is right to complain that it does not come loaded with pre-installed games, such as Solitaire, Minesweeper, Internet Spades, Mahjong, Hearts, Chess, and a bunch of others.
In this case, it’s understandable to look for these golden games online to play on your Windows 10 PC. Therefore, in this article, we have come up with a solution that details you regarding this whole process. You have to install a specific application that will allow you to install classic Windows 7 games quickly. We hope that you’ve carefully understood the tutorial. Do let us know if you found this write-up helpful. Finally, have a great time playing these games!