Table of Contents
Windows 10 is capable of emulation functions, too, such as emulating Raspberry Pi OS. With all of this being said and done, other operating systems are also frequently used and boast their advantages. One of them is macOS which lives in the Apple ecosystem and sports its range of software, programs, and applications.
One of the exclusive applications of macOS is Xcode—a purely development-focused integrated software that helps developers build proprietary apps for iPhones, Macbooks, and iPads. However, if you have been meaning to find out how to install Xcode on Windows 10, we’ve got you covered. The prospect may seem close to impossible at first, but we’ll illustrate how you can get this done with the help of step-by-step instructions. Let’s jump into the article straight away.
What is Xcode?
Similar to how Linux provides its keen users with an Independent Development Environment (IDE), Xcode also does the same, but only for all things Apple. That is to say, people who are well-versed in writing and developing code will appreciate Xcloud providing them with a platform for creating new applications for iPads, iPhones, Macbooks, and macOS. Xcode also encompasses the operating systems employed in Apple Watches and Apple TV.
It has been live since early 2003, not to mention the slew of consistent updates the software has received. Xcode is primarily available to download on the Mac App Store, a full-fledged platform like Microsoft Store for installing macOS applications and software, both paid and free. The application of Xcode itself does not cost anything and can be installed on a device that runs macOS free of charge.
This is all there is to Xcode, to be fair. The program is laden with high-end tools to write and develop code for creating Apple applications. You’ll find an extremely feature-rich text editor within Xcode and a compiler that will help you manage your developments. There’s also a whole build system in Xcode that makes the operative measures of Xcode possible.
Now that you have a clear enough idea of what Xcode is and why it is used, let’s look at its best features. These can serve as an excellent incentive to try and download this software on your Windows 10 PC.
Best features of Xcode
The following is a round-up of Xcode’s most prominent features.
Diverse programming language support
Xcode takes pride in having compatibility with plenty of different programming languages. This software supports standard rules in C++, Java, Python, Ruby, and Swift. In addition, developers get the opportunity to write code in the tech giant’s very own programming language called AppleScript. The Xcode Independent Development Environment (IDE) is also included within the base Xcode application.
Advanced user interface
Xcode comprises a graphical user interface that’s both easy to understand and capable of accommodating power users on the go. It includes a feature called “View Debugging that makes it possible to perceive a 3-dimensional arrangement of your underdevelopment software’s UI. As for the interface of Xcode itself, the program mainly employs the functionality of SwiftUI. This genuinely cutting-edge system makes app development as painless as possible.
SwiftUI is popular for many reasons. One of them is the incorporation of “Fix-its.” These special codes permit effortless resolutions for your errors while writing code. Moreover, the interface makes the operation even more convenient by displaying issues live as soon as you run into them. Furthermore, the SwiftUI code keeps up with the habit of syncing itself with preview changes and canvases.
Professional-grade editor
Xcode displays the highest professionalism rank, and we say that with due consideration. It’s loaded from top to bottom with a broad set of different functionalities that all come together and pave the way to convenient workflow. You can tweak the font and the screen sizes, orient your coded interface in any way you want and employ the use of animations that are nothing short of simple and easy to understand.
What’s more, users can also enjoy performance analytics features with Xcode. You are more than welcome to use the application and observe trends in the overall performance, internal memory (RAM), CPU, GPU, and disk change over time. You will be able to do this with the help of graphical tracks in Xcode. Moreover, there’s no shortage of quality of life touches in the application.
If you want to look up any file in the system but don’t want to spend a lot of time looking for it first, you have the “Open Quickly” feature available in Xcode that pulls all the handiwork for you up the file of your requirement almost instantly. Moreover, accessibility is prevalent in spades too.
All that is required to install and run Xcode is a free Apple ID, and that’s about it. This feature, however, is limited to Apple devices only, and you will need to seek a workaround if you want to get this software on a Windows PC.
Getting Xcode on Windows 10
Now onto the big question. Getting Xcode on Windows 10 can be pretty tricky due to the many processes involved. However, if you don’t want to deal with the technicality of the matter, we recommend running macOS on a virtual machine on your Windows 10 PC and then installing Xcode on it through the Mac Store. Essentially, you’ll still be using the developer software within a Mac environment, but this will be happening through your Windows PC. In essence, you’ll be able to get Xcode on Windows 10.
We recommend Oracle VM VirtualBox to pull off a feat like this. It’s highly advanced software that can handle even the most complex operating systems in a dedicated environment, let alone macOS. If you’d like to know how to install and run VirtualBox on a Windows PC, we recommend checking out this specialized guide.
Getting macOS as a virtual machine in Windows 10
After installing VirtualBox from the tutorial we’ve talked about above, the next step is to get macOS on your PC through the aforementioned software. Now, this can be something challenging to do, but we will do our best to make you understand the exact steps needed to be performed to make it happen.
We have already ticked off the initial requirement to get macOS as a virtual machine in Windows 10 and install and run the VirtualBox software. The next step is to get an actual working macOS ISO, also known as a disc image. This critical system file will help us run macOS in the VirtualBox software on a Windows 10 PC and thereby allow us to install Xcode.
There are multiple ways of downloading a working ISO file for the Macintosh operating system, but not all of them are trustworthy. After extensive research, we’ve managed to spot a working link for the latest version of macOS, Mojave, that you can easily download on your Windows PC. Use this direct link to get the software from the Google Drive repository. The file size is enormous—around 6 GB—so you will need to wait for a little, depending on your internet connection.
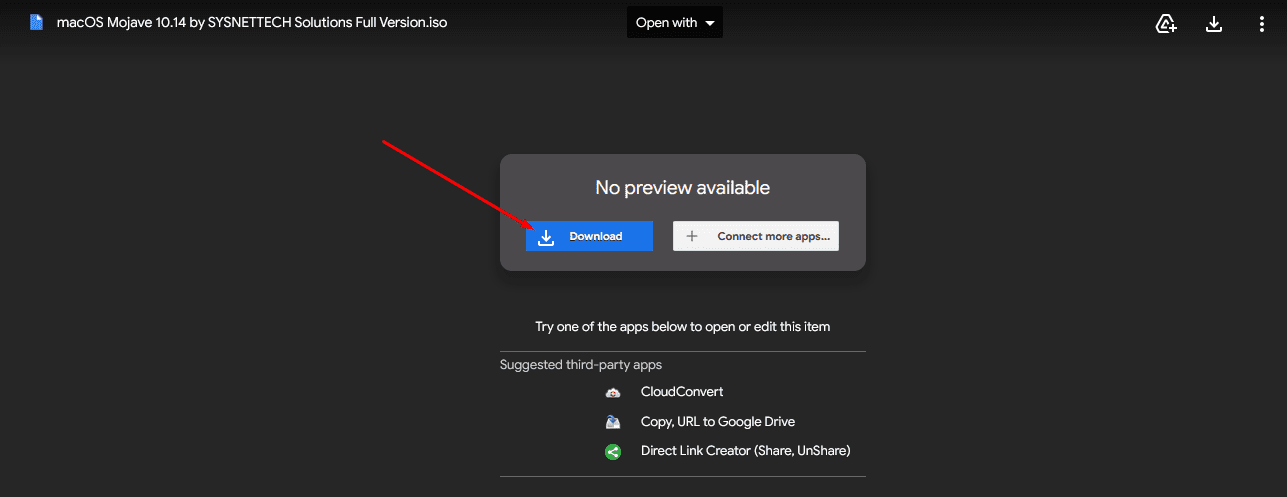
Downloading the macOS ISO
- Note: If you have access to a Mac or can borrow one from a friend momentarily, you can get the macOS ISO that you need to install for VirtualBox with the help of a dedicated macOS installer. You’ll find the latest by the latest version of the operating system in the Mac Store, so this is another possibility.
After downloading the macOS Mojave ISO, the next step is to install it in VirtualBox and configure the software for its proper functioning. Start by launching the VirtualBox app on your PC and clicking on the “New” button to launch your virtual machine.

Clicking on “New”
After that, a window will appear on the screen. It will take you through the initial setup of the virtual machine and help you tick off some vital parameters. The first of the bunch is the name and the operating system. Name your virtual machine whatever you want and select the operating system as “Mac OS X.”
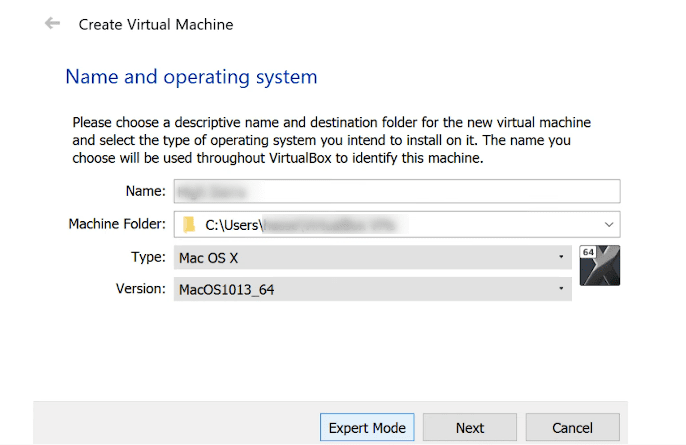
Choosing your name and operating system
The next step is to choose the memory size of your PC that you’d like to dedicate to the virtual machine. Go with whatever the recommended memory size is displayed on the screen for you. In our case, it’s somewhere around 2 GB so we will go with that.
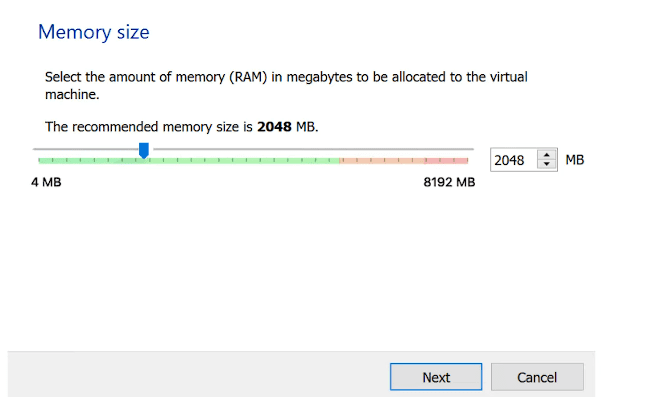
Choosing the memory size
You now have to select the hard disk file type. In the case of macOS and the ISO file we have just downloaded, we will need to choose the “VDI (VirtualBox Disk Image)” option to continue.
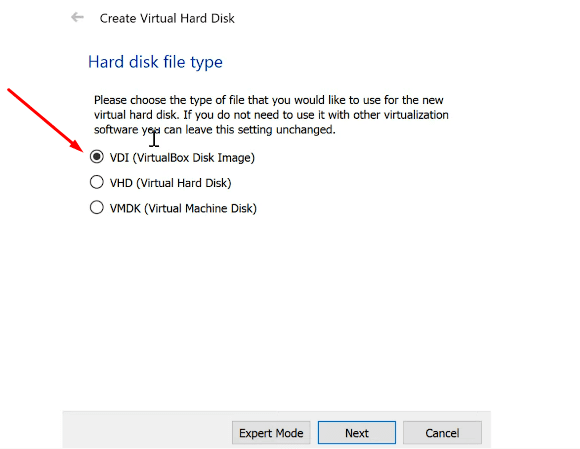
Choosing the VDI file type
Finally, choose the file location and the size you’d like to allocate to the new operating system. 30 GB, for now, seems like a good choice.
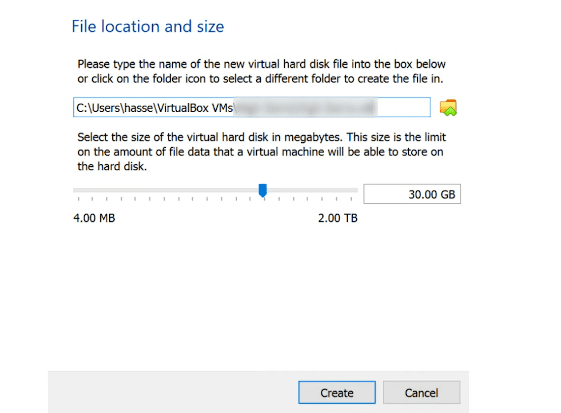
Choosing the size of your virtual hard disk
After clicking on “Create,” you will be taken back to the home page of the VirtualBox software. You will click on the “Settings” icon of the macOS virtual machine to bring up a new window. We have now to get into the final configuration of the program. To begin, click on the “System” panel on the column to the left of the window. You will see multiple options pop up on the screen for you.
One of the first things you’ll have to do here is set the base memory to a suitable level. 2042 MB is the least recommended, but you can always go up. Next, make sure to untick the “Floppy” option in the “Boot Order” area to make macOS launch appropriately on your end with the help of the Mojave disk image. Once you’re done here, click on the “Processor” tab beside “Motherboard” to get to the next step.
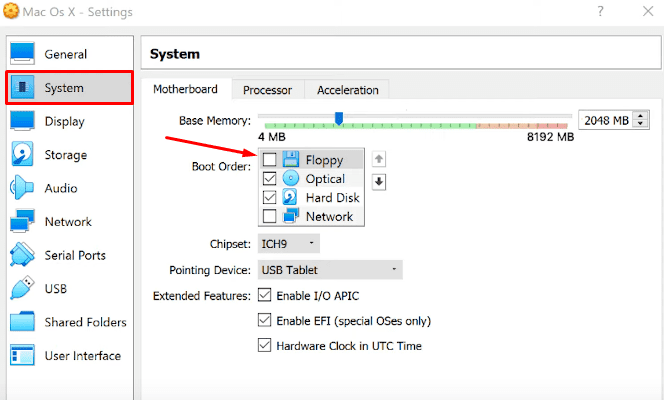
Configuring the virtual machine
In the “Processor” section, make sure you have enabled the “PAE/NX” feature from the list of “Extended Features.” In addition, set the number of processors to 2. That will help you use macOS Mojave comfortably.
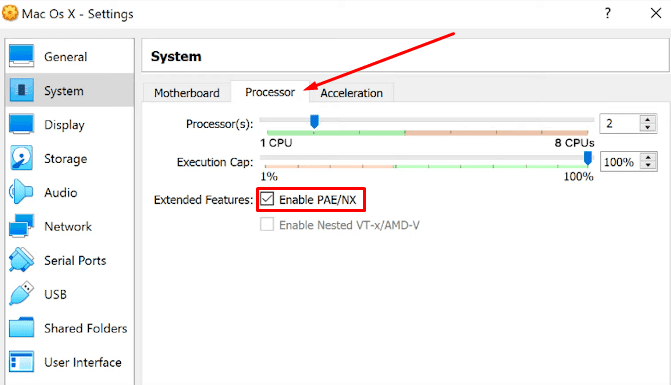
Configuring the processor settings
The next step is to click on the “Storage” panel in the sidebar. That will help you further tweak the VirtualBox software. You now have to insert the optical disk image that we’ve downloaded from the internet with the help of a distinct disk-like icon under the “Attributes” section. Clicking on it will open the “Windows Explorer” app. Select the image you’ve downloaded afterward and click on “OK” to finalize the process.
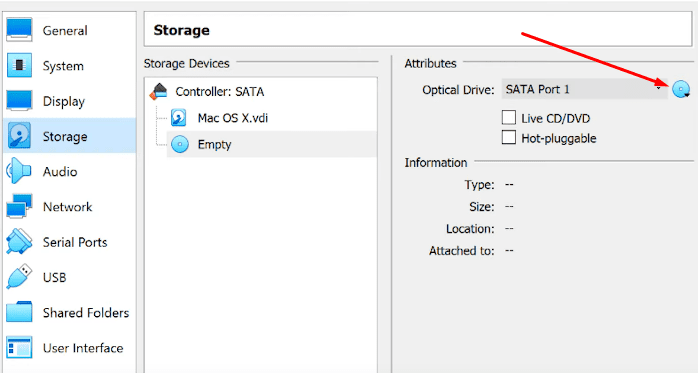
Selecting the macOS Mojave optical disk drive
The final step to configure the VirtualBox software pertains to the display, so click on the “Display” option in the sidebar to get to the relevant section. When you are there, dedicate 128 video memory, and you will be done.
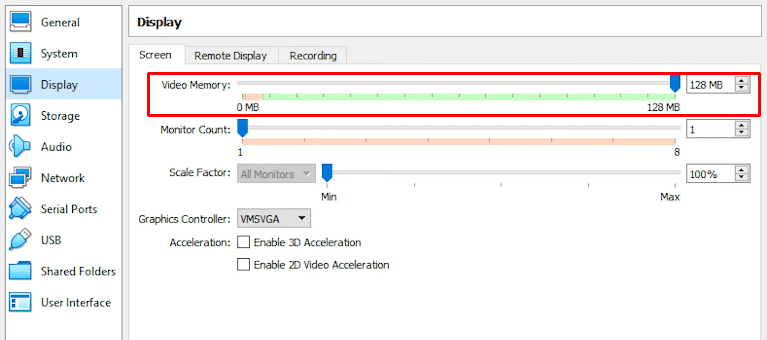
Allotting adequate video memory
We’re still not done yet entirely. You have to run the following commands in the Command Prompt terminal of your Windows PC with the VirtualBox software closed in the background. That should help set things up for you ultimately. The first command in specific relates to changing the working directory of the VirtualBox software.
cd "C:\Program Files\Oracle\VirtualBox\"
VBoxManage modifyvm "macos" --cpuidset 00000001 000106e5 00100800 0098e3fd bfebfbff
VBoxManage setextradata "macos" "VBoxInternal/Devices/efi/0/Config/DmiSystemProduct" "iMac11,3"
VBoxManage setextradata "macos" "VBoxInternal/Devices/efi/0/Config/DmiSystemVersion" "1.0"
That’s all about configuring your macOS virtual machine and getting it to run on your Windows PC. The final step is to click on the green-colored” Start icon in your VirtualBox program and start running macOS. As soon as you do that, you will be greeted by a welcome screen instructing you to follow the on-screen instructions and completely install macOS.
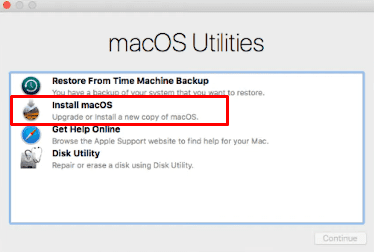
Installing macOS in the VirtualBox virtual machine
Installing Xcode in the macOS virtual machine
As shown in the screenshot below, run it after getting MacOS in your VirtualBox software. That will help you proceed to the next step and get you a step closer to running Xcode on your Windows PC.
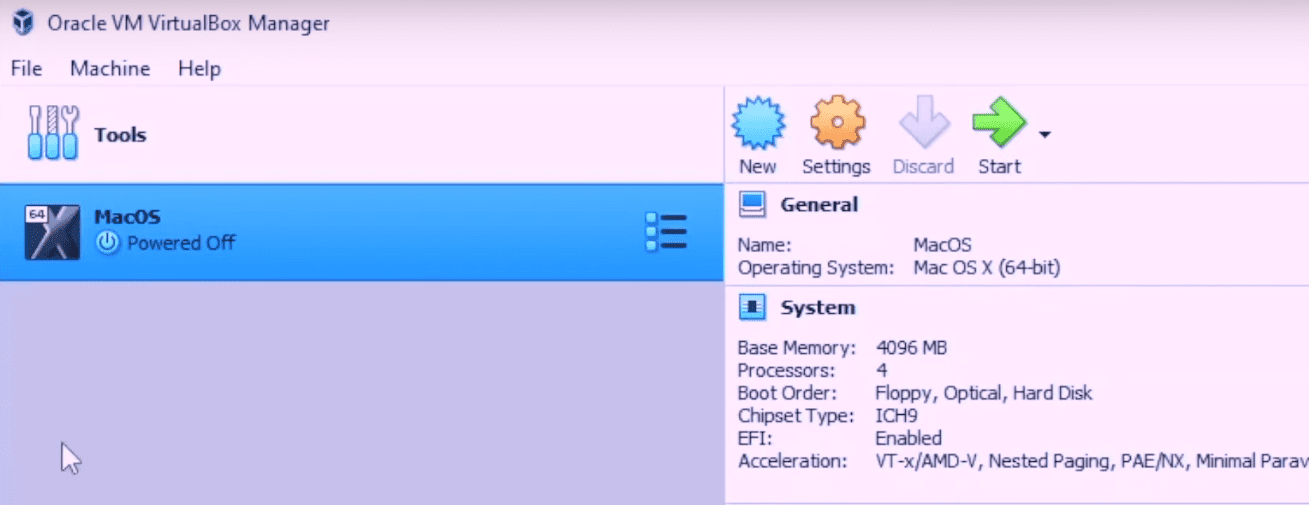
macOS in the Oracle VM VirtualBox Manager
After successfully running a macOS environment, you now have to open the Mac Store within the virtual desktop environment. Once done, search for “Xcode” and find the application on the platform. Click on it to begin the download. The image below shows a visual representation of the Mac Store within Windows 10 and how the Xcode software looks in the marketplace.
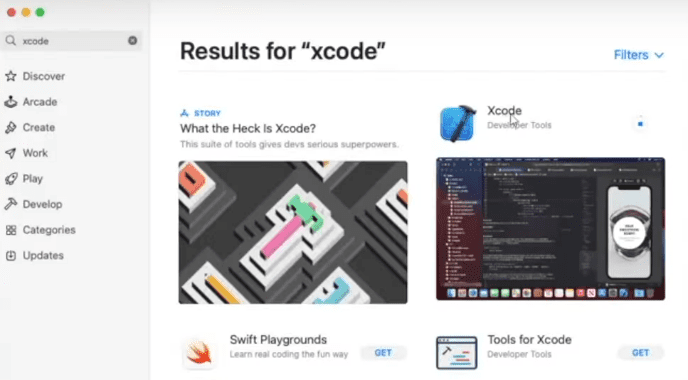
Downloading Xcode from the Mac Store in Windows 10
After installing the application, you can quickly fire it up within the virtual desktop on your Windows 10. As you do that, the initial greeting window of Xcode will appear, prompting you to create a new project or clone an existing one. That’s all there is to this process.
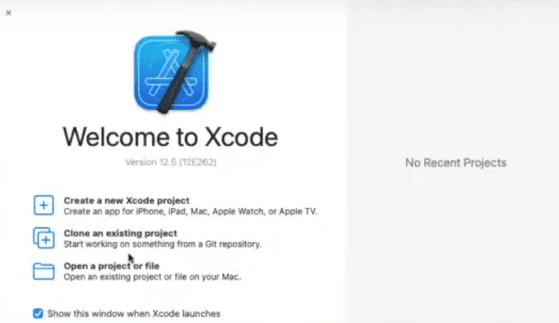
Xcode downloaded
You’ve successfully learned how to install Xcode on your Windows 10 PC with the help of this section. After thorough research, we’ve found out that running this Apple-exclusive development software in a virtual environment is the best method for achieving the task. We’ve tested other ways, but they usually end up with a bugged and laggy experience, defeating the whole purpose of going through the hassle.
We have covered you if you’d like further information and are relatively new to creating virtual machines and environments. Our “How to create and use virtual machines in Windows 10” comprehensively covers this scenario, so please look at it for more information.
Conclusion
In this article, we have talked about running Xcode using the Oracle VM VirtualBox software program. This helpful tool makes it easy to virtualize other operating systems on Windows and get a taste of their functionalities. We’ve practically done the same with macOS in the tutorial above by first getting it on the PC and then installing Xcode within the virtual environment. We hope that you’ve found this guide helpful.
Do let us know down in the comments section about your own experience. We will be delighted to read your feedback!
1 comment
The method described may work but it isn’t legal. Apple only licenses macOS be run on Apple hardware.