The VLC media player is universally known as one of the best free music player apps for Windows and not without several different reasons. It is loaded from head to toe with various accessibility features and even supports most modern-day multimedia formats for constant back and forth. There’s no beating VLC when it boils down to being free, open-source, and highly easy to use as a computer program.
However, certain aspects of VLC’s user interface require a little bit of tweaking before you can achieve the optimal user experience with the famous media player. One is making the VLC player resume video at the stopped position. This is otherwise known as playback functionality, and in this guide, we’ll learn how to get this done in a couple of easy steps. Without wasting any further time, let’s begin.
- Recommended: How to convert MOV to MP4 video using VLC Media Player.
Making the VLC media player resume video at the stopped position
It’s pretty easy to learn how to make the VLC media player utilize the playback feature whenever it is closed down and started back up. You need to be aware of the technical know-how that surrounds the matter. Before we get into that, let’s talk about the feature we’re about to enable first. Picture an instance where you watch a music video or listen to an audio track.
You’re halfway through the media when something comes up, and you have to close the player itself down. Now, whenever you wish to return to where you were listening or watching the media, you will need to sift to that section manually. The player itself won’t remember where you left off. On the contrary, this is what the auto playback resume feature is all about that we’re going to get into just now.
Follow the steps listed if you wish to learn the exact process to help you make the VLC player resume video at the stopped position. Let’s get started right away.
1. The first step is utterly simple. You must fire up the VLC media player app on your Windows PC to get going. Once you’re done, click on the “Tools” button in the toolbar to open up multiple options.
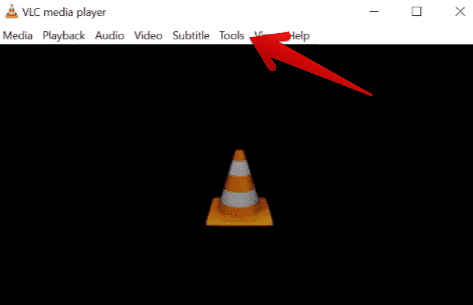
Clicking on “Tools” in the VLC media player
2. After clicking on the “Tools” button, you will need to hover over the “Preferences” option and click on it. As you can comprehend from the screenshot, you also alternatively press “Ctrl” and “P” together to fire up
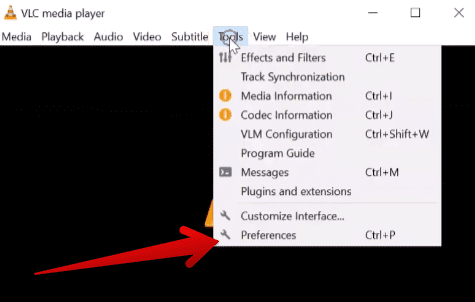
Clicking on “Preferences”
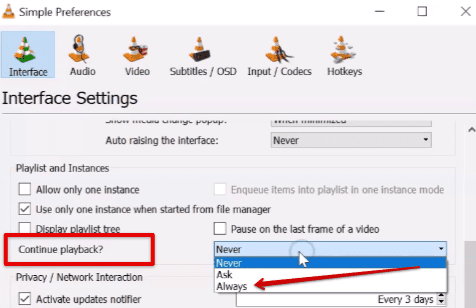
3. You will be taken to the “Interface” section of the video accordingly right after clicking on the “Preferences” button. The key here now is to scroll down until you find the “Continue playback?” feature right within the “Interface” compartment of VLC’s “Preferences.” A dropdown bar will be beside the functionality in question that will allow you to click on it. Doing the latter will make selecting the “Always” option easy, as shown in the screenshot below.
Or, if you’d prefer, you can set it to “Ask” if you do not always want that function to kick in after shutting the player down abruptly. The choice is yours here, so go with whatever sounds preferable. If you use the “Ask” option, you will receive a prompt at the top of the player’s interface about the resume where you left things off. We think “Ask” is the most straightforward choice here since we might not always want the player to start again at the stopped position.
Enabling the playback feature in VLC
4. For the final step, click the “Save” button to apply the changes and ensure that the playback feature is now taken into effect moving forward.
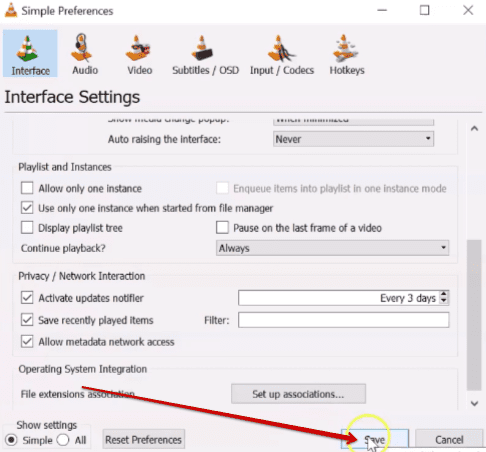
Saving the playback functionality
If you’ve successfully followed the process up until now, you will no longer need to worry about the VLC media player not picking up from where you left off. You can even do a test run at present by firing up a video, scrolling to a distant timestamp, and closing it down immediately. After you’re done, you can relaunch the media player.
Depending on the option you selected above, either the video will automatically resume from the position it was stopped, or it will ask you whether you wish to resume playback. Either way, this is nothing but a win-win situation. We hope that you’ve learned something here.
Conclusion
The VLC media player is simple, effective, and relatively speedy. You do not need a specced-out computer to run this program. Even the most mediocre computer specifications will do fine in handling the world-famous multimedia player efficiently. All you need to do is install it from the official website, run the setup, and follow through with the installation for nothing but the best results. The developers love keeping things as facile as possible with VLC.
In this guide, we have learned all there is to know about making the VLC media player resume video at the stopped position whenever you want to, so it’s never going to be a hassle scrolling through the desired timestamp again. Please let us know in the comments section whether you went with the “Always” option or the “Ask” one. We would love to read your thoughts!