Table of Contents
If you’re an avid gamer constantly finding yourself using your PC for nothing but games, you want to know how to optimize Windows 11 for gaming. Some specific tips and tricks take your regular experience to something more feature-packed and enjoyable, and this detailed tutorial will cover just that. Keep reading to know how this tip-top software can be altered to become a better host for gaming.
Thankfully, Windows 11 takes care of gamers by implementing tons of features that improve the operating system’s performance and allow more stability and smoothness in running video games. However, some of these features aren’t so easy to dig out and require attentiveness. This article aims to help you make certain changes to your Windows 11 PC to become a better device to enjoy games on. Let’s get started.
- If you haven’t been able to upgrade to Windows 11 yet, don’t worry. This guide goes over how to optimize Windows 10 for gaming, so you don’t have to be left behind.
Windows 11 optimization for video gaming
The following is a round-up of the best techniques, settings, and features that you can tweak to optimize Windows 11 strictly for gaming. Let’s begin.
Keep your operating system regularly updated
If there’s one thing that makes Microsoft Windows a robust operating system, it’s certainly how regular updates are flowing to it now and then. Suppose you want to avoid potential issues when gaming on Windows 11; always keep a keen eye for updates through the “Settings” system application. You will ensure that all existential updates always arrive on your PC first to have a stable, smooth, and secure experience.
To check for updates on Windows 11, click on the “Start” menu icon and type in “Settings.” You will now easily be able to click on the “Check for updates” button. Check out the screenshot below for a visual illustration.
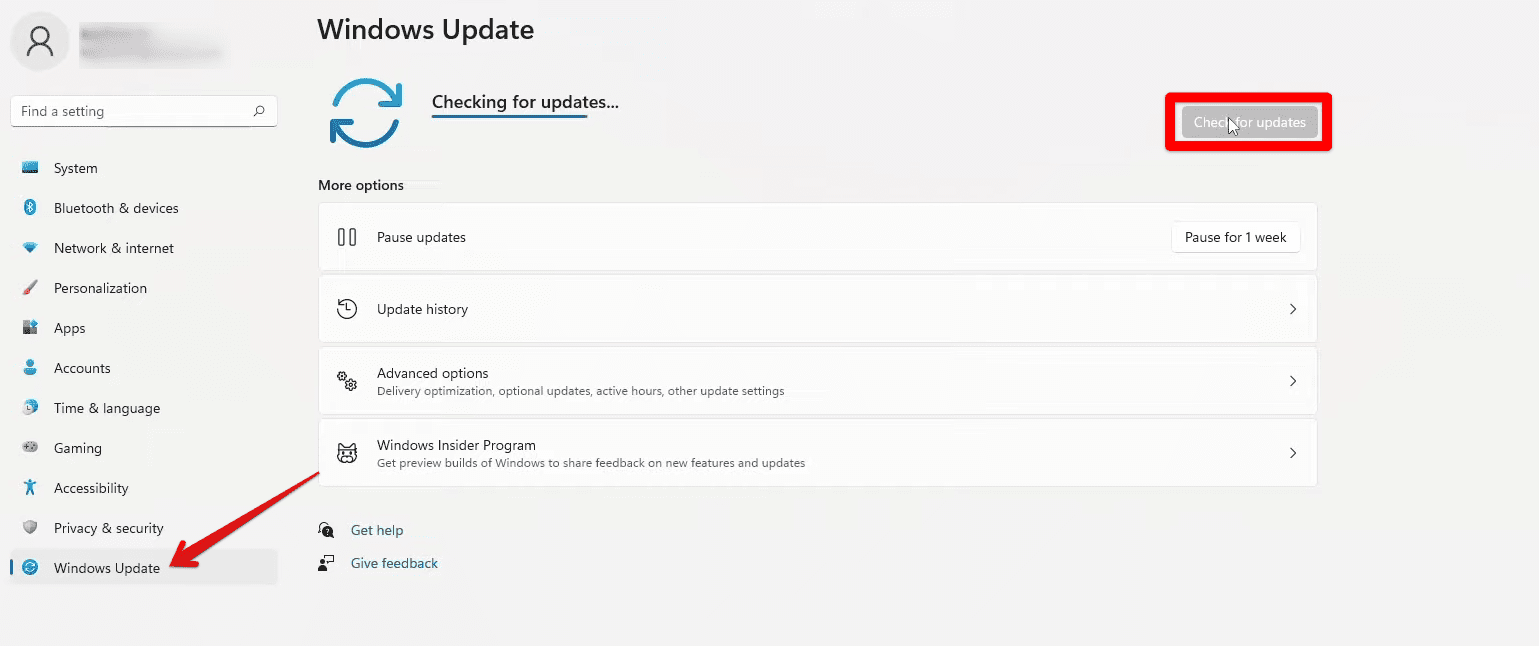
Checking for Windows 11 updates
If you see an upcoming update in line, get to it as soon as possible. You don’t want to miss out on any Windows 11 updates as time progresses since only these can guarantee the utmost optimal working of your operating system. Now that we’ve established a firm ground for optimizing Windows 11 for gaming, it’s only going to get more technical from here on out.
Disable the “Enhance pointer precision” feature
This option creates acceleration on your mouse. You can understand it by moving your camera from left to right or top to bottom when you’re inside any game with a multi-directional camera. You’ll observe the camera moving faster and faster without you changing the speed of the mouse.
This can often be detrimental for players, especially those who play competitively. The following steps will explain how you can disable the “Enhance pointer precision” feature on your Windows 11 PC.
1. The first step is to open your device’s “Settings” system application. This is pretty easy to do and can be done with the help of the “Start” icon.
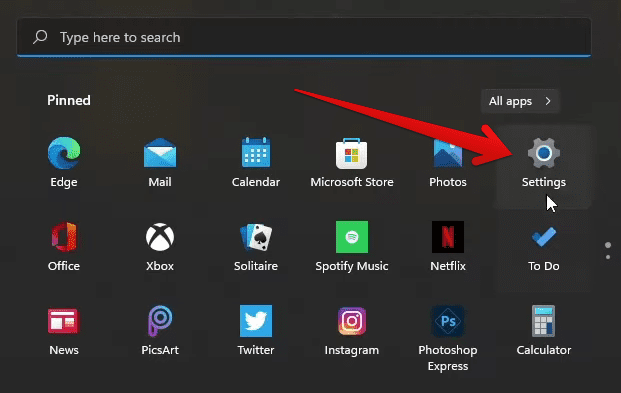
Opening Windows 11 “Settings” app
2. The next step after opening the “Settings” application is to search for mouse-related settings. Type “Mouse” in the search bar of the Settings app. Once the results appear on your end, select “Mouse pointer style.”
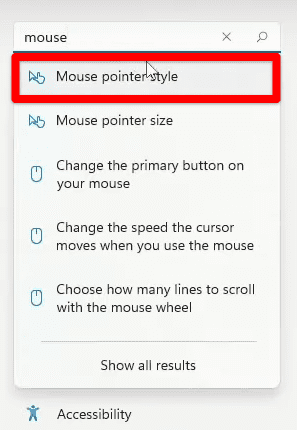
Clicking on “Mouse pointer style”
3. Click on “Mouse” under the “Related settings” section to get to the next step.
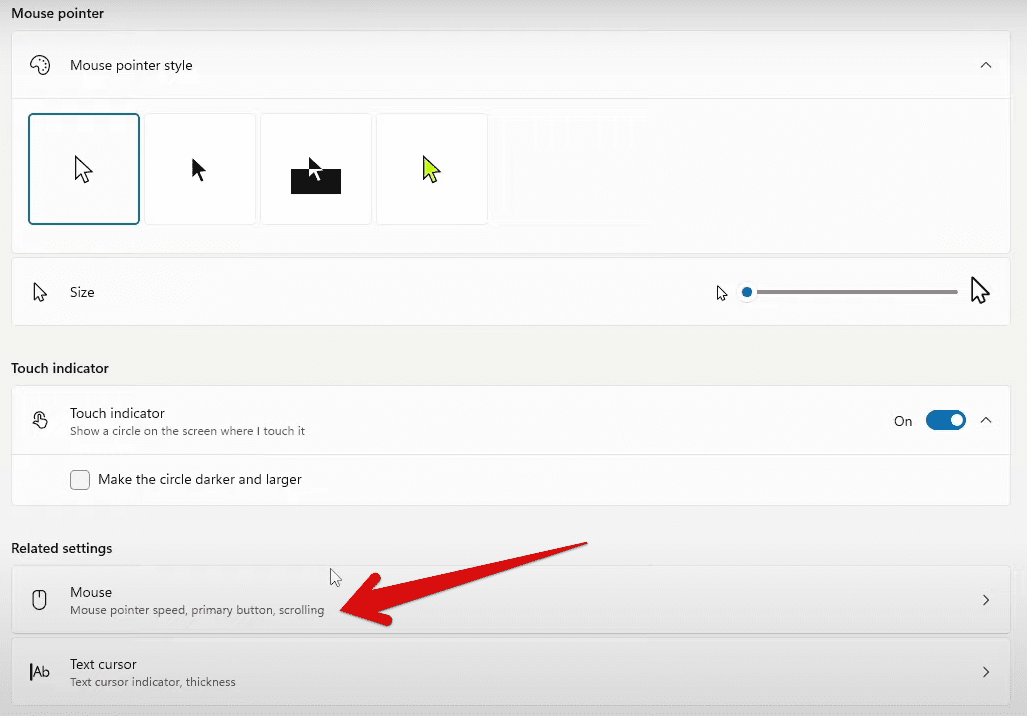
Clicking on “Mouse”
4. Click on the “Pointer Options” tab to continue to the next step.
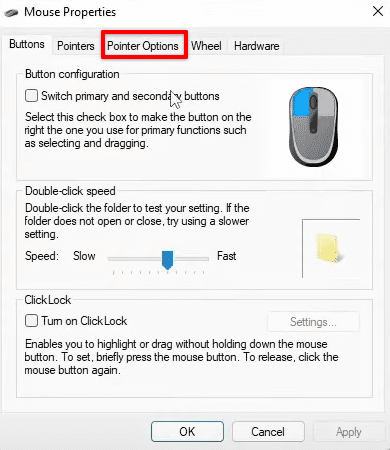
Clicking on the “Pointer Options” tab
5. Uncheck it and click on “OK” to finalize the process. You have now disabled the “Enhance pointer precision” feature on your Windows 11 PC.
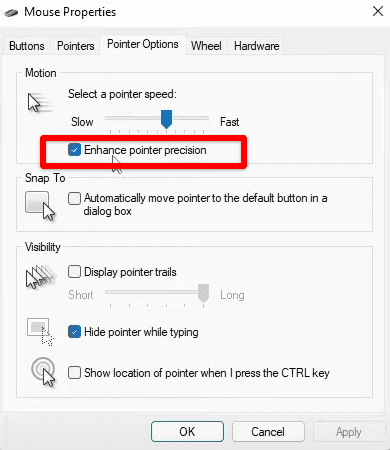
Disabling “Enhance pointer precision”
Assess the Task Manager for unwanted running applications
The Task Manager is an effective control center of Microsoft Windows. It has been present throughout the iterations of this operating system, and it’s needless to say that it’s functioning in Windows 11. To ensure a perfectly optimal gaming environment on your Windows 11 PC, you need to assess its “Startup” tab for applications running concurrently as soon as you boot your device up.
If you’ve had Windows 11 from the start, which means since Oct 2021, you might have had installed quite a few apps on your PC. Now, it can get somewhat tricky to keep individual track of all installed software and programs as time goes on, but the Task Manager is there to make sure you can manage everything easily when the time comes.
To launch this efficient tool without breaking a sweat, press the “Ctrl,” “Alt,” and “Delete” buttons on your keyboard. Once done, the Task Manager should launch right up. You will then have to click on the “Startup” tab in the program to get a list of software that is either “Enabled” or “Disabled” on your PC.
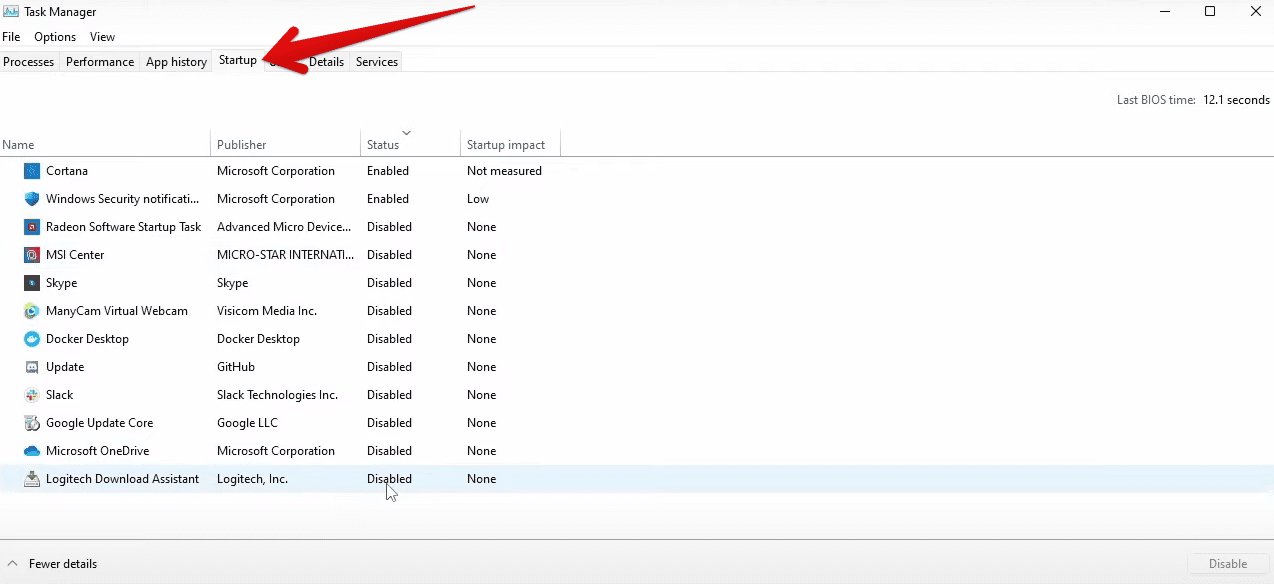
The “Startup” tab in the Task Manager
Now, you have to assess carefully what applications deserve to be on the list of “Enabled” processes and which ones need to be disabled. You must be mindful that keeping your desktop clutter-free will result in the best performance. You will be saving up on important system resources, such as RAM and CPU. It’ll be possible to enjoy games smoothly that way.
Keep Xbox Game Bar disabled
According to some reports circulating online, Xbox Game Bar is causing games to crash and measuring up to deliver poor performance. However, it is otherwise a beneficial feature that uplifts the gaming experience and provides players with multiple options to elevate their time spent playing. You can enable it easily on Windows 10 and even use Xbox Game Bar to record your gameplay.
However, we advise against it on Windows 11 since the developers probably hammer out the pertinent bugs and glitches impeding Xbox Game Bar’s core functionality. The following steps will show you how to disable the feature on your Windows 11 PC.
1. The first step is to open up your device’s settings and click on the “Gaming” option in the sidebar.
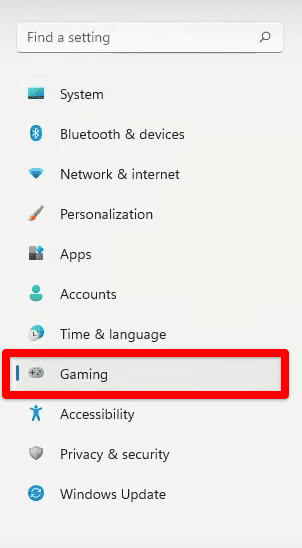
Clicking on the “Gaming” section
2. Right after that, you’ll be able to click on “Xbox Game Bar.”
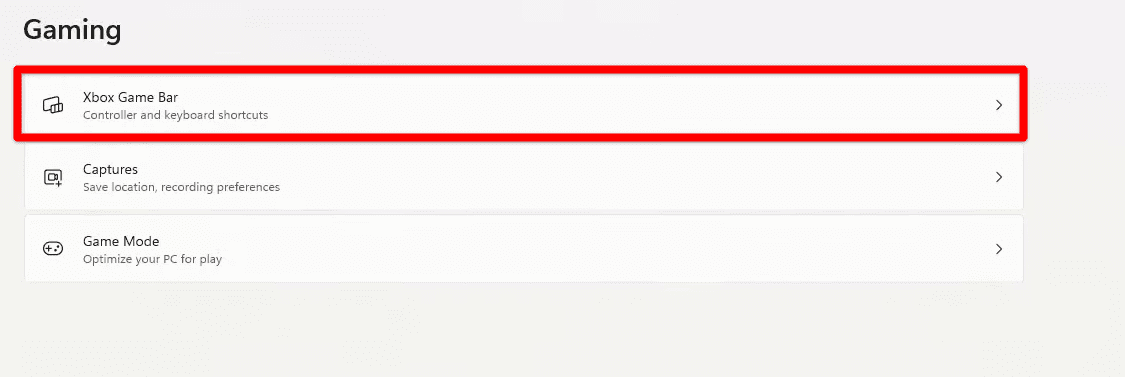
Clicking on “Xbox Game Bar”
3. Next, confirm whether the Xbox Game Bar feature is running on your Windows 11 PC or not. If it is, click on the apparent toggle to disable it.

Keeping Xbox Game Bar disabled
That’s about it for keeping the Xbox Game Bar disabled for the best possible gaming experience on Windows 11. On the contrary, we recommend keeping Game Mode enabled since it’s pretty effective at reducing stuttering in games and laggy input. The following section is going to expand on that as well.
Run your game on “High performance”
The Game Mode feature in Windows 11 can allow you to tweak what mode you’d like to run your games. There’s the option of “Power saving” and “High performance.” If you know, you can count on your laptop’s hardware or use a desktop PC setup. You can easily select “High performance” and reap the benefits that come in its wake.
The following steps will guide you to select the “High performance” mode for a specific game on your Windows 11 PC.
1. The first step is to open the “Settings” app of your Windows PC and select the “Gaming” option in the sidebar.

Clicking on the “Gaming” section
2. Select “Game Mode.”
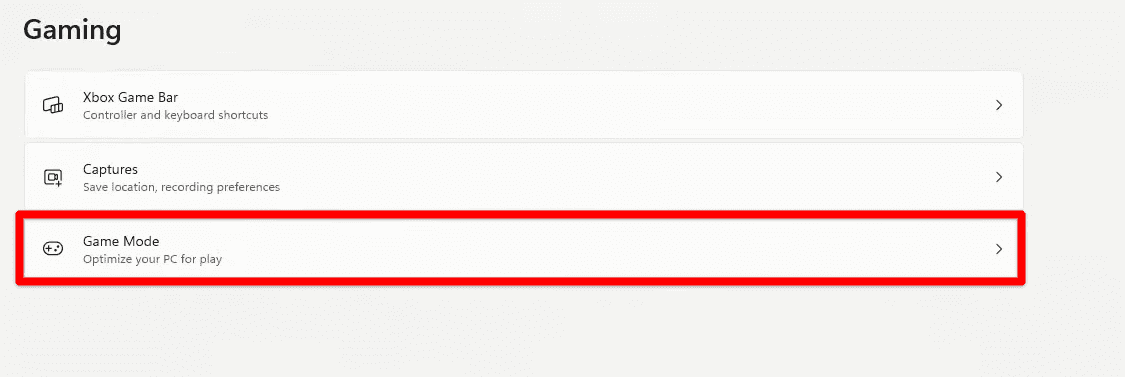
Clicking on “Game Mode”
3. Select “Graphics” under the “Related settings” section.

Clicking on “Graphics”
4. Scroll down the entries on this page and click on the game specifically that you’d like to enhance the performance of. We’re going to choose a random app, for now to show you what to do next.
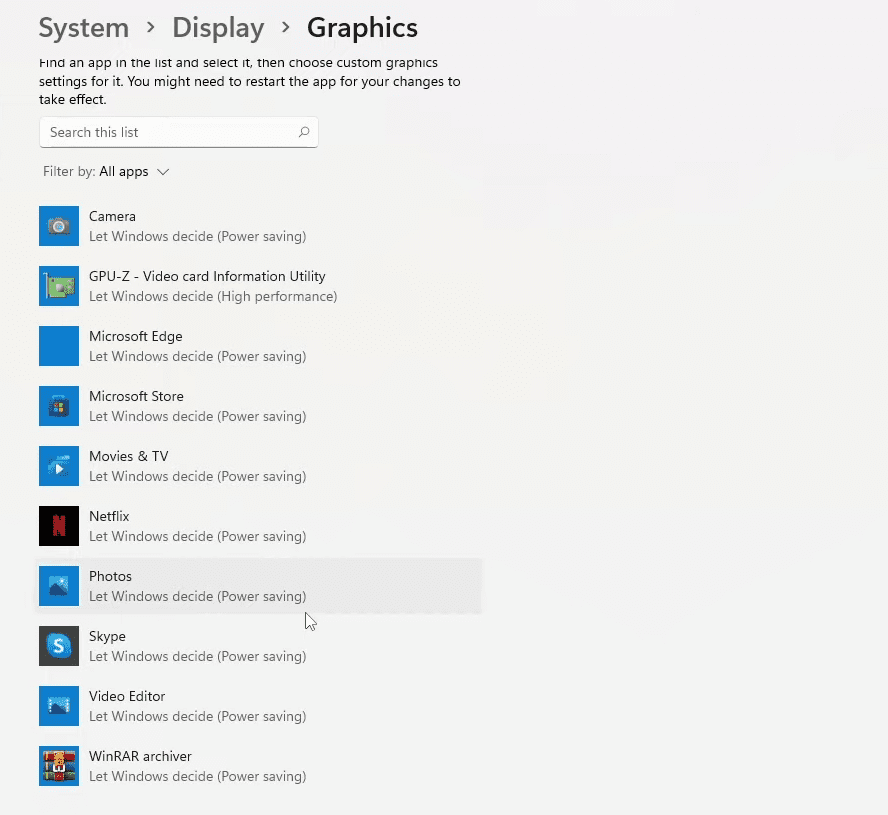
Selecting an app for enhancing the performance
5. A prompt will appear on the screen, giving you three different options to choose from. Here, you will have select “High performance” among “Let Windows decide” and “Power saving” to make your games perform better from here on out. Note that more power will be consumed if you use a Windows 11 laptop, so be wary of this. Repeat the process detailed above for as many games as you want to be installed on your system.
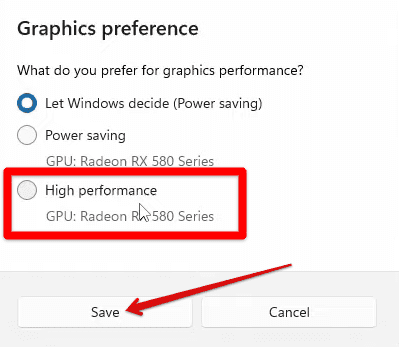
Saving the “High performance” setting for the game
Switch “Power mode” to “Best performance”
There’s another measure to take for making sure the performance levels of your Windows 11 PC are purely geared toward gaming. An option called “Power mode” resides within the “Settings” system app that makes it possible to switch between “Best power efficiency” and “Best performance.” You already know what we’re going to go after here.
Switching the “Power mode” to “Best performance” is incredibly helpful for boosting the quality of your games. This is especially true because you notice better stability, reduced lagging, crashes, and freezing. To learn how to get this done, follow the steps listed ahead.
1. The first step, as always, if you want to tweak something system-related, is to open the “Settings” system application.

Opening Windows 11 “Settings” app
2. Click on “Power” in the “System” section of your device’s settings. You can see what section you’re on from the sidebar in the “Settings” app’s user interface.

Clicking on “Power”
3. Right after that, you’ll see two different main options on the screen: “Screen and sleep” and “Power mode.” Besides, the latter will be a drop-down menu that you can click on. Do that to reveal further three options: “Balanced,” “Best power efficiency,” and “Best performance.” Select “Best performance” to finalize the process.

Selecting “Best performance”
Adjust the display and refresh rate settings
Several visually stunning games resemble real life like no other. Their graphics quality has been made relatively superior to other titles, which sets them uniquely apart. However, it entirely depends on the external monitor in terms of the resolution and display.
People usually forget to adjust the display settings of their monitor, even though the monitor they have is of excellent quality and supports a refresh rate up to 144 Hz. The following steps will explain getting the best display and refresh rate settings for your Windows 11 PC.
1. The first step is to open your PC’s “Settings” app and head over to the “System” section.

Choosing “System” settings
2. Click on “Display.”
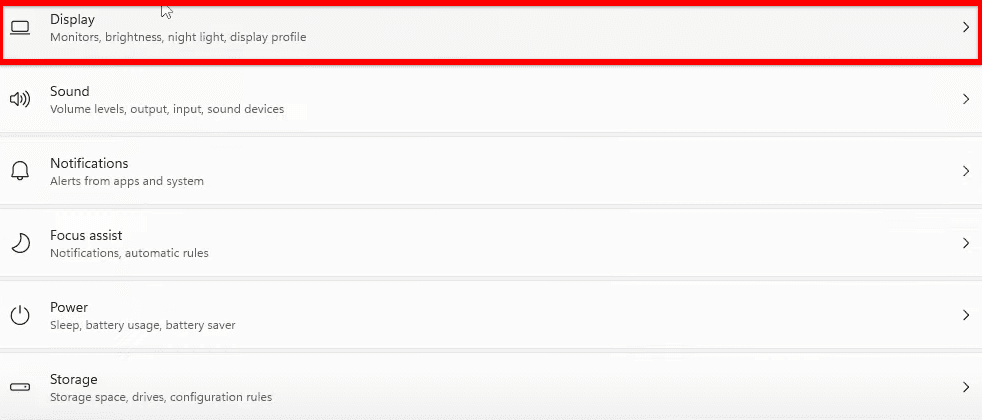
Selecting “Display” settings
3. You should now be seeing the “Display resolution” option under the “Scale and layout” area in this section of the settings. Now, the key here is to make sure that you have selected the native resolution of your monitor here for the best results. If you see that you have a 1080p monitor, but your display resolution is set at 720p, change that back immediately.

Choosing the optimal display resolution
4. The next step is to scroll down until you find the “Advanced display” option under the “Related settings” area. Click on it to proceed further.

Selecting “Advanced display”
5. You’ll observe an option called “Choose a refresh rate.” Here, you’ll observe options of all sorts. You have to assess again the quality of your monitor and the refresh rate it natively supports. If you have a 120 Hz or a 144 Hz external monitor or display, change this option accordingly.

Choosing the optimal refresh rate
That’s about it for adjusting your external monitor’s display resolution and refresh rate on Windows 11. We also recommend enabling HDR on the device if it supports it. You’ll find the option to do this back in the “Display” section and click on the “HDR” option. That should uplift your gaming experience by leaps and bounds.
Perform a disk cleanup
Making sure your storage space is adequate for the proper functioning of your Windows 11 PC is nothing but essential for playing video games. Many problems can arise when you’re out of enough memory and storage to impede your gaming experience and obstruct you from playing.
There is a feature in Microsoft Windows that was also prevalent in Windows 10 that helps you check your hard drive for unnecessary files and removes them accordingly. This functionality is called “Disk cleanup” and can be employed on Windows 11 painlessly. You need to follow the steps listed ahead for the best results.
1. The first step is to open the “Files Explorer” system app on your PC. This can be done quickly with the help of your Taskbar or the Windows Start menu. Once done, click on “This PC” from the sidebar to get to the next step.
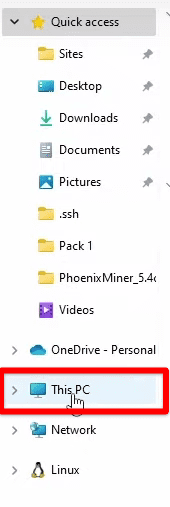
Clicking on “This PC”
2. Double-click on “Local Disk (C:)” to reveal more options. Subsequently, you will have to click on “Properties” to get to the next step. Alternatively, you can also use the “Alt” and “Enter” shortcut key combination here.
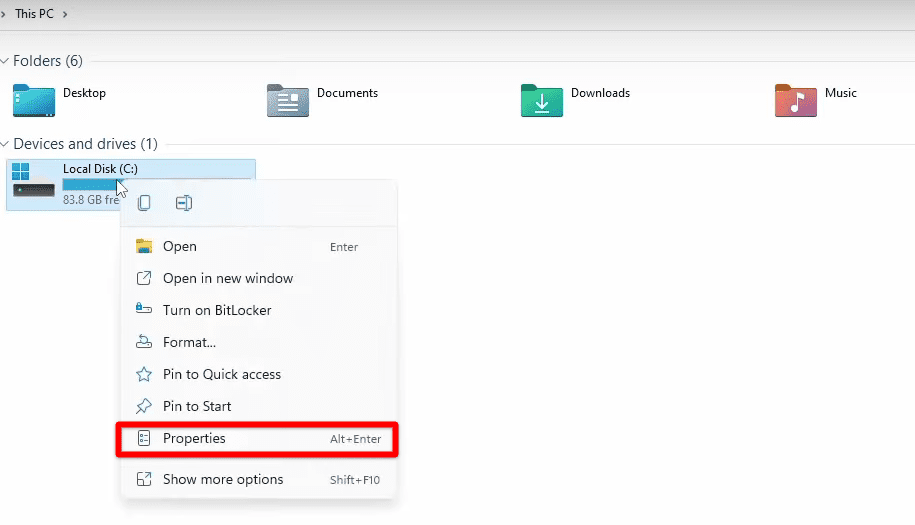
Accessing the “Properties” of the hard drive
3. After this, a window will appear on the screen, and it’s going to be all about the different properties of your Local Disk (C:) hard drive. The next step is to click on “Disk Cleanup.” Doing so should take you to the next step.

Clicking on “Disk Cleanup”
4. After clicking on “Disk Cleanup,” another window on the screen will surface. This will be solely dedicated to cleaning up the hard drive. Now, you can select what individual files you can delete from the available list there. In addition, it’s also worth focusing attention on the “Clean up system files” button. If you have recently upgraded to Windows 11 and do not want to roll back to the previous version of the operating system, it’s worth using the “Clean up system files” button. It will erase major system files related to Windows 10 if you don’t have to do anything with them. Once done, click on “OK.”
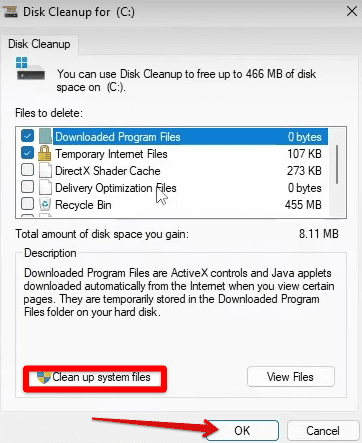
Cleaning up the system files
5. After clicking on “OK,” a confirmation prompt will appear. Click on “Delete files” to finalize the process.
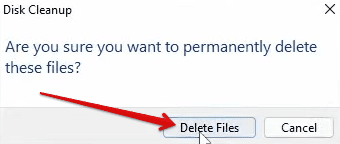
Confirming the deletion
Conclusion
Make sure that you follow the written guidelines carefully for the best results. The combined effect of all the aforementioned instructions will lead you to optimize your system for gaming effectively and avoid the common pitfalls that many players commonly end up getting themselves into. If possible, please comment down below and let us know whether this guide was effective on your end or not.
We’d love to read your feedback!
- In the meantime, here is how you can install classic Windows 7 games on Windows 10.
