Table of Contents
Microsoft Windows is the world’s most popular and incredibly successful operating system that has powered present-day computers with a highly specialized infrastructure. Due to the onset of the internet in the world, we are now more connected than ever and more functional than ever, all thanks to the efficacy of operating systems like Windows. To talk about the capability of said program in a different light, gaming is a widespread industry of the 21st century.
People popularly play games on PC operating systems such as Windows and Macintosh, and there are consoles like Xbox Series X|S and PlayStation 5 to have your fix of playing top-end games. However, all of this refers to the most up-to-date gaming scenario, and times have changed a lot compared to what they once were two to three decades ago. At that time, the era of classing gaming prevailed with the now-legendary consoles of Nintendo, Atari, and Sega.
Many people love to visit or visit classic games if given the opportunity. To talk about one such platform that’ll probably go down as one of the most iconic ones in history, it’s Nintendo Wii U. It was released by the end of 2021 and houses some of the best games ever. So if you want to try the titles of Wii U on your Windows 10 PC, you’ve come to the right place.
In this article, we will show you a simple process of installing the Cemu emulator on your Windows 10 PC that’ll allow you to play Nintendo Wii U games very quickly. Without wasting any further time then, let’s jump right into it.
Playing Nintendo Wii U games on a Windows PC
As mentioned earlier, we have to download install the Cemu emulator, which is a Nintendo Wii U emulator, to get Wii U games on your Windows 10 PC. This is the first step that we have to take. The second would be getting playable games which are otherwise called ROMs. So, without further explaining both processes, let us start with the first stage.
The following steps are going to take it from here.
1. The first step is to get to the official Cemu Emulator website. You can do that using this direct link here. Once you are there, scroll down a little and click on “Download latest version” to start the download of the emulator.

Downloading Cemu Emulator From the Official Website
2. Once you have downloaded the initial setup of the emulator, go into your “Windows Explorer” and find the program. Double-click on it to run it, but make sure you’re running it as an administrator to avoid experiencing any problems. Before you run it, you will also need to extract the files since the program will come in a zipped file format. Right-click on the application and choose “Extract All.”
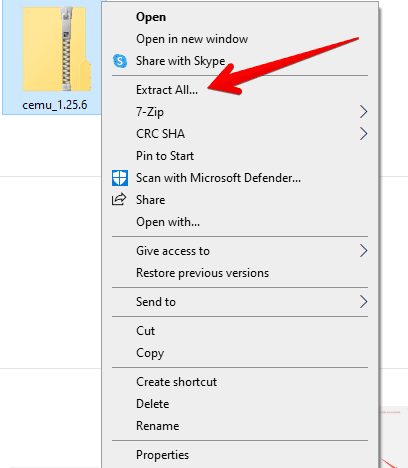
Extracting the Contents of the Cemu Emulator
3. Doing that will open another window on your end. This is where you’ll continue the extraction process. Click on “Extract” to further the scenario.
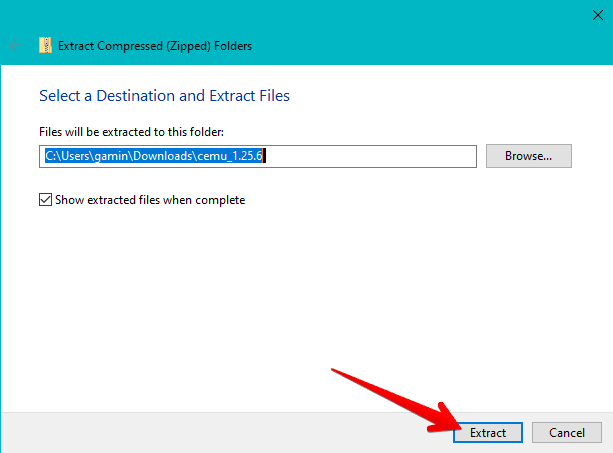
Extracting the Files of Cemu
4. You’re almost done now. The next step is to finally launch the Cemu Emulator and be over with the whole first procedure.

Launching the Cemu Emulator
That’s about it for the first part of this guide. You’re a lot close now to the actual playing part. Now that you have the emulator, it’s time to grab some games. Let’s get into that now.
Grabbing Nintendo Wii U ROMs
The easiest way to play Nintendo Wii U games straight away on your Windows PC is by grabbing ROMs from the internet. These provide a quick and effortless way of firing up some of the best Wii U games on your computer. However, ROMs aren’t a legal source of Nintendo Wii U games. On the other hand, you can buy digital codes from Amazon, the official and most secure purchasing of Wii U games.
It all depends on how you wish to take the matter from here on out. Digital games come with proof of payment and confirm that you won’t be violating any piracy rights or something like that. However, emulators do not require digitally purchased games. You can also get ROMs to do the same thing.
We suggest looking into Roms World for an extensive library of games and many options. Choosing the game will become hard for you as you’ll be overwhelmed when faced this such an exorbitant catalog of Nintendo Wii U games. Make sure that you research properly before trying out a game to see if it suits your tastes or not.
Playing Wii U games through Cemu emulator
Now that you know what to do before getting started with Cemu, the next step is to start playing using the emulator finally. However, to make sure that you have the best time ever playing classic Nintendo Wii U games and getting that native feel on your Windows 10 PC, you should invest some time in optimizing your Cemu emulator. Don’t worry. We are not talking about modifying the source code but using the given on-screen instructions to have a better time playing all those terrific games.
The first thing to check off the bucket list is installing the community-created resource packs, more popularly known as graphics packs, for multiple Wii U games. Doing so can take your gaming experience from one level to the next. It’s recommended either way to have some graphical enhancements present on your machine, so you should get to this right away.
As soon as you launch the Cemu Wii U emulator, you’ll be first shown the “Getting Started” screen. This is where the program tries to fill you in on everything that you can do from the get-go. One of the processes involved will be “Downloading community graphic packs.” Click on the button specified below in the screenshot to get started.
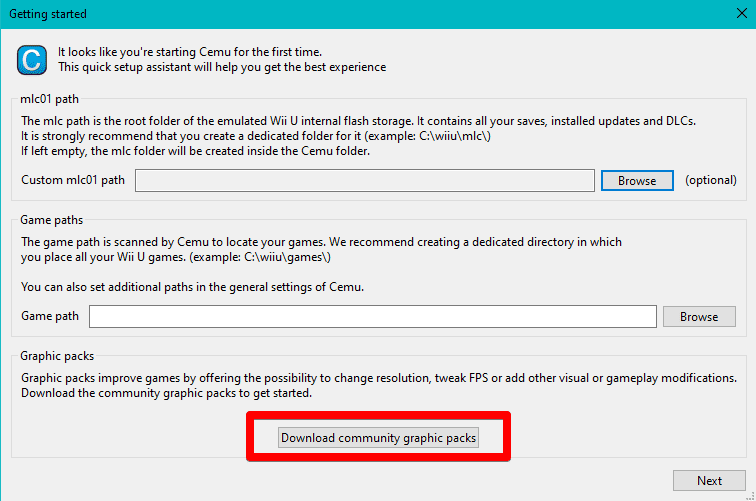
Downloading community graphic packs on Cemu emulator
After clicking on “Download community graphic packs,” the Cemu Wii U emulator will primarily check the version that you have installed on your PC. Right after that, it will commence the download process, and that should take you about 2-3 minutes – no more. The download will extract the downloaded files and install the graphic packs within the emulator. After that, you’re free to go through the list of games and what mods have been downloaded for them for graphical enhancement.
We saw that a 60 FPS upgrade for Batman: Arkham Origins was installed on our emulator, and that’s pretty fascinating. The Wii U is made to run natively on 1920 x 1080 resolution and 60 frames per second, so you’re getting no less than a console experience from this emulator.
So, after you’ve installed the community resource packs, you have one more thing left to do before loading in your ROMs and playing Wii U games. The next task is to set up your input settings. The Wii U’s GamePad controller has dedicated buttons that do the job of acting as a definite input method, but here on your PC, you have a keyboard at your disposal. Therefore, you will have to map your keyboard keys at your very best to have a decent time gaming.
Click on “Configure input,” as shown in the screenshot below, to get started here. Before doing that, however, it’s better to tick off a relatively more straightforward area of settings first. This is specified in the rectangular section in the following image. As you can comprehend, additional options are there to improve the game’s user experience.
First, you can go toggle the “Start games with fullscreen” option to OFF, which we recommend. After that, it’s better to toggle “Check for updates” too so you can have the latest version of the Cemu Wii U emulator always ready for action with newer features and performance improvements. Once you’ve gone through that already, it’s time to get back into configuring your input settings, so let’s check that out right away now.
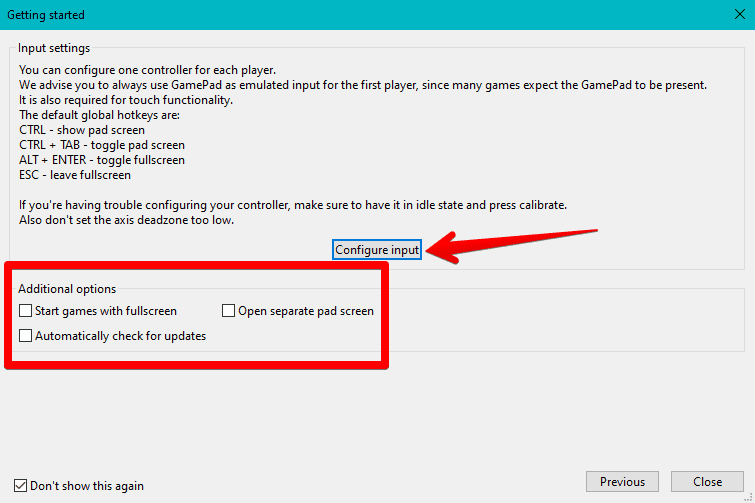
Configuring the input settings
Once you click on “Configure input,” another window will launch simultaneously. This will be a pretty involved section of the Cemu Wii U emulator, but rest assured because it will not be a difficult one. You first have to click on the bar beside “Emulate Controller” and select “Wii U Gamepad” to begin the key-mapping procedure. Doing so will outline the buttons, make them available, and allow you to tweak each key as per your preferences.
Take the following screenshot as a helping hand and acknowledge where to click. You can see that a lot of content has appeared on the page now. Also, you need to make sure that the “Controller API” is set to “Keyboard” if that’s what you’ll be using to play the Nintendo Wii U games. Your next step is to get right into mapping the keys and buttons.
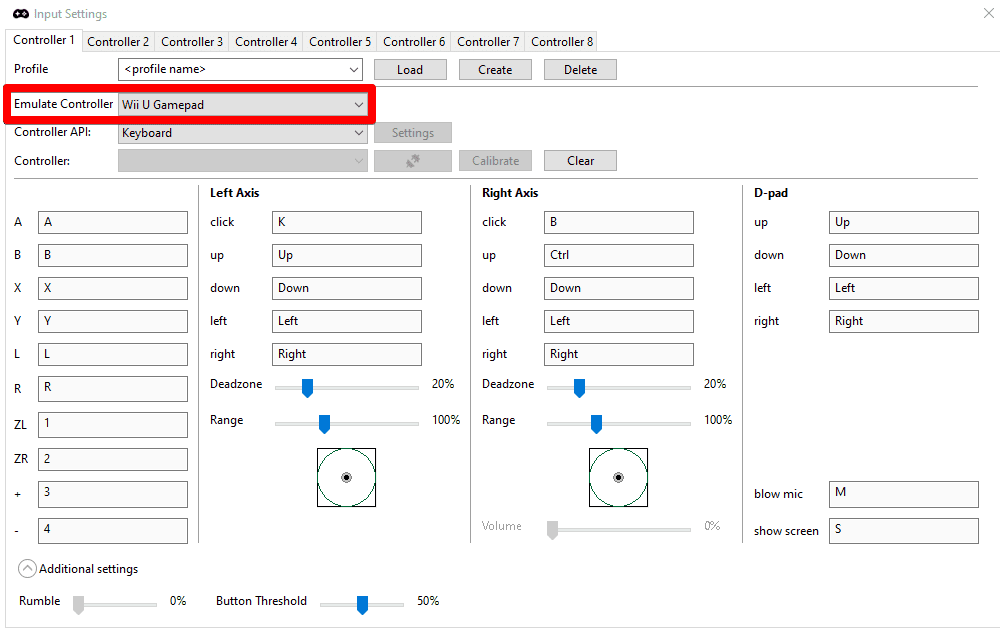
Configuring the controller settings for the Wii U game
The Nintendo Wii U GamePad controller has many keys, but we’ll be replacing their functionality with the keys of our keyboard. The screenshot above merely explains how to set your keys and doesn’t define which ones to set since this is a purely subjective matter. Choose whatever suits you the best to proceed. A helpful tip, in this case, is to increase the “Deadzone” setting a bit to make the games accommodate the PC environment more profoundly.
Once you’ve done all this, it’s finally time to get into loading your ROMs. The ROMs mentioned above World website is a decent place to get started. Still, suppose you’re after a more vast library of Wii U games. In that case, we highly recommend shooting for ROMs Fun, which is another full-featured website dedicated to having the most extensive library of Nintendo Wii U titles.
The Legend of Zelda: The Breath of the Wild is currently the highest downloaded game on the platform, falling just short of Super Mario 3D World. You can visit the linked website to explore more about high-ranking Wii U games, but for this write-up, we’ll show you how to get the said game in a matter of minutes.
Click on this direct link to get straight to the official website page of The Legend of Zelda: The Breath of the Wild. Then, click on “Download” to get to the next step when you’re there.
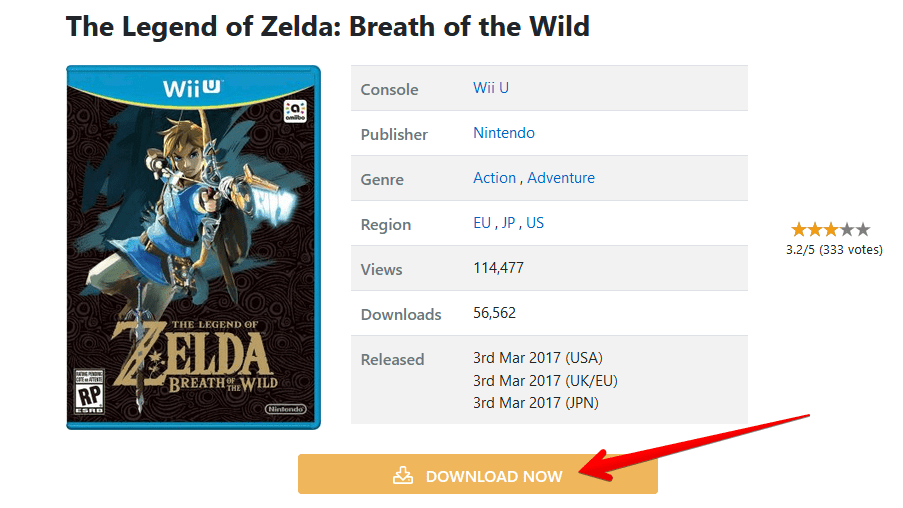
Downloading The Legend of Zelda: Breath of the Wild
Once done, you will be taken to another page. This is where you can painlessly download the ROM for The Legend of Zelda: Breath of the Wild. Next, click on the download link specified in the screenshot below to load another page. The file size is also shown in the area to the right. In this case, it’s somewhere around 13 GB, so depending on your internet connection, it’ll probably be a while before The Legend of Zelda: Breath of the Wild finally downloads.

Clicking on the download link for Breath of the Wild
After clicking on the download link, you’ll be taken to the next page. Make sure to cross out any pop-ups that appear. Finally, click on “Download Now” and follow the on-screen instructions to get the ROM on your PC.

Downloading the game ROM
After finally grabbing the game on your PC, it’s time to fire up the Cemu Wii U emulator again. Click on “File” within the program’s interface at the top toolbar and finally select “Load.” This will launch the local storage of your PC and allow you to choose the ROM easily. Once done, you can finally start playing your favorite Wii U games using a fully optimized experience.
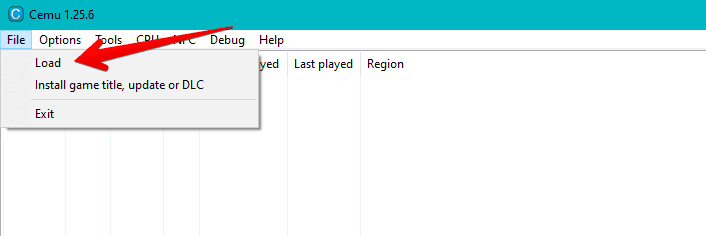
Loading the ROM in the Cemu emulator
That’s about it! The process has been very long so far, but all of it was in the right direction. You’ve now reached the conclusion of the article.
Conclusion
The Nintendo Wii U has a gigantic library of games to boast about, such as Mario Kart 8 and Super Mario Smash Bros., effortlessly taking the experience from one level to the next. To talk about this console itself, it’s loaded with the multi-purpose GamePad controller that takes away the necessity of having a television to play the game. Therefore, it is a very versatile handheld gaming device that features the likes of The Legends of Zelda: The Wind Waker and Batman: Arkham City.
This article has discussed an easy way of running Nintendo Wii U games on a Windows 10 PC. As shown in the article, the process shows the involvement of an emulator called Cemu, which is painless to install and set up. All you have to do is grab some ROMs from the interweb, load them into the Cemu emulator, and enjoy your Wii U games flawlessly. You can also tweak the controls before playing to have the best experience possible.
Please let us know if this write-up gave you valuable information in the comments section. We will greatly appreciate your feedback.
