Table of Contents
Windows 11 is the latest iteration in the family of Microsoft Windows, allowing users to experience a best-in-class operating system in 2022 that’s a ton of steps up from its popular predecessor. Although the program is a visual overhaul and improves upon Windows 10 in many aspects, there are still some features of the latter that have been unable to make it to Windows 11. In other cases, the new functionality is unwelcome, and users want their previous functions back.
One such case is the context menu, which is more of a hassle and less of an improvement in the newest Windows operating system. In this guide, we will walk you through how to get back the 7-Zip right-click context menu in Windows 11 so you can get back to using your PC the same way. Moreover, the forthcoming guidelines will also work for users with the context menu missing on Windows 10.
Right-click the context menu in Windows 11
When you double-click or right-click anywhere on the screen, you visualize what is known as the context menu. This simple, go-to shortcut section allows you to access many compatible applications quickly. For example, tools, programs, and software like 7-Zip or WinRar are best utilized from the right-click context menu. It’s also what you use to maneuver the Chrome browser, especially when you are not too fond of using keyboard shortcuts.
The original Windows 10 context menu is plain and straightforward, but the developers thought it fit to upgrade the feature to a higher level for Windows 11. To access the proper context menu that grants access to usable tools, you first need to perform a right-click, then hover over “Show more options” and click on it again to get the actual context menu. This may not sit well with a plethora of users, so it’s imminent for individuals to start demanding a change in this respect.
With no further ado, let us get right down to the matter and talk about reverting the context menu to the original one on your Windows 11 PC.
The following instructions are going to work for not only Windows 11 but for Windows 10 as well. Although we will write down the steps as plainly as possible to the best of our ability, please try to implement them on your end diligently for the best results.
1. first, open the Windows Start menu and type in “Registry Editor.” Click on the system utility once done. Run the program as an administrator for the best results and unbounded access. You must confirm the User Account Control (UAC) prompt afterward.
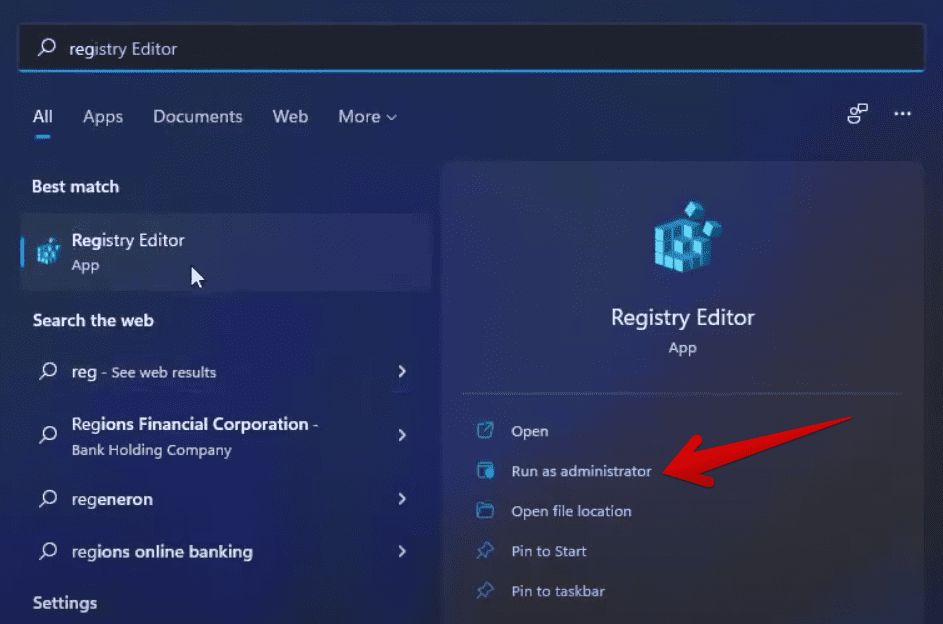
Running the Registry Editor with admin privileges
2. Now that you have the Registry Editor application up and running, you must focus on the side panel and click the “HKEY_CURRENT_USER” directory. Doing so will reveal multiple options on the screen for you. Proceed by clicking “Software,” and follow it up by selecting “Classes” next.
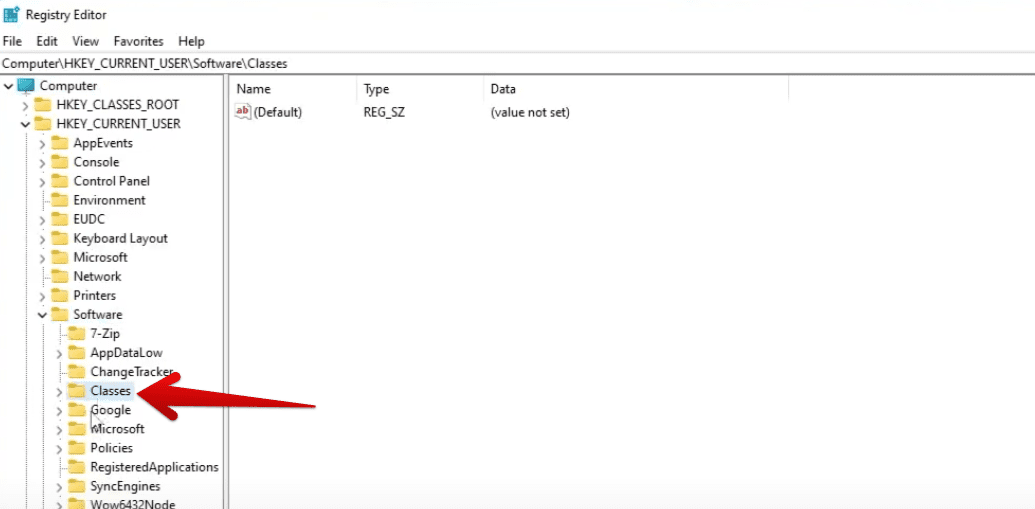
Heading to the correct directory
3. You must now click on the “CLSID” directory and right-click there to create a new “Key.” Check out the following screenshot for a visual explanation. Until now therefore, you should follow the address below to complete the process successfully ahead.
HKEY_CURRENT_USER > Software > Classes > CLSID
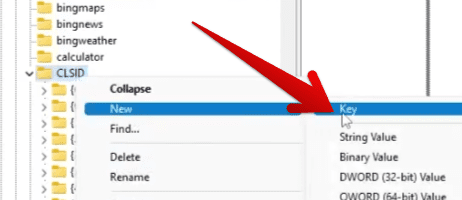
Creating a new key within the CLSID directory
4. This new key has to be named”{86ca1aa0-34aa-4e8b-a509-50c905bae2a2}.” Please do not make any errors in inputting the name of the key, or the process will not bear fruit otherwise. Now, after renaming the key, you must create another key within this key and name it “InprocServer32.”
Now, click on the “(Default)” file that you see on the right-hand side of the opened window, and you should see the “(Value not set)” remark under the “Data” option. Double-click here and click on “Modify” to move forward.
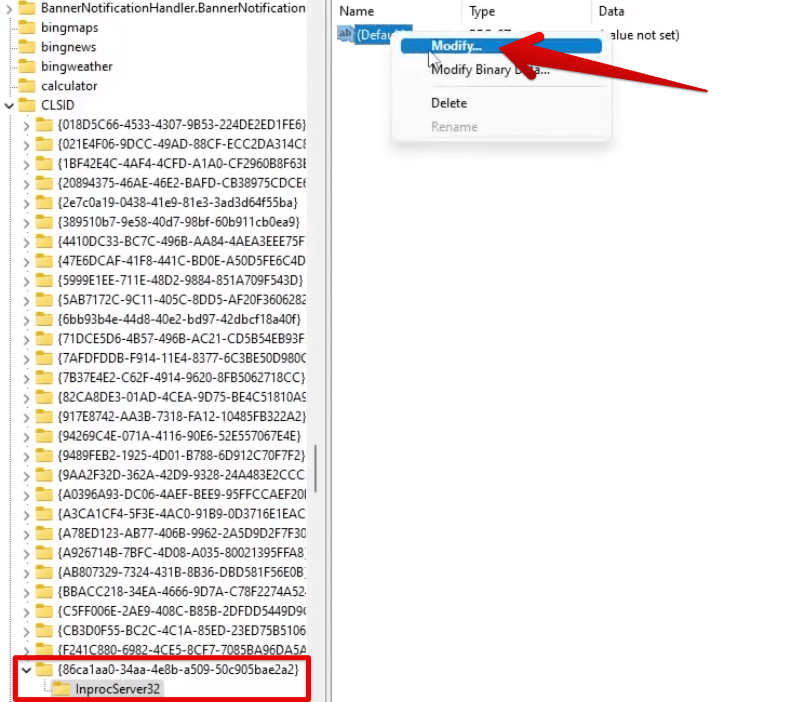
Modifying the newly created key
5. Completing the previous step successfully should open the “Edit String” window. You’ll do nothing here and click “OK” to leave things as they were. However, if you notice, the “(Value Not Set)” remark won’t be present anymore within the “Data” section. If you’ve done everything correctly up until now, the next step is to restart your PC.
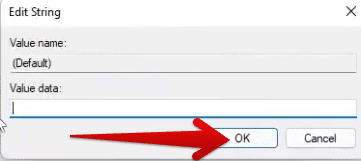
Leaving the window as it is
That’s all there is to the process! After restarting your PC, double-click anywhere on the desktop to return the 7-ZIP context menu on your Windows 11 or Windows 10 PC. It’s time to conclude the article.
Conclusion
Windows 11 might be the next big thing, but there are still some instances where it has left users wanting the functionalities of Windows 10. One buzzing case is the presence of an additional right-click context menu that you’ll need to navigate to get the fully functional menu back. Well, now that you’ve gone past this issue using this guide, you hopefully won’t be running into any like-minded problems again.
Do let us know whether you found the guide helpful for your cause. We would love to read your feedback!