Table of Contents
Fallout 3 is an action, open-world RPG (role-playing game) released and created by Bethesda all the way back in 2008. Fallout 3 became a huge classic and aged like fine wine over the years. It was the first of its series that really caught on and became a complete sensation in the gaming world. Fallout 3 amassed thousands of gamer fans of its franchise, who still to this day play and love Fallout 3.
Not to question or doubt Fallout 3 as the timeless classic that it is, it was designed to run on clunky, old, and low-end hardware. Today’s computers and operating systems have long overtaken the technology from 2008, therefore causing Fallout 3 fans problems. The game was not meant for operating systems like Windows 10 or advanced computers. Thus, it fails to run on these systems, leaving the Bethesda fans frustrated smoothly.
Running Fallout 3 on Windows 10
However, when there is a will, there is a way. And with Fallout fans, there is always a will to make their game work. Fallout 3 fans have found ways to make the game work on newer, faster PCs without a hitch, and if you want to do the same, you have come to the right place. We are going to list the top solutions the Fallout community could conjure up. So, without any further ado, let us learn how to run Fallout 3 on Windows 10!
Solution 1: Run Fallout 3 as an Administrator
A lot of programs fail to run or just crash if they do not have Administrator privileges. People have reported that this is often the case with Fallout 3 as well, and if you grant the game Administrator privileges, it works smoothly. The good news is that running any program as an Administrator is very easy to follow. You can also configure a program’s settings such that Windows will always run it as an Administrator, and you will not have to worry about granting it permissions all the time.
So, let us get into it. Navigate to the Fallout 3 folder, which is usually found in the Steam directory. By default, you can find it at the address below.
Drive: \Program Files (x86)\Steam\steamapps\common\Fallout 3 goty
or simply,
Drive: \Program Files (x86)\Steam\steamapps\common\Fallout 3
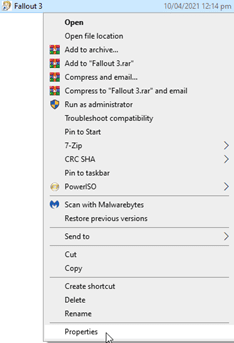
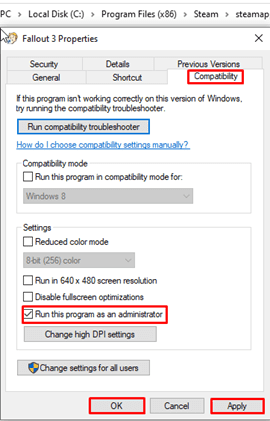
Once you have found the Fallout 3 .exe file, right-clicking it and selecting the option that says ‘Properties’ from the drop-down menu should do. Next, heading over to the Compatibility tab and checking the “Run as an Administrator” option should do. Click Apply to save changes and then hit OK.

Opening Properties

Running Fallout 3 as an Administrator
You should now launch Fallout 3 and see if it is back in order or not. If it is not, then move on to the next solution.
Solution 2: Running Fallout 3 in Compatibility Mode
The most common of all problems Windows 10 users face when running an older program or game is that it is not compatible with their operating system. Fallout 3 is not officially compatible with any new Windows – 8, 8.1, or 10. Once a game runs its course of a decade or more, compatibility issues begin to infest its experience. The same sadly occurred with Fallout 3. But it is nothing irreversible because, with another simple and easy solution, you have a decent shot at fixing the compatibility problems.
As you did in Solution 1, navigate to your Fallout 3 folder in your Steam directory. Right-clicking the .exe file and opening Properties as mentioned earlier should do.
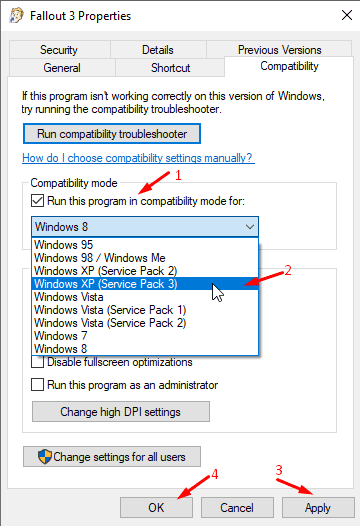
Like we showed you before, go to the Compatibility tab and enable the “Run this program in compatibility mode for” option. Click on the drop-down list and select the entry for Windows XP Service Pack 3. (Best suited Windows to run Fallout 3). Click Apply to save your newly made changes, and then click OK.

Running Fallout 3 in Compatibility Mode
Run Fallout 3 now and check to see if the issue you had been facing is now resolved or not. If this method does not work for you either, try to play around with it for a bit – change the compatibility mode operating system to Windows 7, for instance. Try different things until all hope seems lost, then move on to the next solution.
Solution 3: Editing the Falloutprefs.ini File
Another promising method to run Fallout 3 devised by fans is to edit one of its files manually. “Falloutprefs.ini” is a configuration file, and it has been reported that once tweaked correctly, it fixes all problems. So, let us put this claim to test today.
Start by going to the following directory and locate a file called falloutprefs.ini.
My Documents\My Games\Fallout 3
You can open this file in Notepad so that you can edit it. Find in the file where it says,
bUseThreadedAI = 0
and change the 0 to a 1. If you cannot find the line in the first place, add it in a new line yourself.
bUseThreadedAI = 1
Now, you must add another line of code in the falloutprefs.ini file, type in a new line:
iNumHWThreads = 2
Please save the file by pressing CTRL + S on your keyboard and close it. Run Fallout 3 and check if the modifications you have made to the falloutprefs.ini file have put you back in business or not. If they have, awesome! But if you are still struggling, we have one more solution that you can try.
Solution 4: Installing “Games for Windows Live” Application
Fallout 3 demands an additional dependency to go with its setup – an application called Games for Windows Live. You can easily download this app and get it up and working in no time; follow the instructions below.
Click here to download the Games for Windows Live installer. Once it is finished downloading, open the directory where you saved it and run it. Follow the on-screen guidelines provided by the installation wizard and complete the installation process. Once it is complete, run the application, and you will see that it automatically downloads all the necessary files for Fallout 3 on your computer. As the download is finished, close out of Games for Windows Live and launch Fallout 3. Check to see if the issue you were facing previously persists or not.
Conclusion
In this article, we went over 4 promising ways you can run Fallout 3 on Windows 10 smoothly. Hopefully, it was an informative and helpful read for all of you. Lastly, if you guys came across a hurdle while following any step, make sure to let us know about it in the comments below.
