Table of Contents
Sometimes more the hardware that you have rather than the software can potentially cause the operating system to become buggy in some ways. Therefore, you have to look out for both of these major factors if something starts to slip out of proportion. The Windows Explorer application is a system program that can often crash repeatedly and make it impossible to use the app. If you’re experiencing something similar at the moment, Windows Pixel has you covered.
In this article, we will talk about 10 tips to fix when Windows Explorer keeps crashing, so you no longer have to miss out on this primordial Windows feature and can restore the system to its perfect working condition. Let’s get started right away without wasting any further time, but first, a brief overview of the Windows Explorer system app.
What is Windows Explorer on a Windows PC?
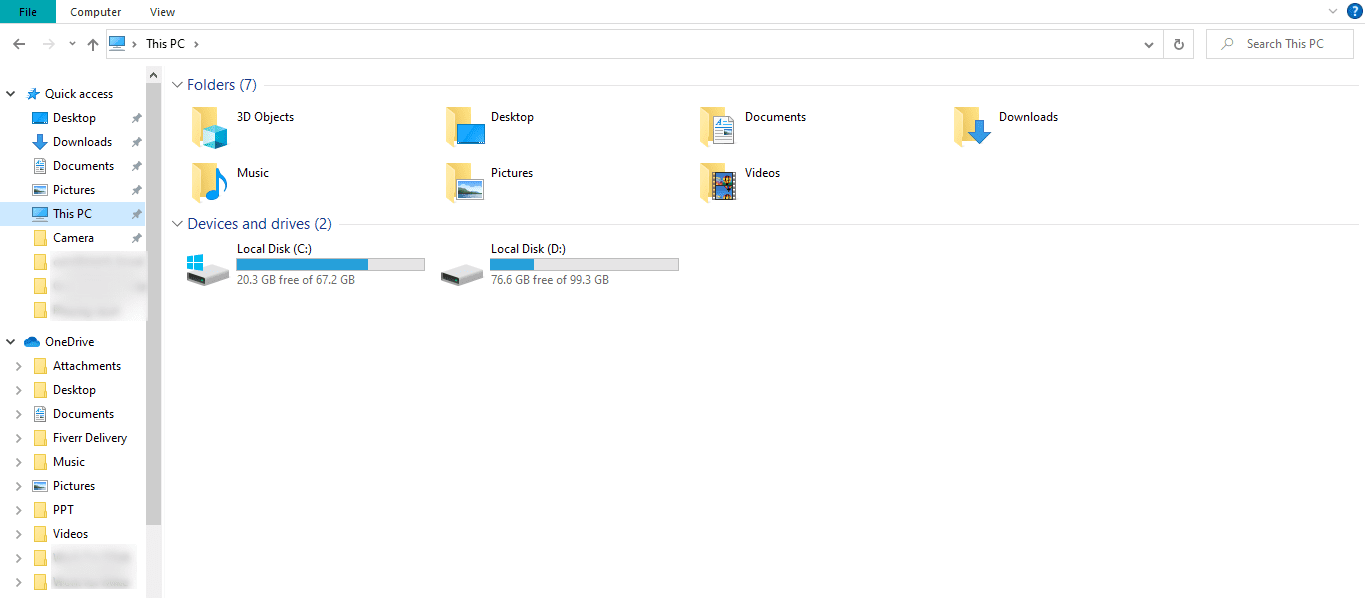
Windows Explorer main user interface
Windows Explorer or File Explorer is one of the major applications of the Microsoft Windows operating system. You can browse files, look for your download, analyze main configuration data, check out your storage, assess remaining storage, and just about everything else using the Windows Explorer application.
Now that you realize how important Windows Explorer or File Explorer is for your computer, it’s time to get into its crashing issue and lay down the best tips that you can help you resolve promptly.
Best tips to resolve the Windows Explorer app crashing issue
The following is a hand-picked list of the best solutions for fixing the Windows Explorer app crashing issue on a Windows PC.
1. Restart the PC
We’re going to start with something fundamental here. It’s not uncommon for people to use their PCs for an absurd amount of time without allowing them to have a fresh restart. What usually happens is that users close down the clamshell of their laptop and let it render into sleep mode or a hibernate period. That is to say, as soon as you open up the computer, it’ll start right back up, usually taking you to the log-in page.
If you see yourself getting pictured by the statements above, the Windows Explorer crashing issue can result from not restarting the PC in a long time. Your desktop operating system might have a ton of background processes running, too, that just might not be leaving enough resources for the Windows or File Explorer app to launch or run correctly. Restarting the PC will help take care of all these crucial things, so you shouldn’t be wasting any time rebooting your device now.
Doing this is painless and very easy. All you have to do is click on the Windows Start icon in the bottom-left corner of the Windows interface. Once done, you’ll be able to select the “Power” key right above the Windows Start icon. Click on it and choose “Restart” to finalize the process without breaking a sweat.
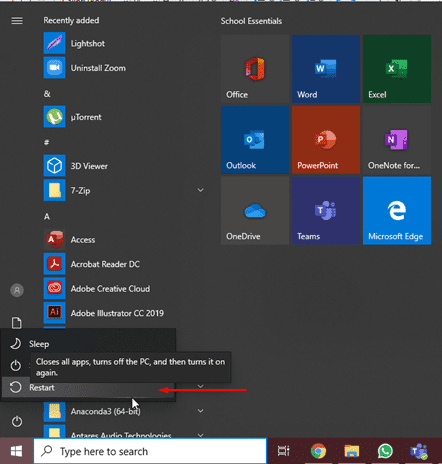
Restarting
Excellent job on restarting your PC! Once the device boots back on, try launching Windows Explorer and see if you still encounter the consistent crashing issue. Hopefully, the issue has been resolved now, but keep reading for more potential solutions if it hasn’t. The fixes will start to get more involved from here on out chronologically, so make sure you’re following the instructions.
2. Update your Windows PC
Having outdated software on any device, whether an application, a separate program, or an operating system, is never a good thing. This can cause a variety of issues on your PC, and the Windows Explorer crashing problem can be one of them as well. The developers remain hard at work to make Windows 10 or 11 stay at the highest tier of all desktop operating systems in the world. In doing so, you’ll find that they release updates for Windows in a periodic manner.
This is why you should always be cautious about the version of Windows you’re running on your computer. The following steps will guide you on checking your Windows PC for updates.
1. The first step is to open the system’s “Settings” application by looking it up through the Windows Search bar or launching it from the Taskbar of the Windows interface.
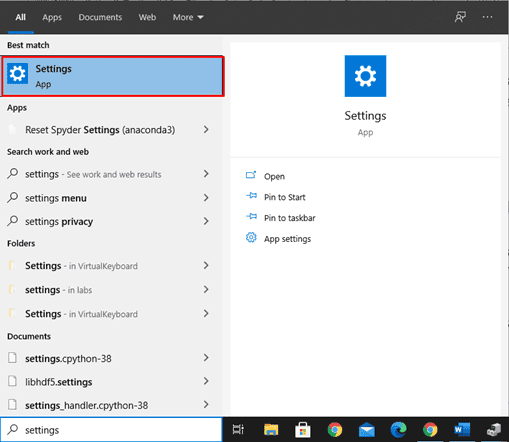
Opening the “Settings” system app
2. As soon as the Settings app opens up on the PC, the next step is to click on “Update and Security.” The following screenshot is a visual explanation of what to do in this step.

Clicking on “Update and Security”
3. There will be an option of “Check for updates” here. Click on it promptly to verify whether there are any other system updates for you in the pipeline or not.
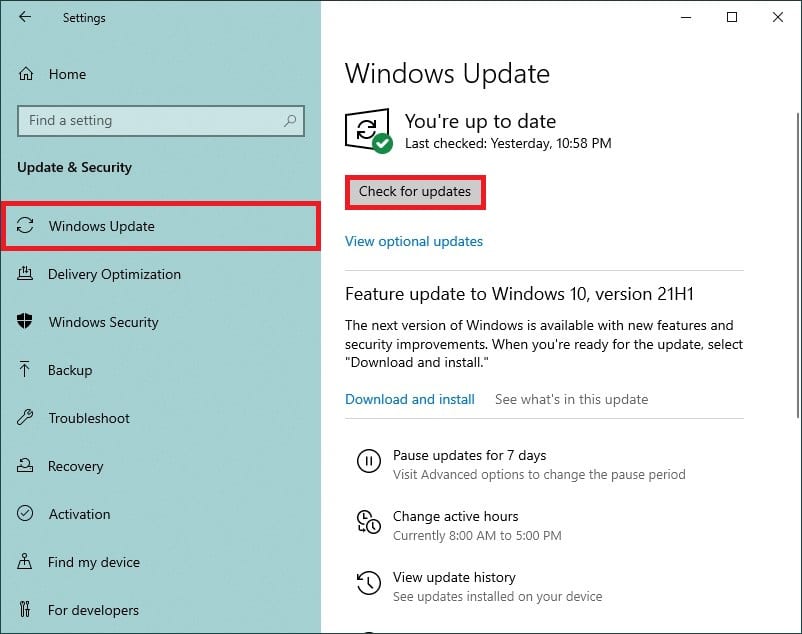
Checking for updates
4. If the system returns you with an available update, make haste to click on the “Install now” button. That way, you will be updating your Windows operating system to the latest available version for its optimal functioning. The screenshot below is just for reference purposes, and you may see a different update description than the one shown in the image.
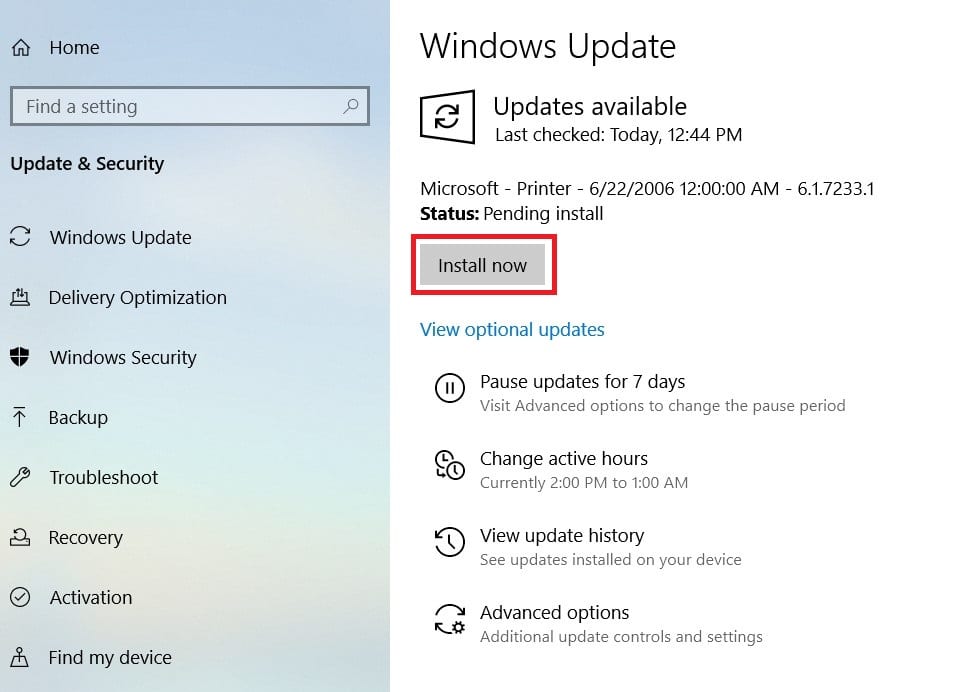
Installing updates
That’s about it for installing updates on your Windows 10 or 11 PC. You will now be notified to reboot the device for the changes to apply to your computer. That will only happen as soon as the updates finish their respective download.
As soon as your device boots back on, please check whether the Windows Explorer crashing issue has been resolved now or not. Launch the application and try using it. Ideally, it should not give you any more trouble now, but if it still does, do keep on reading for more ways to fix this annoying problem.
3. Clear the history of Windows Explorer from the Control Panel
Windows Explorer starts accumulating search history as you use it on your device for multiple years. Numerous issues can arise when unsupervised for too long, including the Windows Explorer crashing problem. That is something you don’t want messing up your PC’s integral functionality. Therefore, all we need to do is head over to a specific application and delete Windows Explorer’s history from there.
1. The first step is to open the Control Panel on your Windows PC. This can be done quickly by searching for the app through the Windows Start menu. Type in “Control Panel” and click on the relevant app icon when it appears in the section.

Opening Control Panel
2. You’re going to see multiple options on the main home screen. Finding Windows Explorer will be difficult, so we will streamline the process by searching for it directly instead. Use the search bar in the top-right corner and type “File Explorer.” Once done, “File Explorer Options” will appear on the screen effortlessly. Click on the option to get to the next step.
- We are typing File Explorer instead of Windows Explorer in the search bar because the latest terminology for the operating system’s file manager application is File Explorer. However, you can still use the two interchangeably in day-to-day conversation.

Searching for “File Explorer Options”
3. This is where you’ll be able to clear the history of the File Explorer system application within the “General” tab, to be precise. Click on “Clear History” once and then finalize the process by selecting “OK.” That should do the trick for you.
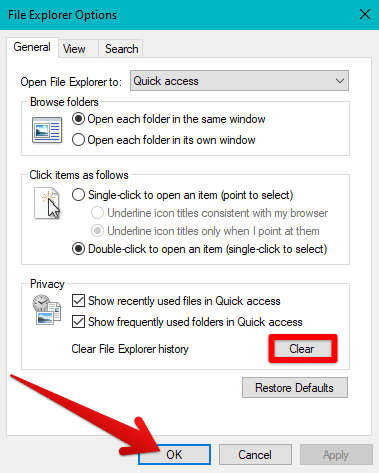
Clearing the history of the File Explorer
You’ve now completed performing this potential fix, so the next logical step is to restart the device and launch Windows Explorer to see if it crashes again. If it’s still giving you trouble, keep on reading because we’ve still got a bunch of solutions to talk about.
4. Relocate the “explorer” folder
This potential fix has been a life-saver for those still using Windows 7. Therefore, this solution is for you if you’re one of these users. However, some people on Windows 10 have also reported fixing the Windows Explorer crashing issue by implementing this fix. What we have to do here is simple. You have to copy a specific folder and paste it into another area of the File Explorer application. With that said, this measure necessitates that you can use the file manager application for a few minutes before it starts to crash.
If this is something that you can easily do, please proceed with this section. If not, continue reading from the next fix. The following steps will explain this procedure in a detailed manner now.
1. The first step is to open the Windows Explorer application on your PC.
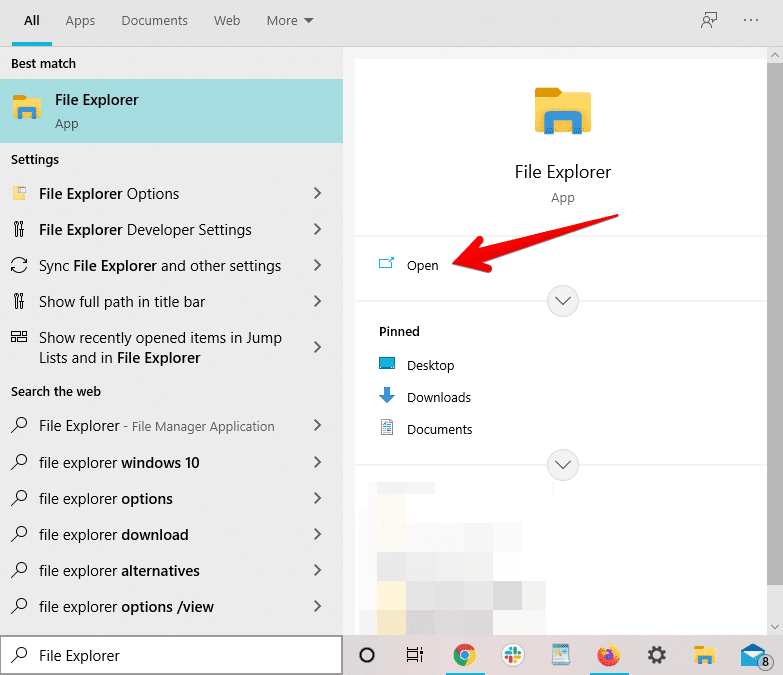
Opening the File Explorer app
2. Once you’ve opened it, use the following path and copy it in the File Explorer’s search bar. Once done, scroll down until you find the “explorer” file. It should be in an executable state. Copy the file by right-clicking on it and then selecting “Copy.”
C:\Windows
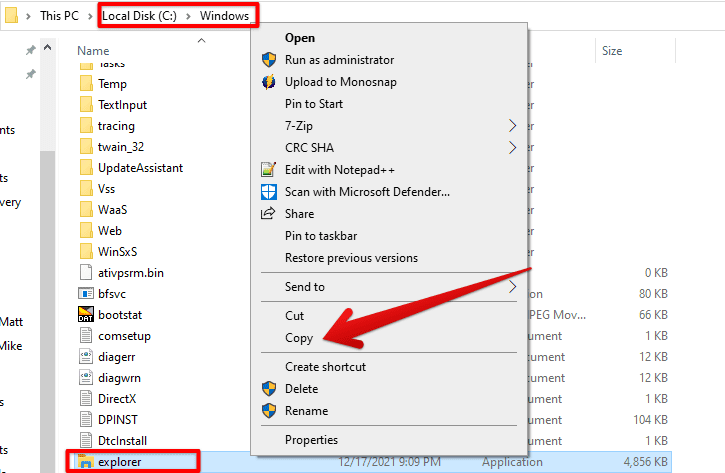
Copying the explorer file
3. Good going so far! You now have to scroll up on the same page and find the “System32” folder. To resolve the Windows Explorer crashing issue, you will be pasting the “explorer” file in that area.
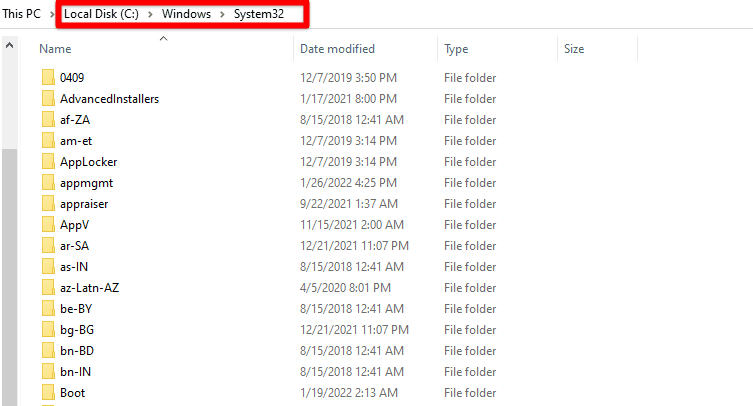
Pasting the explorer file
That’s about it for this fix as well. You have to close the Windows Explorer application and reboot the PC for the best results. After that, boot the device back on and launch the system app in question. Check if it still gives you the crashing bother. Try out this next fix if the problem hasn’t gone away even now.
5. Turn off the Windows Explorer’s thumbnails
More often than not, the thumbnails that appear within the Windows Explorer’s files can cause it to crash. It sounds pretty weird, but it’s a genuine concern, especially if you have low-end hardware. Therefore, this is going to be a simple enough tutorial. We’ll simply be disabling the thumbnails feature of Windows Explorer. It is a depreciating measure, but it gets you back on track using Windows Explorer.
1. The first step is to open the Control Panel.
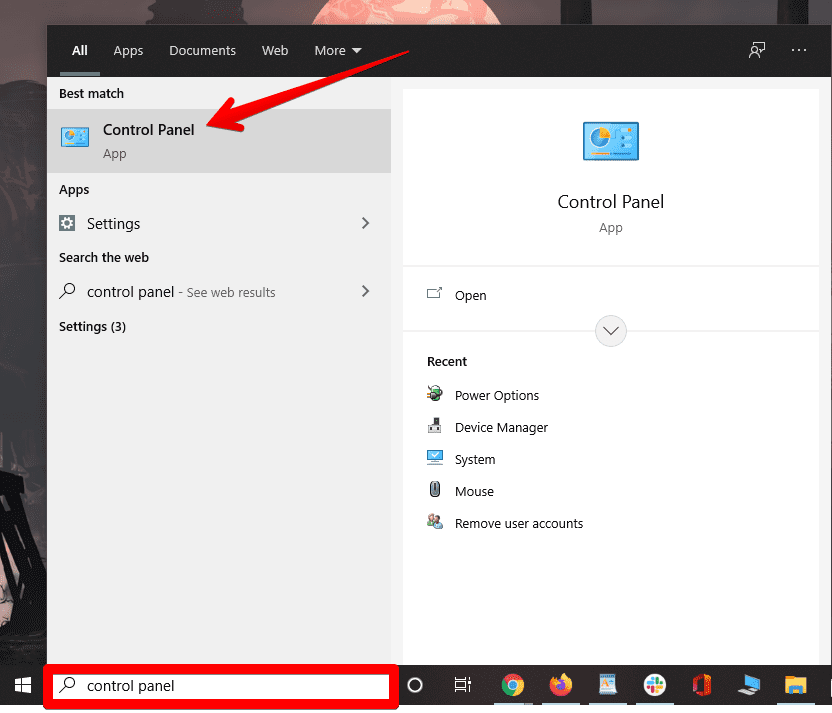
Searching and Opening Control Panel
2. Once done, we have to find Windows Explorer again, similar to how we did in one of the previous sections. Type “File Explorer’ in the search bar and then click on the subsequently appearing “File Explorer” options to get to the next step.

Searching for “File Explorer Options”
3. Completing the last step will open a small window on the screen. To continue, click on the “View” tab in the upper half of the window and then select “Always show icons, never thumbnails.” Finally, click on “OK” to finalize the process.
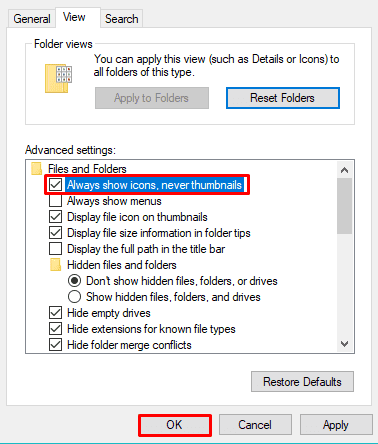
Disabling thumbnails
That’s all about disabling thumbnails on Windows Explorer. Please try launching the application now to see if this fix has solved the issue. Continue reading for more fixes if the problem continues to persist.
6. Perform a socket error recovery
It’s time to tend to the ever-utilitarian Command Prompt for fixing the Windows Explorer consistent crashing issue. We’ll be running a specific command to address any socket error that might have emerged on your Windows PC. This measure has worked for multiple people who have had the same issue as you, so it’s worth a shot. Let’s dive right into the steps required to perform this potential solution.
1. The first step is to open the Command Prompt on your Windows PC. Ensure that you’re running it as an administrator for the best results.
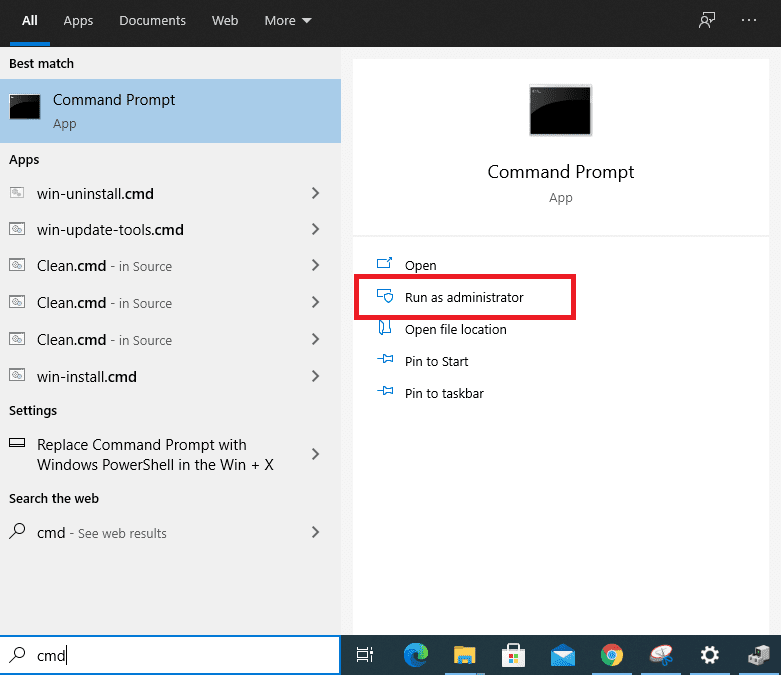
Open Command Prompt as Administrator
2. Copy the following command and paste it into the program. After you’ve finished, press the “Enter” key to continue.
netsh winsock reset

Running a command
3. After pressing the “Enter” key and running the command, the system will briefly return you with “Successfully reset the Winsock Catalog.” However, right below this statement, you will be asked to restart the device for the changes to take effect fully. Therefore, reboot the PC to finalize the process.

Winsock Catalog reset
That’s all about resolving any pertinent socket errors on your Windows device. After restarting the machine, try running the Windows Explorer application to see if you still encounter crashing. Hopefully, you’ll now be able to use the system application error-free, but if the problem still hasn’t been resolved for you, keep on reading as we’ve still got other fixes to try.
7. Employ the SFC tool
Being the full-fledged operating system, Microsoft Windows comprises many different features to help us resolve errors, glitches, and other persistent bugs hindering the core user interface experience. One of these features is the System File Checker tool, the SFC tool. The name depicts checks of the main system configuration files to confirm whether they are in optimal health or if something important is either missing or corrupted.
It is a convenient tool that can help us get down to the bottom of things, especially the Windows Explorer crashing issue. Its working mechanism is pretty straightforward. First, it scans files for any corruption and then substitutes them with appropriately working cached copies previously stored in a specific system folder. Therefore, we will waste no further time giving you easy-to-follow instructions for using the System File Checker tool on your Windows PC.
The following steps are going to take it from here.
1. The first step is to open the Command Prompt on the Windows PC. An easy way to do this is by opening the “Run” program and typing in “CMD.” Doing so will automatically launch Command Prompt on your end, but make sure you’re running the app as an administrator.
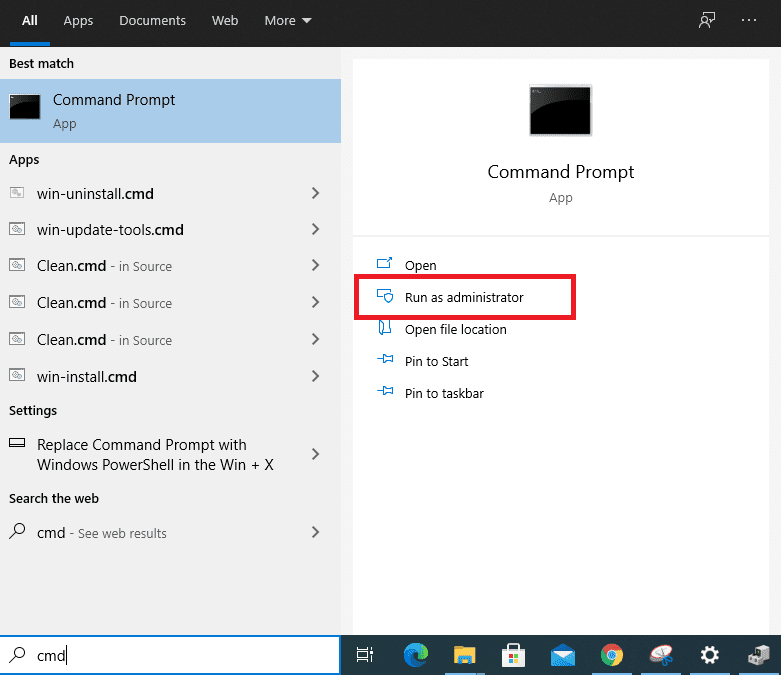
Open Command Prompt as Administrator
2. When you’ve opened up the Command Prompt, you will have to run the SFC command. To do that, copy and paste the following command into your command prompt window and press the “Enter” key.
sfc /scannow

Running the SFC command
3. Doing so will begin the scanning process, which will take some time. Unfortunately, you will have to wait until the scan is complete and the issue has been thoroughly detected. Don’t fret, though, because the wait will be worth it for potentially resolving the Windows Explorer keep crashing issue.

Scanning process underway
That’s as far as we can go for this potential fix. After the verification and the checking process concludes, the Command Prompt will prompt you with the problem and allow you to fix it there and then. However, this necessitates that the program manages to detect something in the first place. If this solution doesn’t work for you, continue reading for more options.
8. Optimize Windows Explorer options
There seems to be another working fix for some users, and it falls under the guise of “Launch folder windows in a separate process.” Usually, anything that you open within Windows Explorer launches doesn’t have a dedicated process allotted to it. Instead, it merges with Explorer’s very own running process and then becomes one system as a whole. This can be undesirable in some cases, so we’re going to try our luck optimizing it for better results.
The following steps are going to guide you on what to do next.
1. The first step is to open the Control Panel.

Searching and Opening Control Panel
2. Once done, we have to find Windows Explorer again, similar to how we did in one of the previous sections. Type “File Explorer’ in the search bar and then click on the subsequently appearing “File Explorer” options to get to the next step.

Searching for “File Explorer Options”
3. Completing the last step will open a small window on the screen. To continue, click on the “View” tab in the upper half of the window and then select “Launch folder windows in a separate process” Click on “OK” to finalize the process.
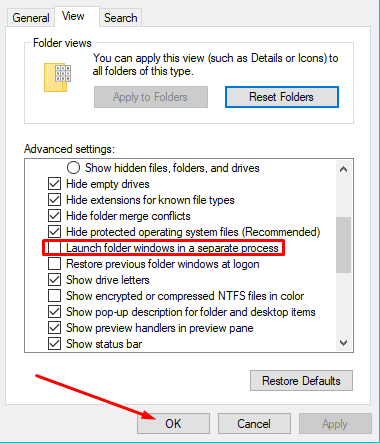
Launching folder windows in a separate process
The ideal step now would be to restart the PC. Once done, use Windows Explorer to see if the issue persists or not.
9. Scan the PC for viruses and malware
Another potential reason might be causing Windows Explorer to crash repeatedly. Although the likelihood is relatively moderate, it is worth scanning your device to see any malware has seemed to creep its way into your PC. The virus might be affecting the functionality of the Windows Explorer only and some other processes that you might be unaware of. This is where the Windows Defender comes in, though, allowing you to effortlessly scan your device and detect any anomaly on the spot.
You’ll find the option to scan within the “Windows Security” section of your “Settings” system application. You must hover over to “Virus and threat protection” and click on the “Scan now” button to begin the process. As you can see in the image below, we’ve already started the scan, and it’s going to take some time before we can finally know the results.
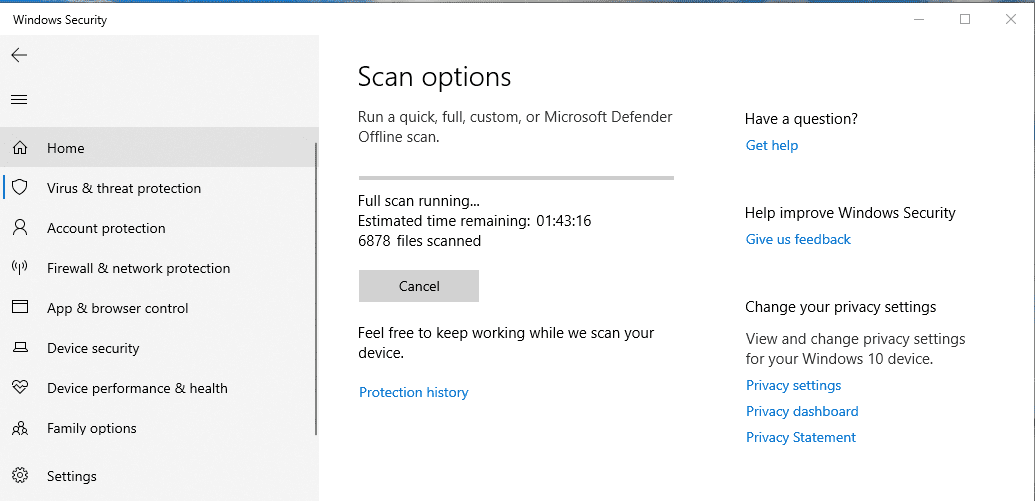
Scanning in progress
An alternative is to go with any other antivirus installed on your PC. Run a scan to see if there’s a virus that needs to be removed off the face of your Windows PC to fix the Windows Explorer crashing issue. Multiple users have found malware affecting their device’s performance, so this is worth a try indeed. Continue reading for the final solution if you’ve confirmed that there’s no virus on your PC or even eliminating the malware at hand hasn’t fixed the issue.
10. Reset your Windows PC
If you’ve exhausted all other options and nothing has worked so far, then we’re afraid you will have to perform a factory reset on your Windows PC and start from scratch. This is one of the most definite fixes of the Windows Explorer app crashing consistently, so rest assured that there’s an excellent possibility of fixing the problem at hand with this potential solution. You can get started with this possible solution by following the steps below.
1. The first step is to open the “Settings” system application.

Opening “Settings”
2. Once done, select “Update and Security” from the options you get on the “Settings” window.

“Update and Security” settings
3. After clicking on the “Update and Security” button, you will have to select “Recovery” from the sidebar on the left. That will take you to the area we need to be in.
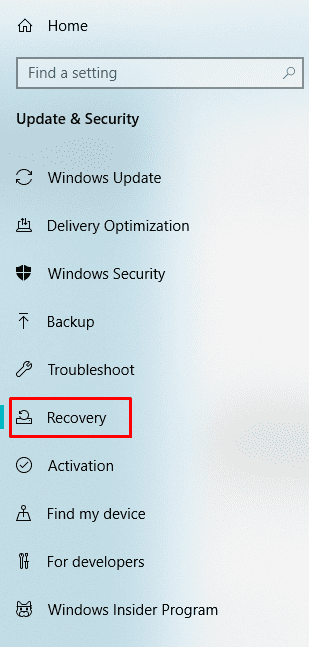
Selecting “Recovery”
4. As soon as you click on the “Recovery” button, you will be transported directly to the settings of this specific section. From here, you will be able to factory reset your Windows PC. Click on the apparent “Get started” button under the “Reset this PC” area to get to the next step.
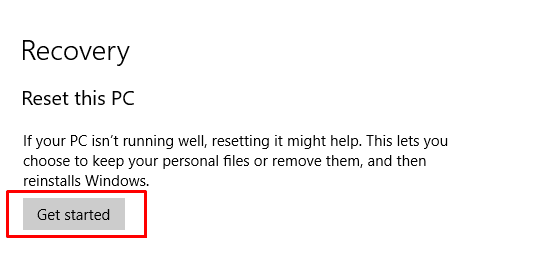
Getting started with the factory reset
5. This is the setup of the reinstallation that will guide you through the necessary steps for initiating a factory reset. One of the first things you’ll have to do is click on “Keep my files” or go for “Remove everything.” We leave it up to you to decide which option to choose, but we will recommend going for “Remove everything.” This is because choosing this option will reinstall every major system component of Microsoft Windows. If you’ve missed fixing a missing or corrupted file on the operating system, this option will help you fix the Windows Explorer crashing issue.
- Please make sure that you’re backing up anything important to you to prevent data loss.
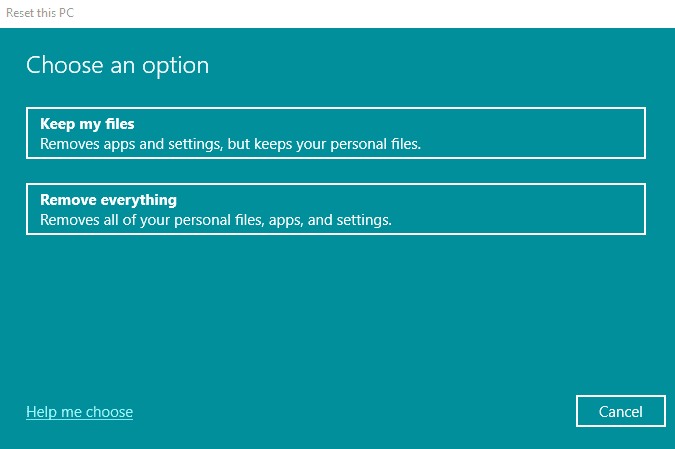
Choosing the correct option
6. The next step after choosing either “Keep my files” or “Remove everything” is to decide whether you’d like to reinstall Windows on your device locally or would opt for a cloud download. We will recommend going for “Local reinstall” in this case for the best results.
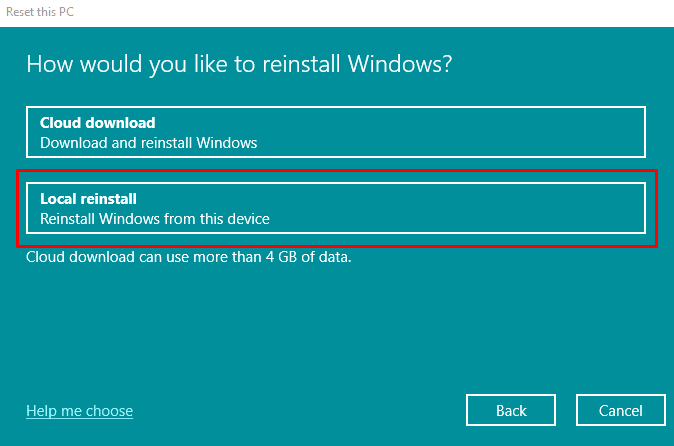
Choosing the local reinstall
7. After choosing “Local reinstall,” you will be required to plug in your PC to a power outlet if you haven’t already. This is because your device’s battery might run out before the Windows reinstallation process finalizes. In that case, you might be setting yourself up for a risky endeavor. Therefore, it’s best to avoid further issues and start charging your laptop instead.
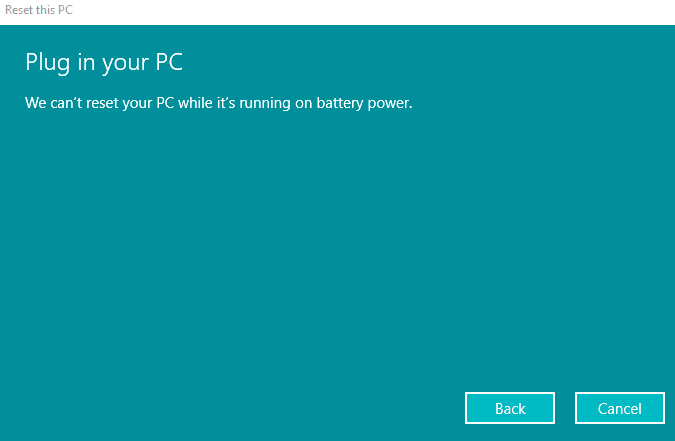
Plugging in the PC
8. After plugging the device in, you will be shown a warning prompt while the desktop makes the transition and prepares itself to reset the device. Click on “Next” to get to the next step of the process.
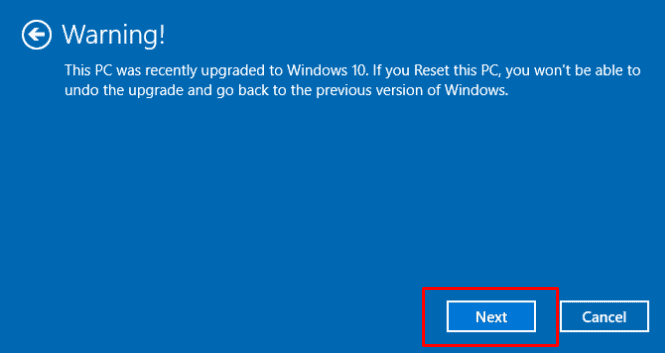
Clicking on “Next”
9. After clicking on “Next,” you no longer have multiple steps to go. All that’s left to be done now is to review the changes implemented on the PC and click on “Reset” to begin the process. Please make sure that you’ve read the changes carefully and are satisfied with your decision before going all-in with the factory reset.
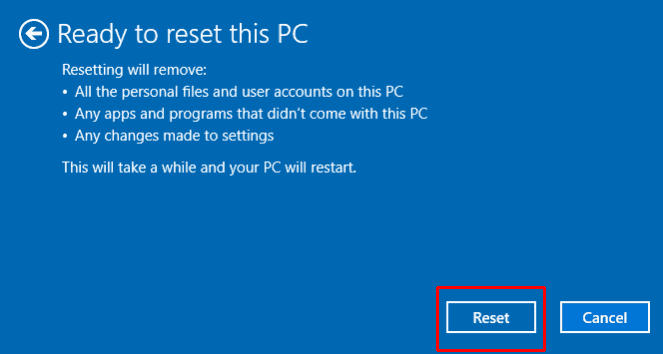
Resetting the PC
That’s about it for this fix! Right after you click on “Reset,” the procedure for resetting your PC will commence. You’ll have to wait a considerable time here and follow the on-screen instructions wherever necessary to complete the reset. Once you can use your PC again, please try using the Windows Explorer application to see if the problem has been resolved. Hopefully, you’ll use the system application without the crashing issue.
Conclusion
The Windows Explorer app on Windows PCs is one of the most crucial system programs that have been provided to users by the developers. Without the optimal functioning of the Windows Explorer, it can get rather hard to use the device, simply because of how important a role it plays in this full-fledged operating system.
This article has discussed the top 10 tips to fix Windows Explorer’s crashing problem. After going through all of the potential fixes detailed above, you should be using the app error-free on your Windows PC now. Please let us know in the comment section if you could figure out the issue. We’d love to hear your feedback!
