Table of Contents
Windows 10 is one of the best operating systems out there with a diversity of processes and programs. Some are simple, while others are hard to understand. One such area where computers depend upon for most of their functionality is memory. You probably know how RAM is a crucial part of every computer, and if the performance of the device were to slow down, the internal memory is one of the first things that people look at. Aiding the internal memory is a neat process that not many people know about—virtual memory.
In this article, our concentration is going to be on virtual memory. We will discuss what this process really is and how you can increase the virtual memory on Windows 10. Let’s jump right in.
What is Virtual Memory on Windows 10?
Virtual memory is an important feature in Windows 10 that allows you to relocate and temporarily save less often modified pages from RAM to the hard drive. This method allows the system to prefer speedier physical memory for more frequently used processes and apps, boosting overall performance and keeping the device from freezing up if system memory is exhausted.
You can also say that virtual memory is a memory management method that allows secondary memory to be used in the same way that primary memory is. Virtual memory is a commonly used method in computer operating systems.
Virtual memory enables a computer to make up for physical memory constraints by momentarily shifting data from RAM to disk storage using hardware and software.
System speed, multitasking, running huge programs, and flexibility all benefit from virtual memory. However, users should not depend too much on virtual memory because it is significantly slower than RAM. When the operating system has to swap data between virtual memory and RAM too frequently, it can make the machine seem incredibly sluggish.
Virtual memory was created when actual memory, commonly known as RAM, was prohibitively expensive. Because computers have a limited quantity of RAM, memory can become scarce when numerous programs are running simultaneously. A virtual memory system replicates RAM by leveraging a part of the hard disk. A system can load bigger programs or many applications running simultaneously with virtual memory, allowing each one to operate as if it had limitless memory without needing to buy extra RAM.
The Functioning of Virtual Memory
To function, virtual memory takes up the hardware of your device and utilizes the software as well.
When a program is running, data is physically stored in RAM. Virtual memory, in particular, will use a memory management unit to translate that address to RAM. The operating system will use page tables and other data structures to create and maintain memory mappings.
The operating system splits memory into page files with a set number of addresses while transferring virtual memory into physical memory. Whenever a page is required, the operating system transfers it from disk to primary memory and converts virtual addresses to actual addresses.
The data can be moved out of RAM and into virtual memory if RAM is required later on. Since the memory manager keeps tabs on the changes in virtual and physical memory, the processes continue reversibly to accommodate the requirements of the computer.
What are the Advantages of Virtual Memory?
Virtual memory has a handful of advantages that Windows 10 can benefit from. Some of these are given below.
- Memory separation lends a higher level of security to the operating system.
- The CPU usage is utilized effectively.
- External fragmentation isn’t necessarily needed.
- Removes the need for programs to maintain a shared memory space.
- Increases performance by taking up more memory than the amount available.
- It is capable enough to accommodate two times the number of addresses as primary memory.
- It can operate several sizable programs at the same time.
What are the Forms of Virtual Memory?
Virtual memory is commonly found in two types—paged and segmented. While both of these can go much in-depth, we are going to talk about them briefly here.
The first one is paged virtual memory. To understand, you need to know that memory is divided into portions called paging files. When a computer’s RAM is depleted, pages that aren’t in use are moved to a swap file on the hard drive allocated for virtual memory. When the swap file is needed, a procedure known as page swapping returns it to RAM. This mechanism guarantees that the operating system and programs on the computer do not run out of physical memory.
Page tables are used in the paging process to transform virtual addresses used by the OS and programs into physical addresses used by the MMU. The page table entries determine if the page is in actual memory or not. The managing unit implements a page fault exception that tells the system to relocate the page back into RAM when resources are exhausted. The virtual address of the page appears in the page table when it has been loaded into RAM.
Now, the other type to explain is segmented virtual memory. This type of virtual memory is divided into parts of varying lengths. The virtual memory space on the hard disk can be used to store segments that are not in use in memory. A segment table keeps track of segmented data or processes, indicating if a segment is available in memory, or if it has been updated, and its physical location. Furthermore, with segmentation, file systems consist of a list of segments mapped onto a process’s possible address space.
Changing Virtual Memory on Windows 10
Thankfully, you can change virtual memory on your device when your primary memory is running low or when you want to speed up the performance of your computer. You can increase the virtual memory on Windows 10 using settings. The following steps will tell you how to do it.
1) To increase the virtual memory on Windows, first, open settings by typing “settings” into the search bar, then click on “system.”
2) After you have opened the “System” folder, click on “About” and then click on the “System info” option on the top right corner under the “Related settings” section.
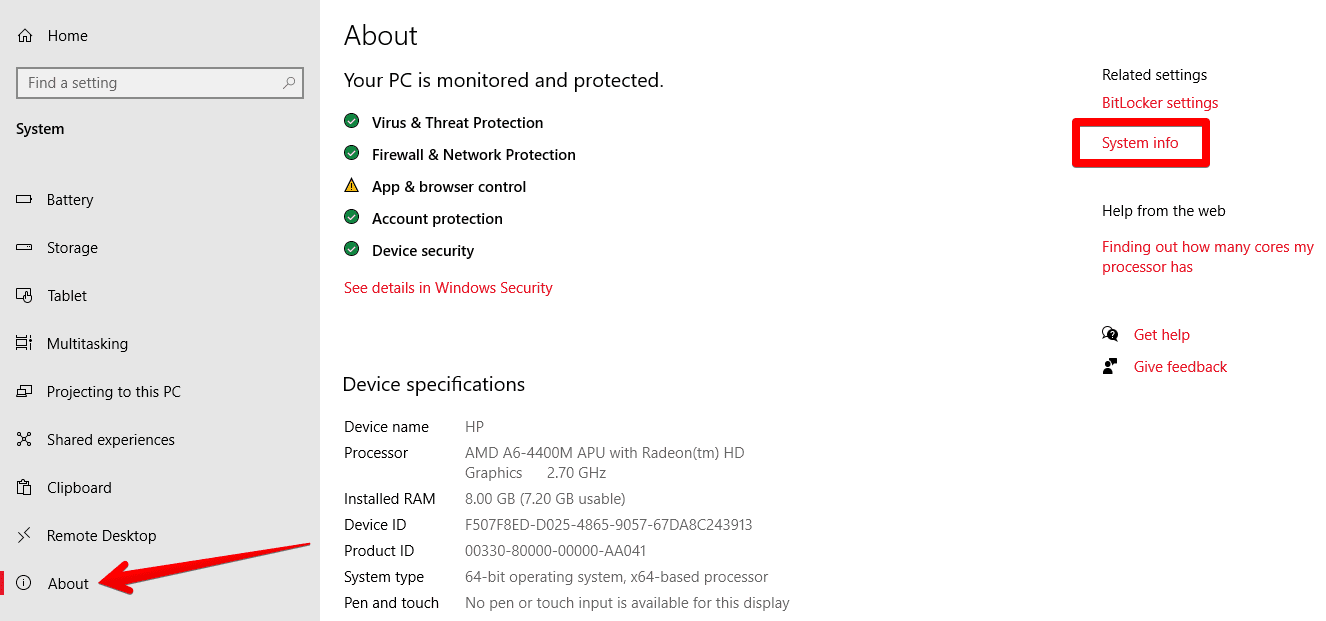
Opening System Info
3) Now, click on the “Advanced System Settings” option on the left side.
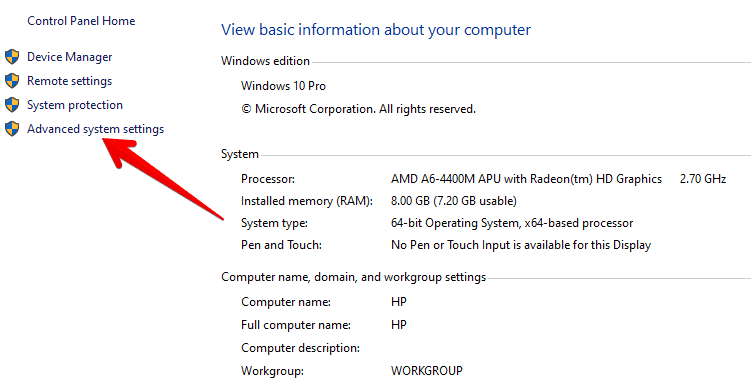
Clicking on Advanced System Settings
4) Under the “Advanced” tab, click on “Settings” under the “Performance” section.
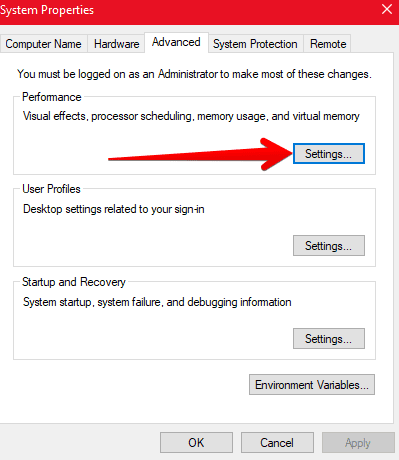
Clicking on Settings
5) After you have opened the settings, click on the “Change” button under the “Advanced” tab.
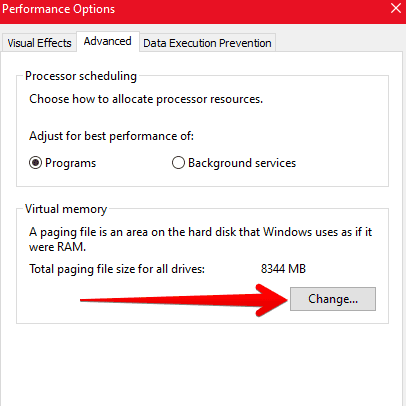
Click on Change
6) Now, you will untick the “Automatically manage paging files size for all drives” option. After that, select the “Custom size” option and then enter the Initial size and Maximum size of MBs as per your requirement and then click on the “Set” button.
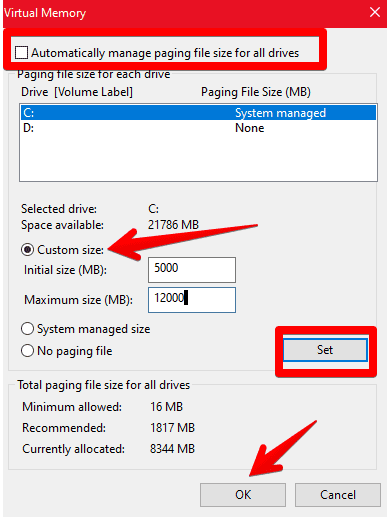
Increasing Virtual Memory
8) In your final step, you will click on “OK” twice and then restart your device.
That’s about it! After restarting your device, your virtual memory will be changed, and you’ll be good to go.
Conclusion
Virtual memory is what Windows uses when things get difficult to keep up with. It has its advantages and disadvantages and can be effectively used to speed up your device’s performance. In this article, we’ve discussed the major aspects of virtual memory and focused on changing it. We hope that you’ve learned a thing or two reading all this.
