Table of Contents
Windows 10 is a complex operating system that has multiple processes running for it at once. When things get complicated, some hiccups are bound to come up here and there. On Windows Pixel, we have covered various error fixes for Windows 10, such as Bad System Config Info, Potential Windows Update Database Error Detected Issue, and Windows Update Cannot Currently Check for Updates Error. However, it’s about time that we focus on another error that comes into effect when there’s an update process involved and typically shows you the “0x800705b4” code.
Fixing the Windows update error 0x800705b4
It’s important to know that this error code is related to Windows Defender, and tweaking with that component has solved many issues. Previously, users couldn’t update their computers, but the prospect is very much possible now. Therefore, in this article, we will discuss the methods involved in fixing the Windows update error 0x800705b4. So, without wasting any more time, let’s get right into the solutions.
1. Run the System File Checker command
The first method you can use to fix the Windows update error 0x800705b4 is to run the SFC command in your command prompt, otherwise known as the System File Checker command. This utility helps the users of Windows 10 to scan the operating system and check for any corruptions within the databases. By employing such a technique, you can easily find out what’s causing problems in your computer.
To run the SFC command, use the steps given below.
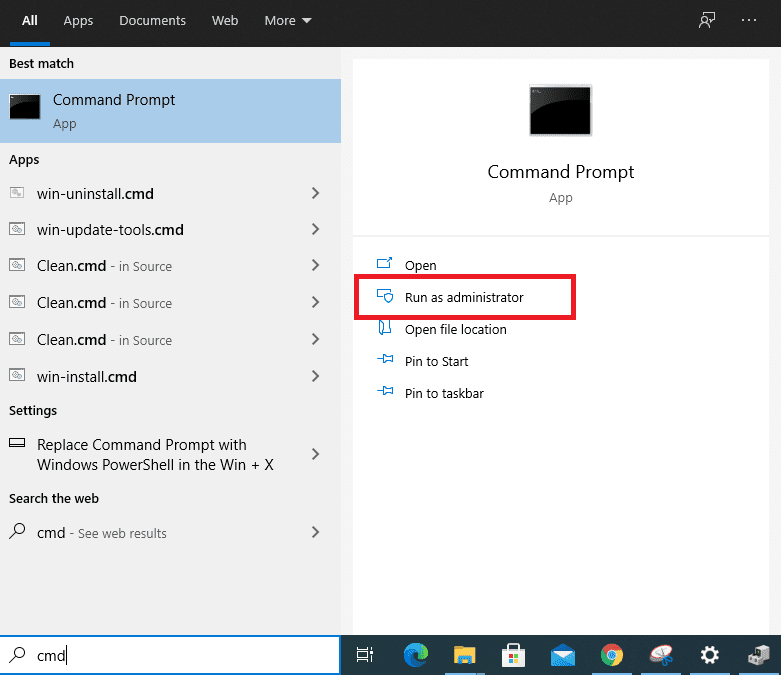
1. Launch the “Command Prompt” on your computer by using the Windows search bar. Make sure to run it as an administrator, so you are not hindered by any permission-related restrictions.
Open Command Prompt as Administrator
2. When you’ve opened up the Command Prompt, you will have to run the SFC command. To do that, copy and paste the “sfc /scannow” into your command prompt window and press the “Enter” key.

Running the SFC command
3. Doing so will begin the scanning process, and this is going to take some time. Unfortunately, you will have to wait until the scan is complete and the issue has been thoroughly detected.

Scanning process underway
This is where the first method of fixing the Windows update error 0x800705b4 ends. After the scan has finished, you will see the problem pop up automatically, prompting you to fix it immediately. If not, let’s continue to the following technique.
2. Check Windows Defender Firewall
Microsoft Windows Defender is an integral part of the operating system that actively provides the security services needed to keep Windows 10 fully secure and protected. It comprises a firewall, anti-virus, and anti-malware. However, the Windows update error 0x800705b4 can often arise due to an issue related to Windows Defender, mainly when it isn’t running correctly. Follow along the step-by-step directions given below to check whether Windows Defender is functioning.
1. Press the Windows and “R” keys together to launch the “Run” feature automatically. Here, you’ll type in “services.msc” to open up Microsoft’s services.

Opening Microsoft’s services
2. The next step is to scroll down until you find Window’s Defender Firewall. What you have to do now is to check under the “Status” column to see if it’s running and also under the “Startup Type” and see if it’s set to “Automatic.” If not, you will have to double-click on Window’s Defender Firewall and set both of those to the relevant settings.
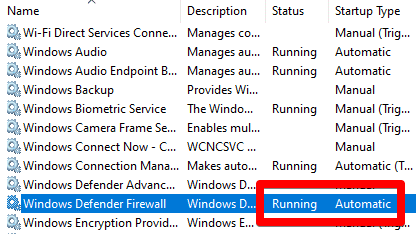
Windows Defender Firewall Running and Automatic
That’s about it for this method. Ensuring that the Windows Defender Firewall service runs optimally is a good way of eradicating the Windows update error.
3. Restart your Windows 10 PC
This is, perhaps, the oldest trick in the book, but make no mistake in acknowledging its efficiency. It’s possible that ever since you’ve encountered the Windows update error 0x800705b4, you haven’t had a chance of restarting your Windows PC. If that’s the case, reboot the computer right away and try updating it again. A soft restart like this is bound to fix any existing problems, and this update error can be one of them. You can quickly do that by heading to your Windows Start menu and clicking on “Restart.”

Restarting
4. Use the DISM command
Another method to fix the Windows update error is to use the Deployment Image Servicing and Management (DISM) tool to cater to your Windows images so they can be prepared, fixed, or serviced to ensure the optimum working of the operating system. The DISM tool is also used to resolve update issues and remove any corrupt files that might be causing the system not to update. The following is a step-by-step tutorial that will take you through running the DISM command-line in the command prompt terminal. Let’s get into it.
1. Click on the Windows Start button and launch the Command Prompt, similar to how you did before.
open command prompt as administrator
2. Next, you have to enter the “DISM.exe /Online /Cleanup-image /Scanhealth” command into the Terminal window and press the enter key to commence the working of the DISM tool.

entering the DISM tool command
3. Once you’ve gone through that command, you’ll need to enter another command in your Terminal window to maximize the efficiency. This command is “DISM.exe /Online /Cleanup-image /Restorehealth,” and you’ll press the “Enter” key after entering it. Do make sure that you’ve launched Command Prompt as an Administrator to run each command successfully.

entering another DISM tool command
If running the DISM tool doesn’t take away your Windows update error 0x800705b4, we have one final method remaining up our sleeves. However, it’s pretty time-consuming, and you will have to make efforts to go through that process. That said, desperate times call for desperate measures, so let’s get right to it.
5. Reset the components of Windows Update
If you’ve tried everything above and have found no luck so far because the issue persists, it’s now a good idea to go forth with resetting the Windows Update components one by one manually. Doing so will allow you to remove the corrupt components of Windows Update that are giving you issues, so let’s dive right in with this process.
1. The first step is going to be the same as the previous method. You will have to open up the Command Prompt. You can easily do that from the Windows Start menu. Just make sure that you’re launching it as an Administrator, so you don’t run into any permission-related problems in the process.
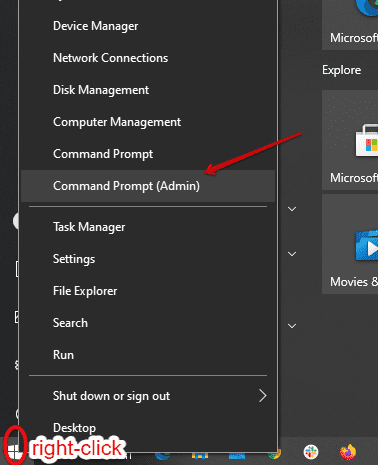
Opening Command Prompt as an Administrator
2. With the Command Prompt opened up, and our first job is to stop the following processes one by one momentarily.
- BITS
- Cryptographic
- MSI Installer
- Windows Update Services
To do this, we will have to input a command for each of those processes. Therefore, please enter the following commands in your Terminal window. Note that they are separate, and you have to press the “Enter” key after each of the listed commands.
- net stop wuauserv
- net stop cryptSvc
- net stop bits
- net stop msiserver
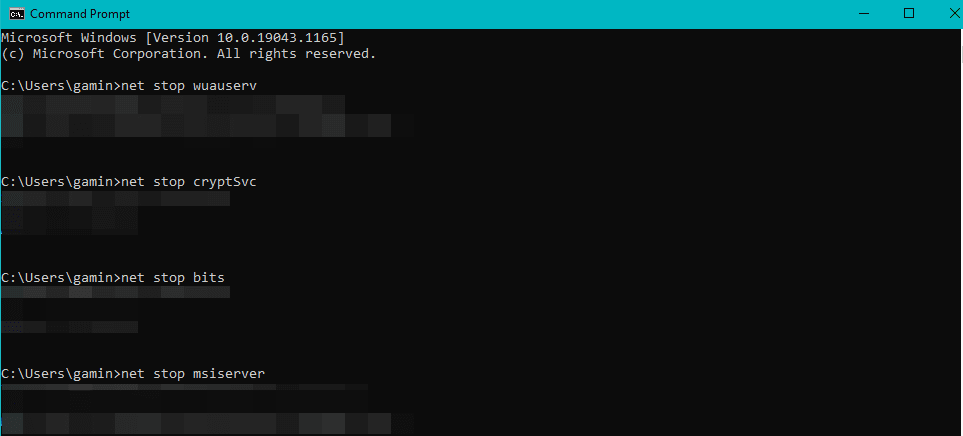
Disabling some Windows services
3. After you’re done with stopping all the mentioned services, the next step is to rename the “SoftwareDistribution” and the “Cartoot2” folders within your operating system’s files. Again, you will have to enter a series of commands to get this done. Thankfully, copying and pasting the following into your Command Prompt Terminal window will be fine.
- ren C:\Windows\SoftwareDistribution SoftwareDistribution.old
- ren C:\Windows\System32\catroot2 Catroot2.old

Renaming the “SoftwareDistribution” file

Renaming the “Cartroot” file
4. With the previous steps all concluded, it’s time to repeat step 2. The only difference here will be starting the listed services instead of stopping them from getting back to their regular operation again. To reiterate, please enter the following commands in your Terminal window. Note that they are separate, and you have to press the “Enter” key after each of the listed commands.
- net start wuauserv
- net start cryptSvc
- net start bits
- net start msiserver
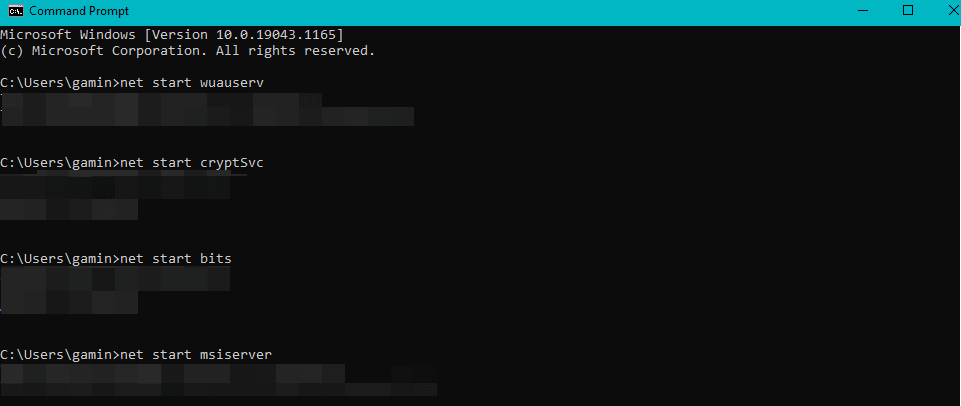
Starting the Windows services
5. This should have done the trick for you by now. All that’s left is to close the Command Prompt and restart your Windows 10 PC.
Restarting
After restarting your PC, try installing the Windows updates one more time. You should be having no trouble now, and the Windows update error should be fixed promptly.
Conclusion
It’s no rarity to acknowledge that Windows 10 is a high-performance operating system that’s known to get very complex, especially if you’re willing to dig deep within. Several different errors can surface, but there’s always a fix lying around the corner. Updates are a regular part of Windows 10, and things can get wrong sometimes. The Windows update error 0x800705b4 is an everyday affair that entails some measures to approach a swift fix.
In this article, we have shown you a total of 5 different quality methods to fix this tiresome issue. As mentioned earlier, the last method is the one that you should try if none of the preceding four techniques work out for you. Resetting the Windows Update components will potentially take away all the associated errors, including the Windows update error 0x800705b4. We hope that this write-up will come in handy for your Windows 10 PC.