Table of Contents
Although Windows 11 was first announced in June, it is now available for download. There are currently a few new devices with the OS pre-installed, and there will be lots more soon. You can install Windows 11 right now if you have a suitable Windows 10 device. The Windows 11 download page is now available, and the Installation Assistant makes getting started a breeze. You’ll also find the official ISO file there. It’s the quickest and most convenient way to copy it to a USB stick or other flash drive and install it on as many compatible devices as possible.
The best approach to installing Windows 11 is on a bootable USB drive. Or would anyone like to burn a DVD? Even if it’s just for emergencies, having a Windows 11 bootable USB stick on hand is always a brilliant idea. A flash drive, a free Microsoft download, and a Windows PC are all you need to make one. Here’s how you can make your own.
You can utilize a Windows 11 bootable USB stick to clean, install or upgrade your OS if you have one on hand. While you’re offline, the bootable USB can also help you fix your PC and clean install Windows on several PCs.
Creating a Windows 10/11 bootable USB Drive using command prompt
Microsoft makes it simple to build installation media using the Command Prompt. This article will show you how to make a USB flash drive installer for Windows 11 using the command prompt. If you prefer the GUI way, we have that covered too here.
Despite Microsoft’s official backing, the procedure is still somewhat tricky. Here’s everything you need to know about it.
What you’ll require
You’ll need a PC running Windows 10 or 11 and a USB drive with a minimum of 8GB. External solid-state drives (SSDs) or hard disk drives (HDDs) would also work.
Before you start, double-check that you won’t run out of room at any point. Because the Windows 11 ISO file is 5.1GB in size, you’ll need enough space on the computer where it’s being downloaded, any flash drives, and the target devices.
It’s worth backing up any files you won’t need right away and conducting a factory reset. You can then choose what you want when you get back to your PC.
Check if your PC can run Windows 11 before utilizing the bootable drive. If it can’t, you will have to explore how to install Windows 11 on an unsupported computer.
How to get the Windows 11 ISO image
Before We Begin, here’s how to get the Windows 11 ISO Image. A Windows 11 ISO file, commonly known as an ISO image, is required for creating a Windows 11 USB bootable drive. As a result, it’s a good idea to take care of this first before making a Windows 11 USB stick.
Here’s how to get the Windows 11 ISO onto your computer.
- To obtain a copy of Windows 11, go to Microsoft’s official website.
- Scroll down to the section under “Download Windows 11 Disk Image (ISO).”
- Subsequently, select Windows 11 from the drop-down option.
- Then, to proceed, click the Download option.
- The current page will load more information and display the section Select the product language. Choose your favorite language from the drop-down menu for Choose one. Then, to proceed, click Confirm.
- Click the 64-bit Download button when the download section loads.
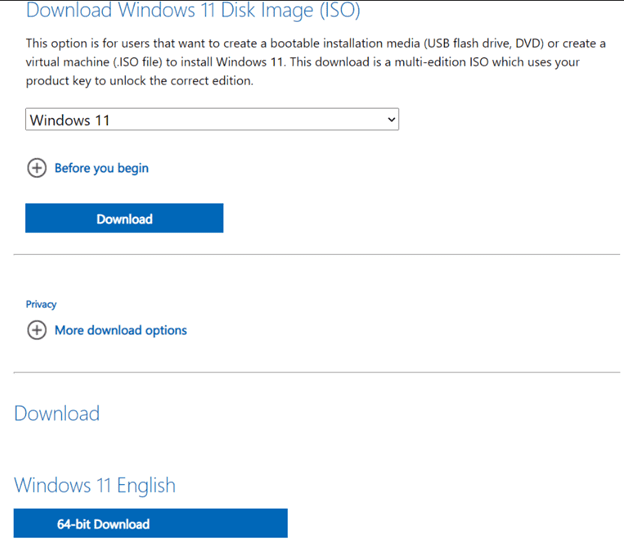
Windows 11 Disk Image
Your download will start right away. However, it may take time to complete the download, depending on your Internet speed. Once you’ve downloaded the ISO file, use one of the ways listed below to make a Windows 11 bootable USB stick.
Using Command Prompt, create a bootable drive
If you don’t want to utilize a third-party program to make a bootable drive, you can create installation discs with the Diskpart software and Command Prompt. This is how you do it.
- Please make a backup of all of the files on your USB drive before connecting it to your computer.
- Under Command Prompt, press the Win key, type cmd, and click Run as Administrator. If you prefer PowerShell over Command Prompt, you can do so.
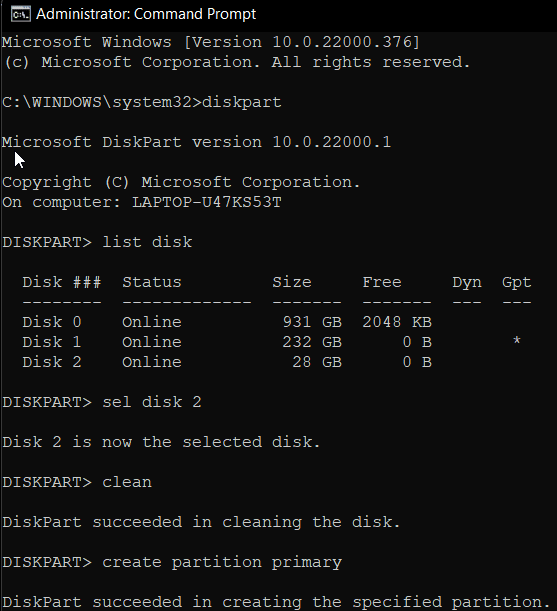
Administrator command prompt
To start the Windows Diskpart utility, execute the following command in the command prompt window and press Enter.
DISKPART
- Then, to see a list of all available storage devices, type the following command:
LIST DISK
- Locate your USB drive here. You can tell the size of your USB drive by looking at the Size column. The USB device is labeled as Disk 2 in this example.
- To pick your drive, type the following command:
SEL DISK 2
- Replace DISK 2 with the number allocated to your USB drive in the above command. If you have a single SSD or SATA disk, your primary drive will be DISK 0, and your USB drive will be DISK 1. Because the next step involves wiping the selected drive, you must choose the correct drive.
- To completely erase the contents of the drive, type the following command and press enter:
Clean
- To create a primary partition, type the following command:
Create Partition Primary
- To choose the primary partition, enter the following command:
List Par
The Command Prompt will display the details of your USB drive.

USB Drive Details
- To activate the partition, type the following command and press enter:
Active
- Then, to format the USB device, execute the following command. The drive must be formatted in NTFS format, as FAT32 will result in an erroneous parameter error.
FORMAT FS=NTFS LABEL= "BootableDISK" QUICK OVERRIDE
- To leave the Disk Part utility, type Exit and press Enter.
- You must now mount the ISO image and copy the contents to your USB drive.
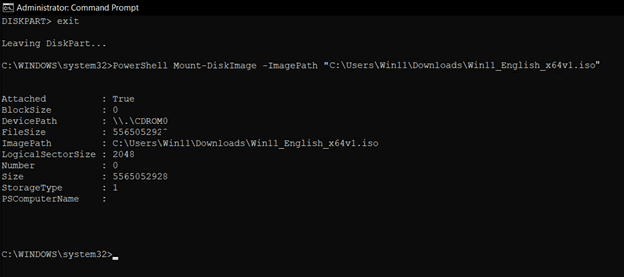
mount the ISO image and copy the contents to your USB drive
- To mount the Windows 11 ISO file, execute the following command and hit Enter:
PowerShell Mount-DiskImage -ImagePath "C:\Users\Win11\Downloads\Win11_English_x64v1.iso"
- Replace the file path with the location of your Windows 11 ISO in the above command.
replace the file path with the location of your Windows 11 ISO
- To start Diskpart, type the following command after the ISO has been mounted.
Diskpart
- To see the available volume, execute the following command.
List volume
The command above will assist you in determining the Mounted ISO file’s Drive letter. As a result, the Mounted ISO will be shown as DVD-ROM in the Type column.
The letter linked with the volume is listed in the Ltr column. Please take note of the ISO volume’s specifications because you’ll be using it in the future.
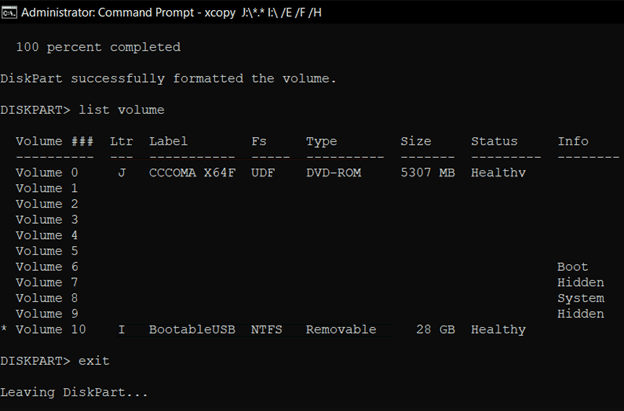
volumes specifications
- To quit Diskpart, execute the following command once you have the disk details for the Mounted ISO:
Exit
After that, type the letter for the Mounted ISO volume and press enter. Suppose your Mounted ISO volume letter J, type, and enter the following command.
J:
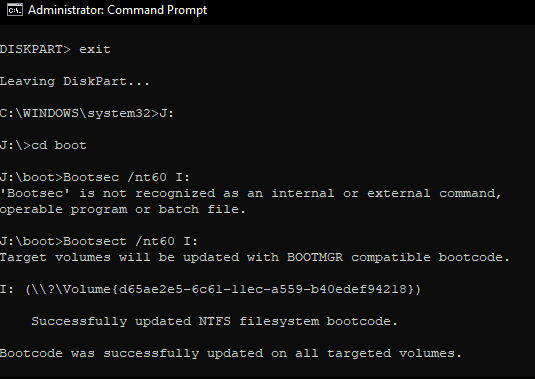
To boot from a CD, type the following command:
cd boot
To apply the master boot code compatible with Bootmgr to the USB flash drive, type the following command:
Bootsect /nt60 I:
Replace I with the drive letter associated with your USB flash drive in the above command.
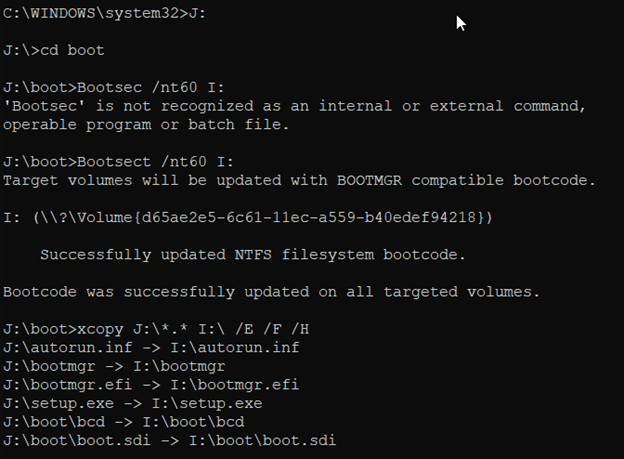
replace I with the drive letter associated with your USB flash drive
- To copy Windows 11 system files to the USB flash drive, execute the following command and press Enter:
xcopy J:\*.* I:\ /E /F /H
- Replace K: and I: with the letters of your Mounted ISO Volume and USB drive, respectively, in the above command.
- The procedure may take 5-10 minutes to complete. It’s typical for the Command Prompt to feel stuck, so wait until the operation is finished.
- Files (s) copied notification will appear if the operation is successful.
That is all there is to it. You may now clean install Windows 11 using the USB bootable drive. After you’ve finished, you’ll have a USB stick that you can use to install Windows 11 on any compatible device.
- Connect the USB stick to the device you want to use.
- Restart the computer.
- Hold the F8 key before the Windows logo appears to start Safe Mode.
- Choose ‘Use a device’ from the drop-down menu and choose the USB stick.
The Windows 11 ISO image you downloaded should now boot up on your computer. If this is not the case, you may need to disable Secure Boot in the BIOS settings.
Conclusion
There are a few different ways to make a Windows 11 bootable USB drive. In this article, we explored using the command prompt. However, other methods like Microsoft’s Discs Creation Tool and Rufus can rapidly create a Windows 11 bootable USB stick. You can use the same method to clean and install Windows 11 on a new computer, fix your Windows machine, or dual boot Windows 10 and Windows 11. It is up to you now to choose the best option for you!
