Table of Contents
In the world of media players, one entity roams around as single-handedly the number one multimedia software for Windows PC and a bevy of other platforms. This high-class program is recognized all around the spectrum for being highly original in its working mechanism and inspiring other companies to come forth with something similar. VLC is loaded to the brim with features, and there’s no single moment you’ll ever think of the tool as inconvenient.
Apart from supporting a network of different file formats and allowing users to convert MOV to MP4 video, VLC Media Player boasts a variety of other functionalities. You can even use it to record your Windows screen if no additional software is in sight for accomplishing the matter at hand. We, at least, never expected a media player to offer this kind of function among the rest of its working principles. If you’re interested in learning more, keep reading to discover an in-depth tutorial.
What is VLC Media Player?
VLC Media Player is one of the world’s most famous multimedia players that can play audio and video files and allow users to work with different formats, such as MP3, FLAC, WMA 3, Wavpack, MIDI, LPCM, DTS, WMA, and others. It operates cross-platform and even boasts a fairly effortless installation. All you have to do to get going with the software at hand is first to download the setup file from the developers’ side and then run it on your Windows PC.
It won’t take more than a couple of minutes for VLC Media Player to run like a champ on your device. The same goes for VLC’s download and installation on other platforms. The platform typically boasts millions of concurrent users across the spectrum due to its slew of convenient features. VLC is also highly regarded because it does not comprise any spyware or any advertisements of the sort.
Lastly, the program’s user interface is highly customizable to a reasonable extent—the added functionality of being able to create your skins with the in-built skin editor in VLC. There’s also the ability to install plug-ins and extensions to revamp the program’s user interface however you like. All these features combine to bring forth a highly admirable usage experience of VLC Media Player.
Let us get down to the business end of this article and talk about a simple way to record your Windows screen using the media player at hand.
A quick and easy way to record a screen with VLC
Thankfully, VLC makes it fast, simple, and easy to get started with capturing your Windows screen. All you need to do is follow some steps outlined in an easy-to-understand format, and you’ll be good to go. Then, implement the instructions diligently from start to finish for the best results.
1. The first step to begin the process is opening your VLC Media Player desktop app on your Windows PC. You can do this from the Windows Start menu if it has not already been pinned to the home screen. Once you’re done, click on the “Media” button on the toolbar at the top of VLC’s user interface to reveal multiple options. From there, click on “Open Capture Device” to continue. Alternatively, you can use the “Ctrl” and “C” shortcut keys.
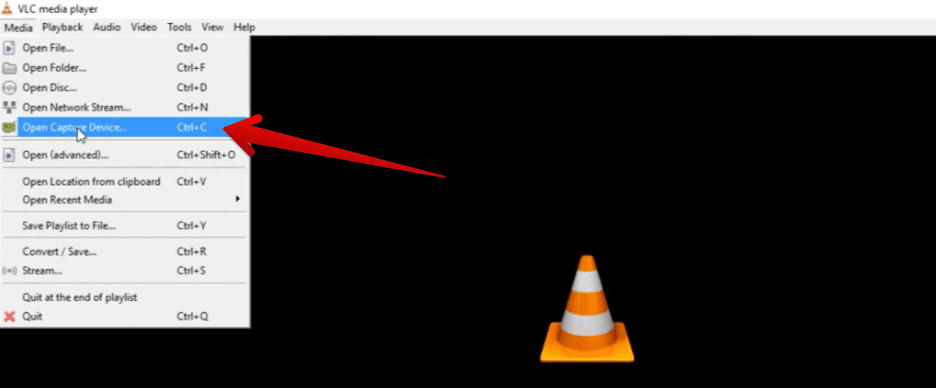
Clicking on “Open Capture Device”
2. After clicking on “Open Capture Device,” you will be taken straight to the “Capture Device” options in a new window called “Open Media.” Here, you will be able to authenticate the various settings you’ll need to tweak to record your Windows screen easily from this point onward. The “Capture mode” option will be set to “Desktop” among other options. Next up, you will be selecting the frame rate that will be used to capture the screen.
Feel free to refer back to your PC’s hardware and determine the relevant specifications, so you can pick the perfect frames per second value for recording your screen. Usually, 30 FPS works just fine for the purpose at hand. To continue, click on the drop-down button beside “Play” and select “Convert.”
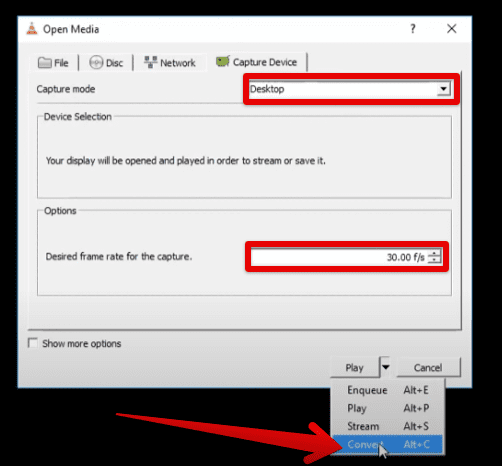
Tweaking the “Capture Device” settings
3. The “Convert” section is where you will set the destination folder for your captured recordings. Choose the directory to which you wish to save your recordings and click on the “Start” button. Doing so will begin the screen capture process.
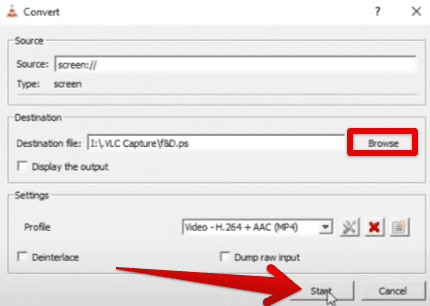
Furthering the process
4. Congratulations! You’ve just begun recording your Windows 10 screen. To stop the screen capture process, click on the “Stop playback” button, and that will be it. You can now quickly start using your PC the way you want for the recording to show the process to proceed.
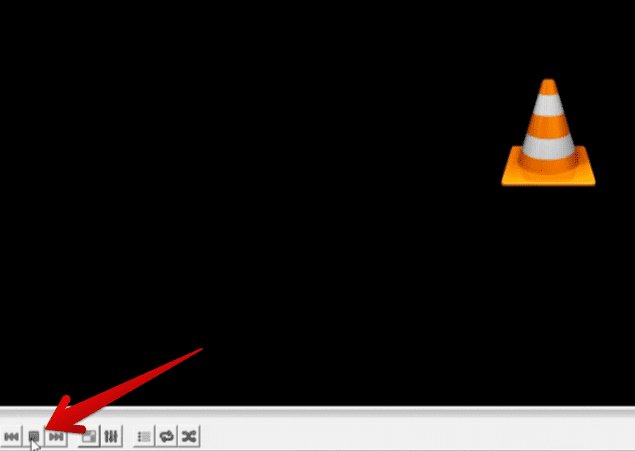
Stopping the recording
That’s about it! You can quickly head to the destination folder you’ve chosen to save your recordings. After clicking on the “Stop playback” button, you’ll find your saved recordings. We hope that you’ve found this helpful article for your cause.
Conclusion
Windows PCs can access millions of different software on the internet. However, this man-curated abundance of so many programs does not necessitate that each option will be worth the hassle. Luckily, VLC Media Player is one of those powerful tools we can download on our devices without letting a second thought prevail. It truly fulfills your multimedia requirements by presenting forth a ton of different support options.
In this guide, we have learned how to record your Windows screen using VLC Media Player, which happens to be one of the many different features of this high-quality tool. Please do let us know in the comments section whether this guide proved valuable for you. We would love to read your feedback!
