Table of Contents
If certain colors are not printing correctly, it raises concerns that should be quickly looked at. On most occasions, if your printer color starts to fade out on printouts, then probably your printer is running low on ink. Due to technology improvement, most modern printers allow users to keep track of their ink levels from their computers with the manufacturer’s printing application.
This tutorial will comprehensively cover all the aspects you need to be acquainted with to check printer ink levels on your Windows 10 operating system. In addition, this article will also review the popular printer brands and how their ink levels can be checked via the computer. Therefore, we recommend that you read the entire article to understand everything regarding printers and their ink levels.
Checking ink and toner levels should be done regularly to estimate the levels of ink and toner remains. It is an essential practice since it aids users to know when to replace, refill or purchase replacement tools. The process of checking for printer ink levels can be done on two fronts:
- First, it can be checked from the printer control pane
- it can be checked from your Windows computer.
Therefore, these two fronts are essential in helping check the toner/ink levels in your printer. However, sometimes, when your printouts become blotchy or faded, you need to check the ink levels to ascertain that they are not low. In such instances, you will perform the procedure using either of the mentioned methods. However, in this article, we shall only focus on checking printer ink levels using your Windows 10 computer.
Checking printer ink levels on Windows 10
There are thousands of different printer brands in the market, making it a nuisance to check printer levels using method one (using the printer control panel). However, this is not the case when using Windows 10 since the steps are similar regardless of the printer brand. To perform the check therein, stick to the procedures highlighted below:
Click the Start menu and search for settings as shown in the image below:
- Under settings, locate “Devices.”
- Next, under devices, select “Printers & Scanners.”
- After selecting the printers and scanners option, you will be able to locate the printers connected to your Windows 10 operating system.
- Now click on the Printer you wish to check. Under the status section, you will be able to see the ink levels of the Printer. In addition, you can also click on more information to get more content concerning the connected Printer.
Now that you can check printer ink levels in Windows 10, let us narrow down how to check printer ink levels on the popular printer brands.
How to check ink levels in an HP printer
With HP printer users, the process is relatively easy. All you need to do is visit HP’s official website and search for a tool called HP print and scan doctor. This tool is vital as it automatically troubleshoots the Printer, thus identifying all the problems you encounter with your printer.
The tool’s slick nature enables its users to quickly and efficiently check the remaining ink levels on their printers.
Follow the steps below to check the remaining ink on your HP printer:
- Then, on your Windows 10 operating system, locate the HP Print and Scan Doctor tool and run it.
- Click on the Printer/Supply level to check the ink and toner levels of your printer.
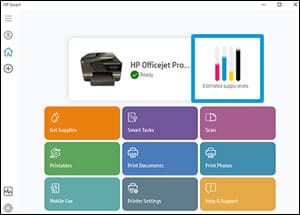
Note: Latest versions of Windows 10, iOS, and android, lack the Print and scan Doctor Tool, but they have the HP Smart app. This app shows the HP printer ink levels on its home screen.
To download the HP Smart app for Windows 10, go to the Microsoft store and search for HP Smart. Then, follow the guides to download and install the app on your operating systems. Once you have set up your printer, then the ink or toner levels will be displayed on the home screen as shown in the image below:

HP Smart app Ink or toner levels
How to check ink levels on a Dell Printer
By pressing the win key + s, you will open the control panel. Alternatively, locate the start menu and search for “Control Panel.”
Once the control panel has launched, click “View devices and printers.” This is a subcategory found under the “Hardware and Sound” category.
Locate your printer Icon and double click it. A new window containing the printer features and options will pop up.
Now click on the “Adjust print option.” A new window with new options and tabs will pop up.
Select the “Device Services” a new options screen will appear
Click on Dell ink level. The Printer’s ink levels will be displayed. If your ink levels are not displayed, it is possible to conclude that the Printer does not support this feature since not all Dell printers support this feature.
How to check ink levels on an Epson Printer
Ensure your Epson printer is connected to your Windows 10 operating system. Next, under the Windows taskbar, locate and double-click on your Epson printer Icon.
Note: If you are wondering what a taskbar is, the bar is located at the bottom of the screen. An inverted arrow is facing upwards on your right side of the taskbar next to the battery icon, internet, and sound icon. Click on the arrow, and you will find a list of other application icons, double-click on your Epson printer Icon.
However, if the first method does not work for you, you will have to try method 2. Here, you will locate the settings icons, the “Devices,” and select “Printers & Scanners.” Now select the Epson printer icon and double-click it.
Under the Epson printer properties screen, click on the “Maintenance” tab.
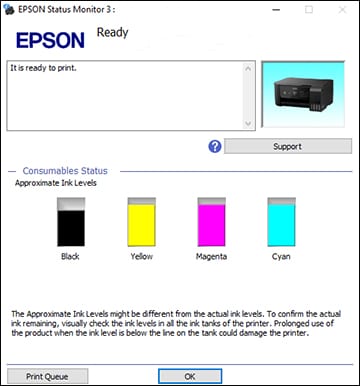
Click on “Epson Status Monitor 3” to display your printer’s ink levels.

Epson Printer ink level status
Note: the name in the step mentioned above varies depending on the printer model.
How to check ink levels on a Xerox printer
If you are a new Xerox user, you first have to download the required drivers from Xerox’s official website. When you are done, power on your printer and connect it to your Windows 10 operating system.
Follow the stages below to check the ink levels on your pc:
- Navigate to the start menu and locate the control panel
- Under Hardware and Sound, click on “View devices and printers.”
- Locate the Xerox printer icon
- Right-click on the printer icon, then select the properties menu
- Under preferences, select display the current toner and ink levels for your Xerox printer. This will display the current ink and toner levels of your printer.
How to check ink levels on a canon printer
Canon printer users can quickly check the ink levels by launching the Canon status monitor. However, if you wish to check the ink levels using your Windows 10 operating system, then follow the steps below:
- Power on your Canon printer and connect it to your windows 10 operating system (always ensure that you install the recommended canon drivers if you use it for the first time on your Windows 10 operating system).
- Next, under the taskbar on your right hand, locate the upward-facing arrow and click on it.
- Now double-click on your printer icon and select properties.
- You can now check the ink levels from the status icon.
How to check ink levels on a brother printer
If you have a brother printer, you can check the ink levels using the printer panel or your Windows operating system. In this case, we shall only focus on checking the levels using the windows operating system. To do so, follow the steps below:
- After connecting your printer with the other printers, navigate to the task tray and double-click on your brother printer icon.
- It will open the brother status monitor utility.
- In this utility, the ink and toner levels will be displayed as shown below:
The process is quite similar when using the windows option to check the ink and toner levels. Hence, we can’t cover all the printers since it will be a repetition. However, if you have a printer that has not been covered in the ones we mentioned in this article, you can apply the concept to your brand. In case it fails, you can ask for help from the comments section.
Let us quickly review how to check the printer ink levels using the Printer’s menu:
First, you should keep in mind that all printers are different, and the steps highlighted below are generalized. Therefore, we recommend that you consult your official printer providers for detailed guides and instructions on checking the ink or toner levels.
Below are the generalized steps on the process to check ink levels using the printer menu:
- Using the appropriate navigation keys as instructed from your printer’s manual guide, locate the home or the menu button.
- Now find the settings on the menu of your printer.
- Try and locate the status or reports section from the settings if your Printer has such an option.
- Depending on your printer, the ink level results will be displayed on an LCD screen. However, if your printer’s ink levels are not displayed, you will be required to print out the system status or data page to see your printer’s ink or toner levels.
Note: because the printers are different, in step 3, some users might be required to go a step further and locate the ink or toner level section. Hence, you should try out all of the mentioned steps and if you still don’t get a breakthrough, feel free to engage your official printer providers.
Conclusion
This article covered all the aspects you should be acquainted with to check the printer ink levels on your Windows 10 operating system. We hope the article helped you get the solution to your problem. If you have any challenges, we recommend that you first seek help from your official printer providers before trying any other solution.
