Table of Contents
If you are a Windows 10 user, then it is probable that you have had a run-in with the Windows 10 Update Assistant. It is a built-in management tool, which works to keep your system safe, up-to-date, and secure. Windows 10 Update Assistant notifies the user if there are newly available updates to install and makes the updating process much more convenient and easy.
Until now, it’s all been praise, and all seems fine and dandy with the Windows 10 Update Assistant, so why would someone want to remove or disable it? Well, it has proven to be a great helpful tool for beginners who do not want to update their system manually or don’t have the technical ability for it, but also a pure nightmare for IT experts and professionals working in organizations and such.
Problems with the Windows 10 Update Assistant
People are annoyed with Windows 10 Update Assistant to the point where it has been renamed as a virus, and somewhat understandably so. The thing is, it shows the user too many pop-ups and notifications, installs updates at inconvenient hours, and in general makes the life of, for example, a school IT manager ten times harder. Furthermore, it has been known to somehow find its way back into users’ computers after deleted. Windows 10 Update Assistant was designed to help people keep their operating systems safe, updated, and ready to fight off any potential malware. That, however, did not pan out exactly as planned since the Assistant itself acts like malware most of the time. It automatically installs new updates, restarts computers with no regard for running applications or data that may be damaged and corrupted. Users are also reluctant to keep it around since it may download incompatible updates or make their computer all buggy.
Disabling Windows 10 Update Assistant
But worry not, as we have conjured up a few splendid solutions to your Windows 10 Update Assistant problems, ones that will send it away for good, and you will not have to worry about it in the future.
Solution 1: Setting your Wifi as a Metered Connection
Let us get into our first solution to disabling Windows 10 Update Assistant. This one is supposed to tackle the Assistant temporarily. This method entails that if you change your network settings and set the Wi-fi as a metered connection, the Update Assistant would stop downloading massive updates. There may be a slight chance that despite having tried this solution, your problems may not go away fully. As as you connect to a public network or Wi-Fi, Windows 10 Update Assistant might suddenly get back to downloading huge updates for your system. Furthermore, there is also the possibility that the Update Assistant will still keep pushing large updates even on a metered connection. That being said, let us keep our spirits high as it is worth a try, nonetheless.
The first step would be to type in “Settings” in the search box at the left-bottom of your taskbar and click Settings when it pops up.
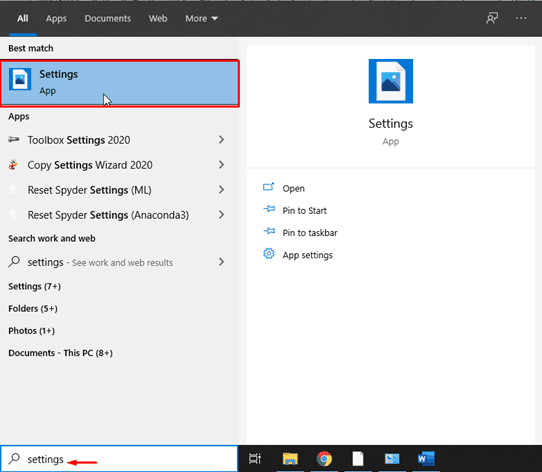
Opening Settings
Next up, click on Network & Internet in the newly opened window.
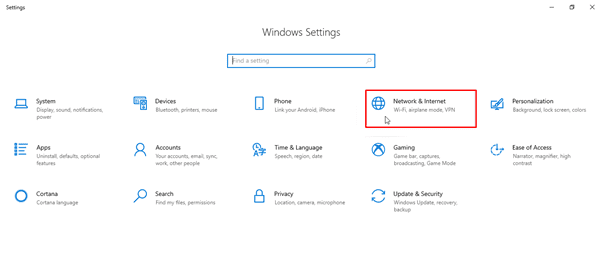
Opening Network & Internet Settings
On the next screen, you should see something like this. Click on Change Connection Properties to proceed.
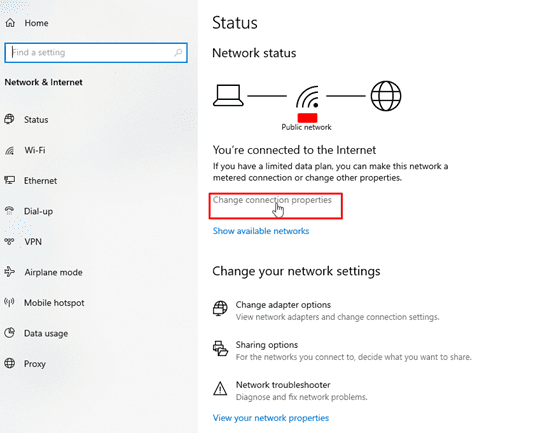
Changing Connection Properties
You should now find an option that lets you toggle between setting your Wi-Fi as a metered connection. Click on it to turn it on.
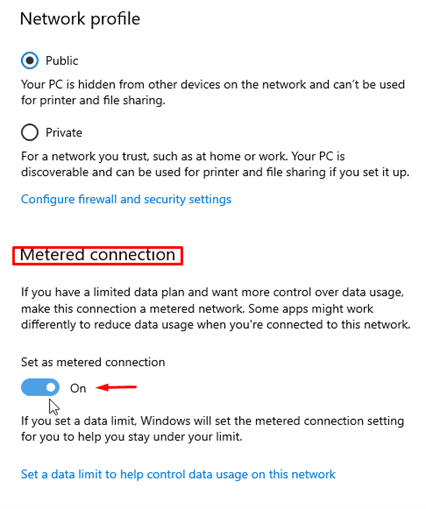
Setting Wi-Fi as Metered Connection
With that done, you should be free of Windows 10 Update Assistant now. You may want to go into your Task Manager and see if there is a process running for it. If this solution worked for you, then that is great. If it did not, then we have got more solutions for you to try!
Solution 2: Stopping the Update Service
The first solution works for some users and dubiously doesn’t for others. If you categorize it as the latter, you should definitely give this one a go.
You can now get rid of Windows 10 Update Assistant to type in “Services” in the aforementioned search box on your taskbar. Once the app pops up, click on it.
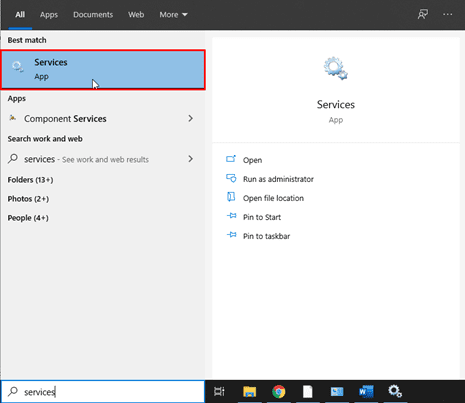
Opening Services
In the new window, there will be a list of running services. Find “Update Orchestrator Service,” click on it to select it. Once done, hit the “Stop the Service” button on the left side. (Or right-click on the service and click “Stop” in the dropdown menu.)
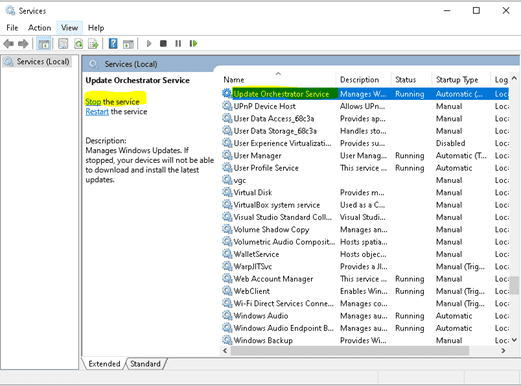
Stopping Update Orchestrator Service
Having done that, you should be free of the Windows 10 Update Assistant. However, if you still, unfortunately, aren’t, we have three more solutions for you to try.
Solution 3: Uninstalling the Windows Update Assistant
Having tried subtler and softer ways around it, this one allows you to remove Windows Update Assistant from your computer permanently. Now, before getting into how to do it, please bear in mind that Windows updates ARE important and do a lot to keep your system safe. So, it is preferable to uninstall it in only the most desperate times permanently.
Type in “Control Panel” in the same search box and open it.
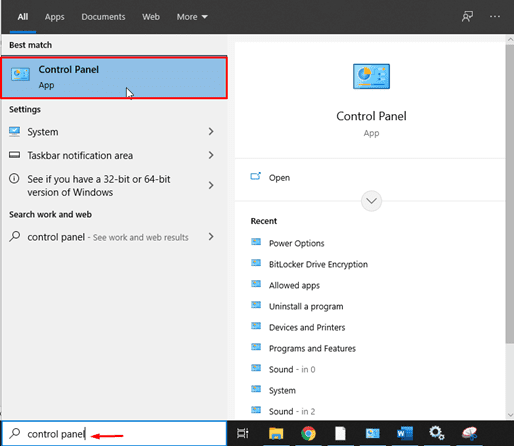
Opening Control Panel
Next, you will see a new window with a bunch of icons on it. Find the one that says “Programs” and click Uninstall a Program right below it.
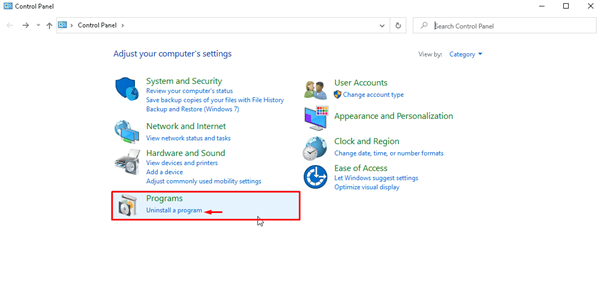
Navigating to Uninstall a Program
A window called “Programs and Features” will now open and show you a list of all the installed programs on your computer. Find “Windows 10 Update Assistant” in the list and click Uninstall.
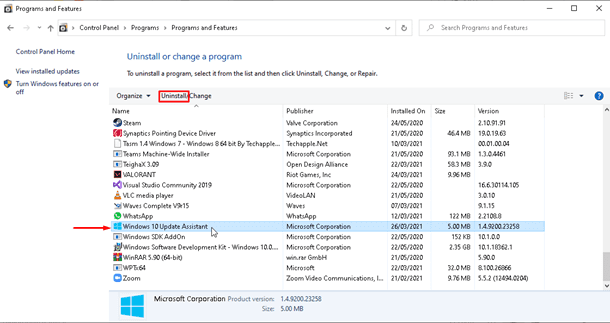
Uninstalling Windows 10 Update Assistant
Once Windows 10 Update Assistant finishes uninstalling, you should be about done and dusted! If somehow you still face the same problem, perhaps you ought to try the next two solutions.
Solution 4: Constantly Running a Termination Loop
Another thing you can try is to keep running a .bat file on a loop in the background. Running an infinite loop in your background may not sound like a great idea, but it will get you free from the annoyance of Windows Update Assistant. Now that we’re done with its pros and cons, let’s see exactly what it takes to execute this plan.
The script we are about to show you is essentially going to kill or terminate all Windows Update Assistant activities. Launch Notepad and copy-paste into it the code we have provided below:
@echo off

:loop

taskkill /im Windows10UpgraderApp.exe /f 2 > nul

taskkill /im SetupHost.exe /f 2 > nul

goto :loop
Once finished, saving the file with the .bat extension should do. See the image below to see how to do that.
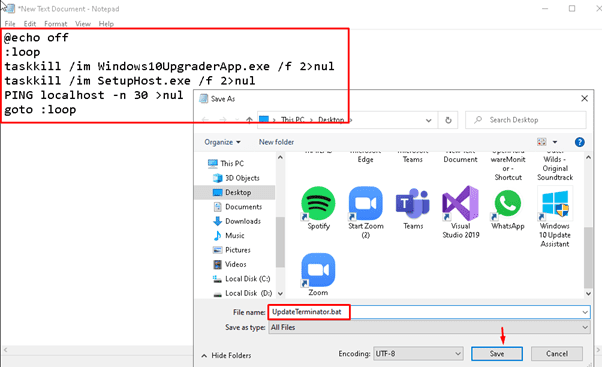
Saving Script as .bat File
When you have successfully created the batch file, running it as the administrator should do. With that done, you will have killed Windows Update Assistant. If you want your batch file to run silently, there are loads of guides on the internet on how to do that.
Solution 5: Blocking Windows Update Assistant through Firewall
If all the aforementioned solutions have failed to work their magic, this final one could be a saving grace. You can go into your Antivirus or Firewall settings and learn how to block Windows Update Assistant from downloading any files. This would mean that the Assistant cannot download new updates as you would have set it as a security threat to your PC. We would go into extensive detail about performing this whole process, but the problem is that most users have different antiviruses, and it would be quite a daunting task to demonstrate it for all of them. You can look up guides specific to your software to block certain apps from downloading stuff and figure it out yourself.
Conclusion
So, that about sums up five ways, you can disable Windows 10 Update Assistant. We would advise you to take precautions and make sure that your system is secure before going Terminator on Windows 10 Update Assistant. Either way, hopefully, you will have understood and learned how to disable it now. With that being said, if you happen to face any issues, feel free to tell us about them in the comment section below.