Table of Contents
An emulator in computing is software or hardware that enables one computer to behave like (emulate) another computer. In simple terms, an emulator allows the host/parent system to run software designed specifically for a guest system. This article guide will show how the parent system (Windows) can run the guest system (Raspberry Pi).
A Raspberry Pi is a small-sized single-board computer developed by the Raspberry Pi foundation located in the United Kingdom. The Raspberry Pi is commonly known for allowing learners to understand the basics of computer science. This project mainly targeted schools and people living in developing countries.
Can we emulate the Raspberry Pi OS (formerly called Raspbian) on our Windows PC? Yes, we can. There are many distinct methods we can use to emulate the Raspberry Pi on our Windows operating systems, as shown below:
- Emulate Raspberry Pi OS using a virtual machine
- Emulate Raspberry Pi using an RPi-Emulator
- Emulate Raspberry Pi using Quick-Emulator (commonly referred to as QEMU)
- Emulate Raspberry Pi using Microsoft Azure
- Run a Raspberry Pi live disk
As we already know, the Pi Desktop was purposely meant for technology enthusiasts and programming beginners. To emulate the Raspberry Pi on your Windows PC, you can check out how it is done in this article guide tailored to illustrate the emulation of a Raspberry Pi on Windows.
Emulating Raspberry Pi OS on Windows
Emulating a Raspberry Pi is helpful both technically and financially. There is no need to purchase it and later be disappointed. You can first try and emulate it to ascertain whether you can proceed and buy it or not.
Let us have a glance at the mentioned ways of emulating a Raspberry Pi on Windows
1. Emulate Raspberry Pi OS using a virtual machine
This is one of the standards and widely used methods of emulating almost any operating system on Windows. If you want to emulate the Raspberry Pi on your Windows OS, you need a virtual machine installed on your PC. We shall be using a VMware Workstation for this tutorial, but you can also use a VirtualBox.
Follow the simple steps provided herein to get the task done:
1. Download VMware Workstation
2. Download the Raspberry Pi ISO image
3. Follow the provided on-screen instructions to complete the installation of the VMware application
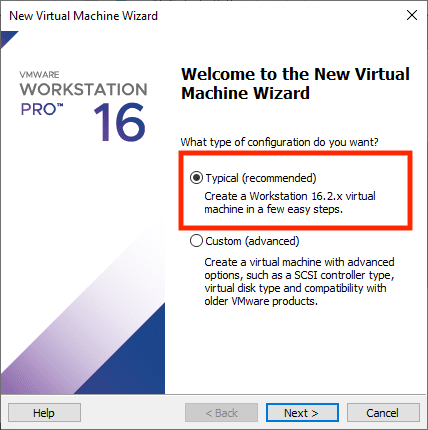
4. Once installed, launch the VMware application and click on “Create a New Virtual Machine.”

Virtual machine
5. Select the first option, “Typical(recommended) and click “Next.”
Typical Setting
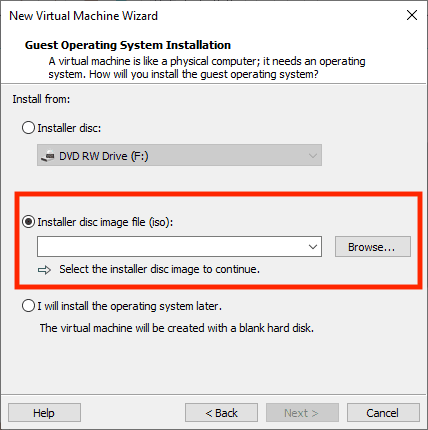
6. On the next “Virtual machine wizard” screen, select “Installer disc image file (iso):
Installer Disc
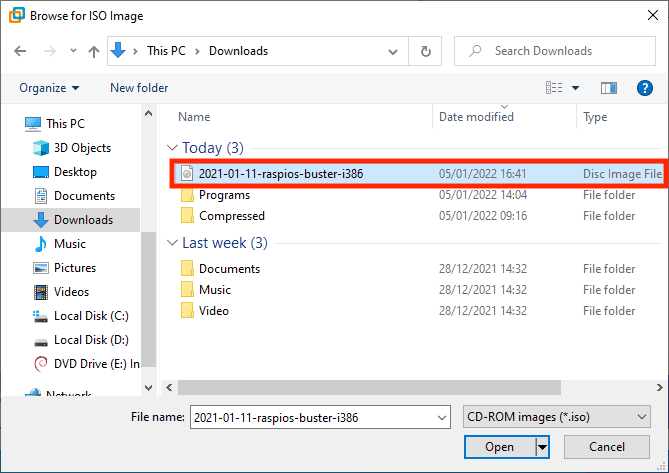
7. Click on “Browse,” then select the Raspberry Pi image we downloaded in step 2 above.
Browse to select ISO file
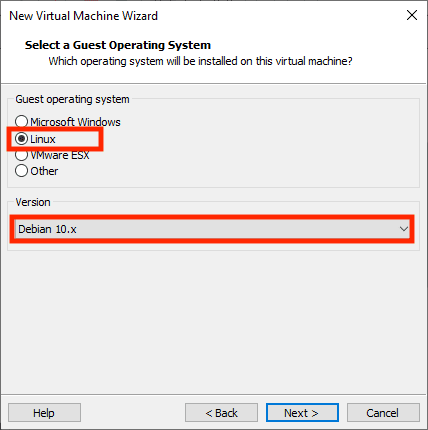
8. On the next screen, choose “Linux.” Under the version, choose “Debian 10.x” as shown below:
VM Wizard
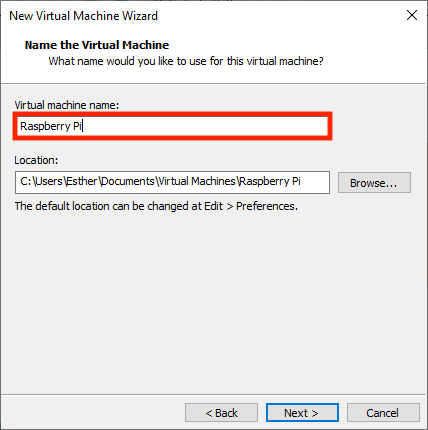
9. Rename your Virtual machine and change the location if need be
Machine Name
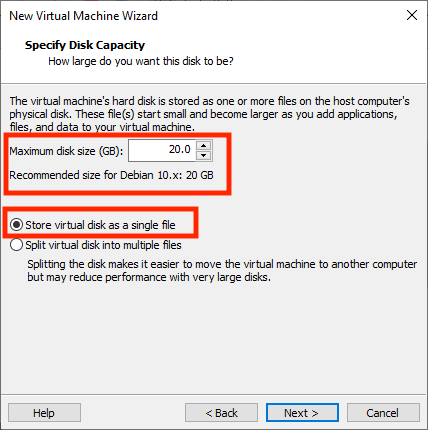
10. Specify the disk capacity. I will select 20GB for this guide and check the “Store virtual disk as a single file” option.
Disk Size
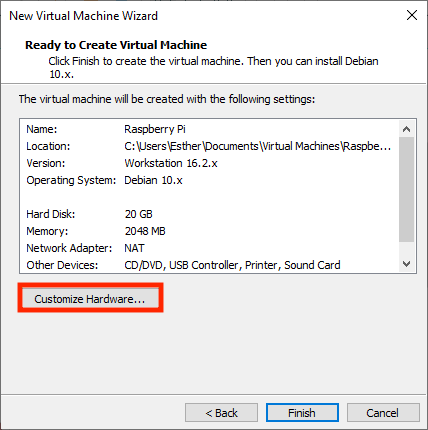
11. Select “Customize Hardware” to change the preferences. This step is optional as you can run the installation with the default settings
Hardware
12. If you skipped the previous step or finished customizing the settings, click on the “Power on this virtual machine” option to fire up the guest OS.
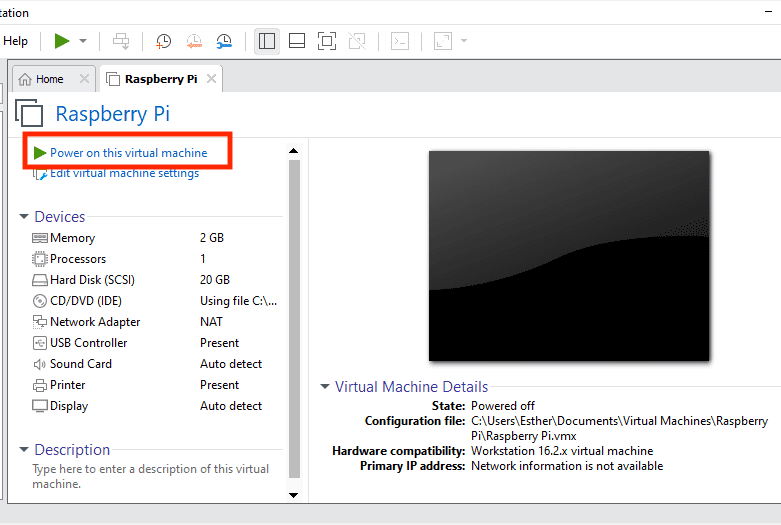
Power ON
13. Once the virtual machine is powered on, select the “Graphical Install” method and click enter to start the installation process.

Options
14. Select your preferred language and click “Next.”
15. Let the installer do its thing. Partition disks by using the “Guided – use entire disk” option

Guided Option
16. Select the disk to partition as shown below
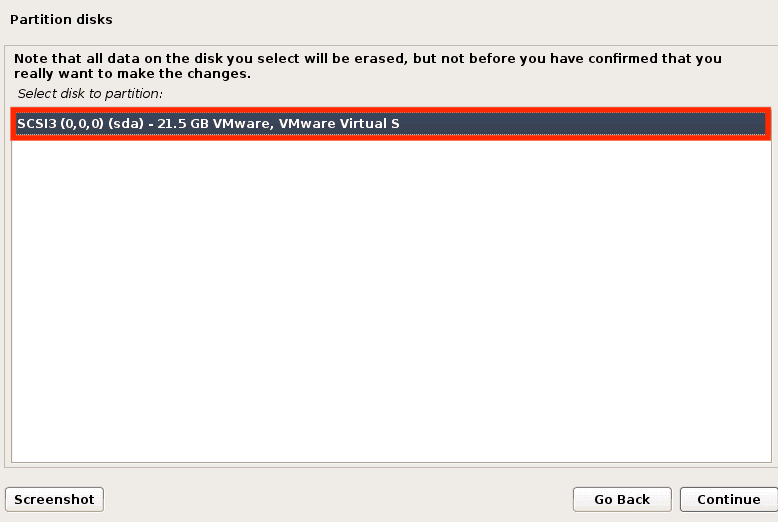
Disk Partition
17. Choose “All files in one partition,” the recommended method for new users, and click “Continue.”
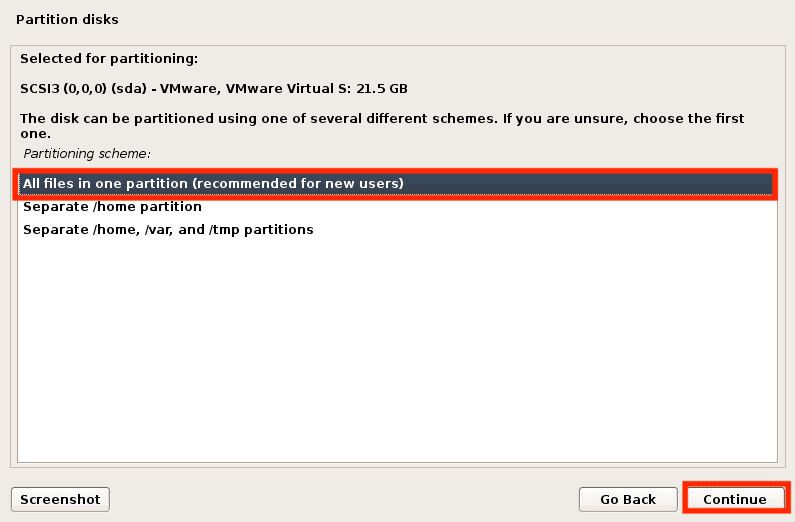
Partition Disks
18. Finish the partitioning process and write changes to disk, then proceed with the remaining installation process
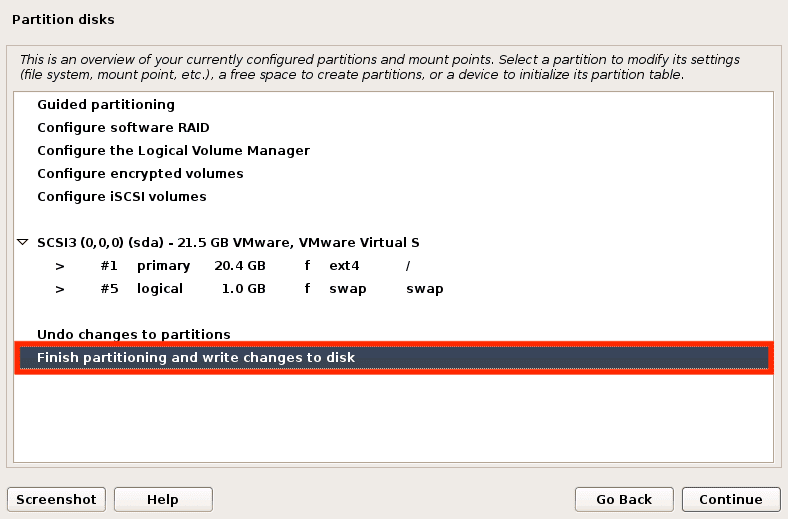
Write Changes
19. Select “Yes” to accept the changes made to the disks and continue

Partition Disks
20. The installation process will take quite a while; hence be patient.
21. Finally, select “Yes” to install the Grub boot loader
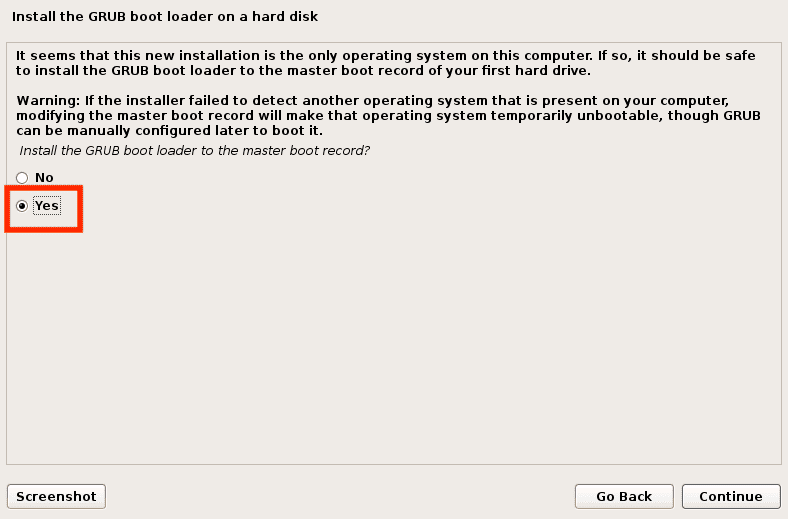
Install Grub
22. Choose the device for the boot loader and click continue
23. Restart your Raspberry Pi to complete the installation and enjoy the Pi experience.
The VMware emulator, just like a VirtualBox, emulates the Raspberry Pi by running the Debian system as selected in step 8 above. Major operating systems can be emulated using this method.
2. Emulate Raspberry Pi using an RPi-Emulator
The newly launched Raspberry Pi emulator is designed to emulate the Raspberry Pi OS OS on a Windows environment. Most users familiar with this emulator refer to it as a simplified QEMU model since it contains a similar setup with only the interface differing.
The primary aim of the RPi-Emulator is emulation. However, it also improves the overall efficiency of the simulated hardware on your Windows computer. Besides, this emulator acts as a wrapper for QEMU.
The charm about this emulator is it provides users with an intuitive GUI (Graphical User Interface), and it also allows system storage expansion, thus accommodating Raspberry Pi OS data easily.
How to use the RPi-Emulator
Follow the guides provided below to learn how to use the RPi-Emulator.
Step 1: Download the RPi-Emulator
Step 2: Click on the “Run” in the QEMU subfolder as shown below and let the installer run.
Run RPi-emulator installation
Step 3: Once the automated installer completes the installation, run the command below to launch the graphical session:
startx
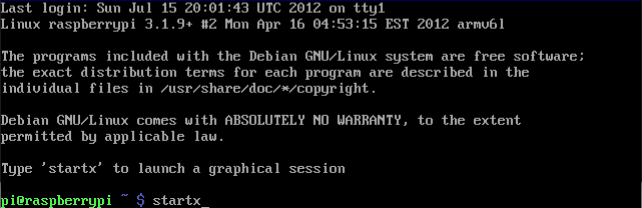
Command Prompt
Step 4: A graphical session similar to the one illustrated below will be shown.

Graphical session
Note: As stated earlier, the RPi-Emulator is quite similar to QEMU, and it uses the same setup. The only notable difference between the RPi-Emulator and QEMU is the user interface. For more clarity, you can check out the graphical user interface of both emulators and compare them to see the differences.
That’s all you can enjoy emulating Raspberry Pi on your Windows environment.
Note: To ascertain that indeed you have Raspberry Pi, run the LXTerminal and check if it gives the following name:
pi@raspberrypi
Output:
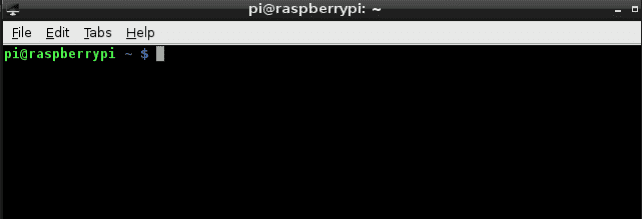
Command Prompt
3. Emulate Raspberry Pi using Quick-Emulator (commonly referred to as QEMU)
QEMU is one of the widely known lightweight Raspberry Pi emulators. This process is almost similar to the one of RPi-Emulator that we previously covered. However, we have to use the Raspberry Pi OS image ISO we downloaded while using the VMware Workstation in this guide.
Visit the QEMU official website, download the “.exe” file, and install it on your Windows operating system. Follow the on-screen provided prompts to complete the installation process. Once you are done installing, the application will be installed in the program files. However, its downside is that we cannot launch the application. Hence we need to do some additional tricks. Stick to this guide to learn more.
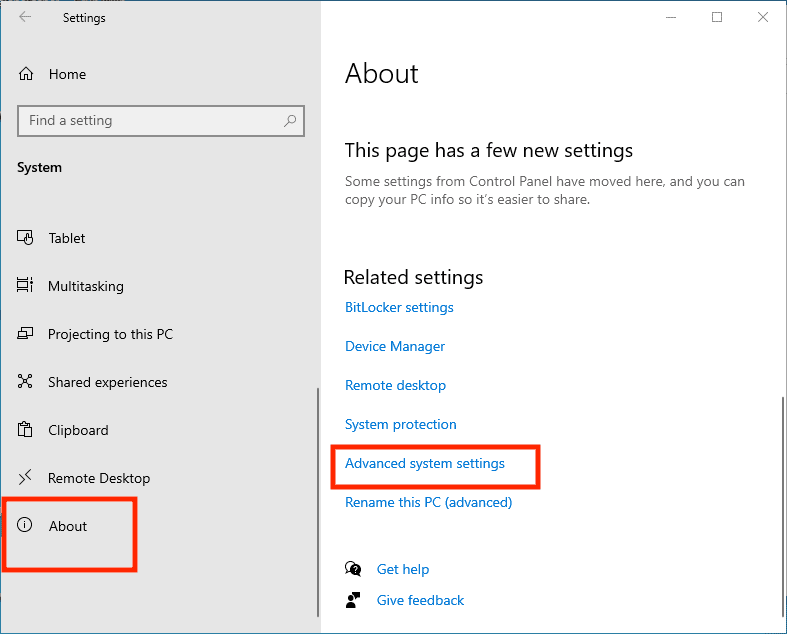
1. Launch the Settings and select “About.”
2. Next select “Advanced system settings.”
Advanced System Settings
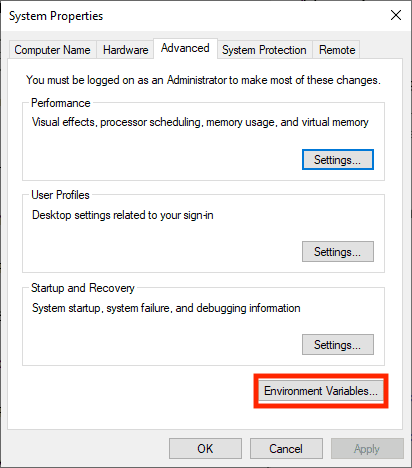
3. Under the “Advanced” tab, select “Environment Variables.”
Environment Variables
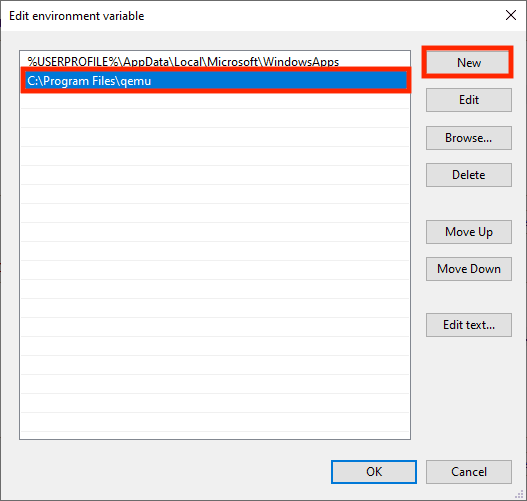
4. On the “Environment Variables” screen, double-click on “Path” and select “New.”
5. Input the command below and click “OK.”
C:\Program Files\qemu
Edit Environment Variable
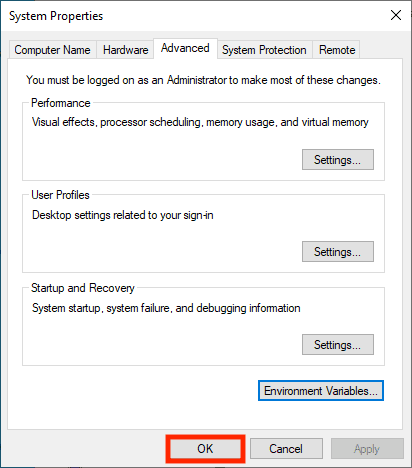
6. Conclusively, click “OK” on the “System properties” window as shown below to complete the process:
System Properties
Once you have completed the process highlighted above, let us make the Raspberry Pi machine in QEMU.
Making a Raspberry Pi machine in QEMU
Before commencing this step, you must ensure you have downloaded the Raspberry Pi ISO image. If you haven’t downloaded the ISO, click this link and download the file. It might take a while, dependent on your internet speed. Once it is done, proceed and follow the prompts provided herein:
Step 1: Create a folder in the “Documents”
Step 2: Once you create a folder in the “Documents” section, copy the downloaded ISO file into the created folder.
Note: It is not mandatory to make a folder, but we have done so in this article guide to avoid complications while making the machine.
Step 3: Now launch the PowerShell by opening the “Start Menu” and typing in “PowerShell.” Once the search results are shown, click “Enter” on your keyboard to launch it.
Step 4: Using the cd command, we shall go to the directory we created in step one. For my case, I will use the command below:
cd Documents\ ISO
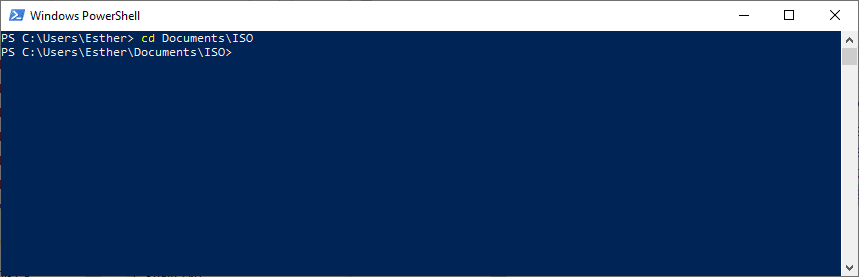
Windows PowerShell – Change Directory
Step 5: Boot the ISO file on QEMU using the command provided below:
qemu-system-x86_64.exe -boot d -cdrom .\2021-01-11-raspios-buster-i386.iso -m 2048
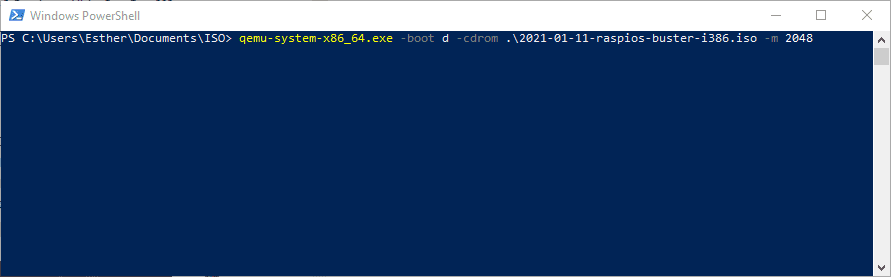
Boot ISO
Let us understand the code syntax.
Code syntax:
“qemu exe file” -boot d-cdrom “iso file name” -m “size of RAM to be assigned to it.”
Code breakdown:
qemu exe file – is the qemu setup application we downloaded in this article
iso file name – is the name of the Raspberry Pi ISO file we moved into the ISO folder in Documents
-m – this is the RAM to be allocated to the emulator (in this case 2048 MB)
Step 6: Select “Graphical Install” and click “Enter” on your keyboard
GUI Option
Step 7: Now, follow the on-screen guides to complete the installation process.
Note: We shall not go through the installation phases since they are similar to those covered in this article guide. Therefore, to avoid monotony, we shall skip to the end. If you encounter any complexities, please refer to the “Emulation using VMWare Workstation as the processes are similar after selecting “Graphical install.”
Alternative installation method
Prerequisites
• QEMU application (Download the 32bit version to avoid complications)
• Raspberry Pi OS
• Kernel
• Windows OS
• 7Zip
Ensure you have downloaded all the files mentioned above before using this method.
Once you have assembled all the prerequisites mentioned above, follow the steps below:
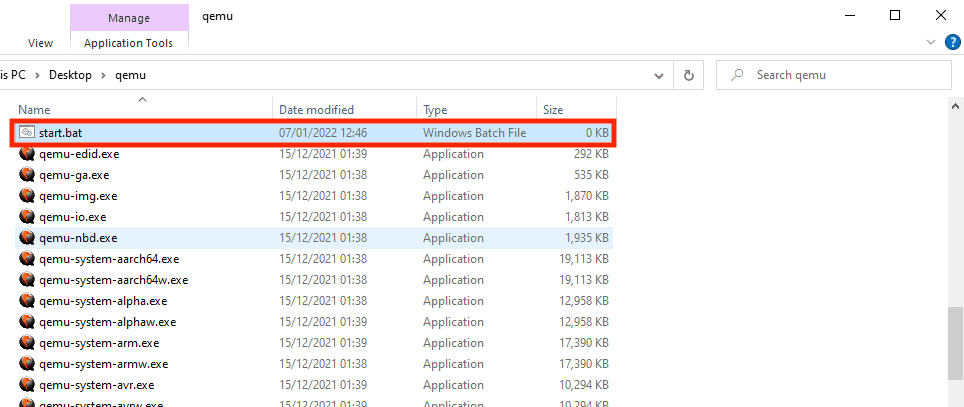
Step 1: Extract the downloaded files into the same folder.
Once you have downloaded the prerequisites, use the 7Zip applications to extract all the files to the same folder. For the sake of this tutorial guide, I will name the folder “qemu.”
Note: While downloading the Raspberry Pi OS desktop, ensure you select the “Pixel desktop version.” Once you have, move it to the “qemu” folder.
Step 2: Setting up the QEMU Emulator
1. Open the folder containing the QEMU, Kernel, and Raspberry Pi OS OS. On that folder, generate a new text file with the name “start.bat.”
bat extension
2. Righ-click on the created text file and click on “Edit.”
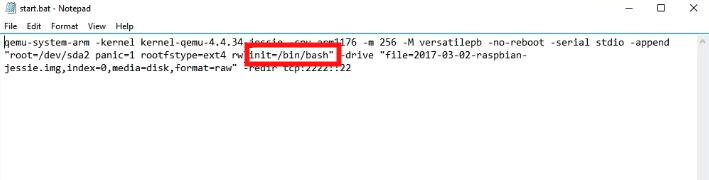
3. Input the command below and save the file:
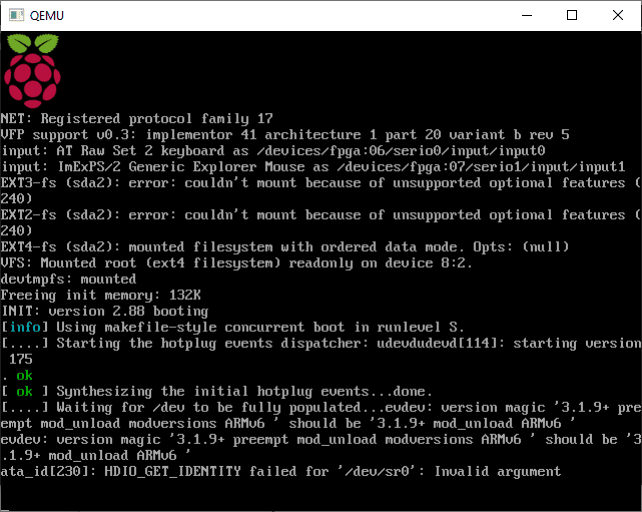
qemu-system-arm -kernel kernel-qemu-4.4.34-jessie -cpu arm1176 -m 256 -M versatilepb -no-reboot -serial stdio -append "root=/dev/sda2 panic=1 rootfstype=ext4 rw init=/bin/bash" -drive "file=2017-04-10-raspbian-jessie.img,index=0,media=disk,format=raw" -redir tcp:2222::22
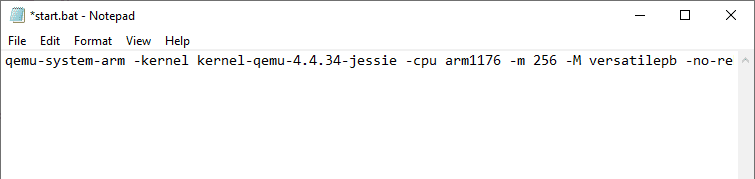
Code snippet
4. Launch CMD from the address bar in the “qemu” folder and run the command below:
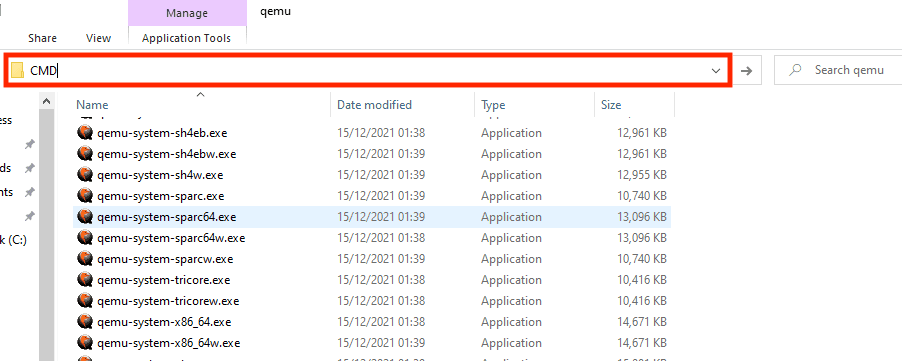
CMD
start.bat
5. Run the command below:
sudo nano /etc/udev/rules.d/90-qemu.rules
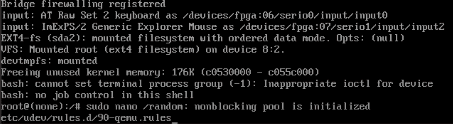
Command Line
KERNEL== "sda", SYMLINK+= "mmcblk0"
KERNEL== "sda?", SYMLINK+= "mmcblk0p%n"
KERNEL== "sda2", SYMLINK+= "root"
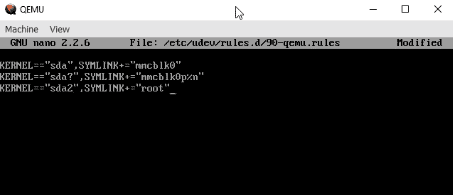
Text Editor
6. Now press “Ctrl + X” then “Y” and “Enter.”
7. Close the QEMU emulator using the command terminal below:
sudo shutdown -h
8. Navigate to the “start.bat” file and delete the following line, then save and close the file:
init=/bin/bash
delete init-/bin/bash line
9. On the CMD type in:
qemu-img.exe resize 2017-03-02-raspbian-jessie.img +4G
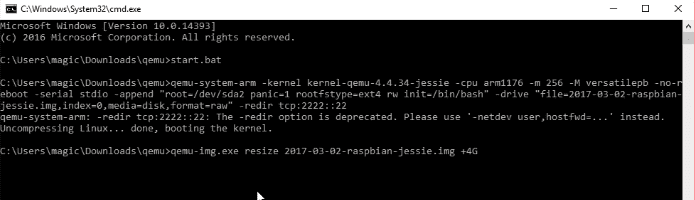
Resize the raspbian storage
10. Don’t worry about the errors. The resizing process will still take effect.
11. Run the “start.bat” command
That’s all you have successfully installed the Raspberry Pi on the QEMU emulator.
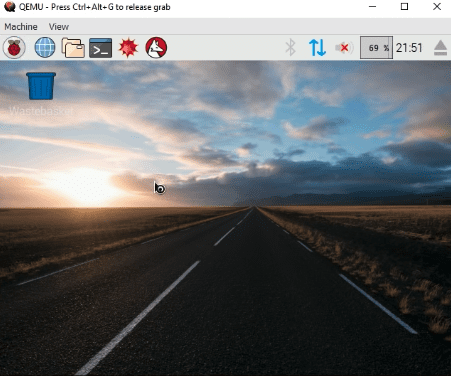
QEMU Pi Window
4. Emulate Raspberry Pi using Microsoft Azure
Microsoft Azure, often termed Azure, is a cloud-based computing service designed and operated by Microsoft. It is used for application management through Microsoft-managed data centers. Microsoft Azure has a built-in option to download Pi emulators on Windows operating systems. Besides this option, MS Azure comes equipped with a user-friendly online simulator.
In an emulated Raspberry Pi OS environment, the two features are essential as you can access the Raspberry Pi application without buying the real Pi hardware. This emulator is good for efficiency as MS Azure offers a readily-made setup; hence it does not require command line forms like the QEMU emulator.
There should be no alarm call for those who have never used the Azure application. Emulating an OS using this emulator is as simple as downloading a program and unpacking it on the Azures server. Therefore, you can easily enjoy a complete emulated Raspberry Pi experience with this ease of access.
Note: If you lack your designated Azure server, you can use the online client simulator to emulate the Raspberry Pi.
Download the Microsoft Azure or use the Raspberry Pi Azure Online simulator
5. Run a Raspberry Pi live disk
Using emulators to emulate Raspberry Pi has shortcomings. For instance, one of the most collective shortcomings is that emulators emulate older Raspberry Pi versions, thus limiting users.
To get a more updated and recent version of Raspberry Pi, you need to use a Raspberry Pi Desktop, which replaced the older version of Raspberry Pi with the Raspberry Pi OS OS. However, the downside of using emulators such as QEMU is you will use the older Raspberry Pi OS OS.
Using this method is relatively more straightforward compared to the already mentioned methods. All you are required to do is download the Raspberry Pi Desktop ISO and burn it to a USB thumb drive. Once you are done, restart your PC and enjoy the Raspberry Pi OS.
Download the Raspberry Pi latest desktop and use it on your Windows PC.
Conclusion
The Raspberry Pi Desktop is meant for you if you are a rookie tech enthusiast and programmer. Despite it being quite affordable and readily available, there is no need to purchase it, and you can emulate it first. This will help you learn more and save the money you could use to buy the Raspberry Pi.
This article guide has compiled and reviewed the very best cheap and easy-to-use Pi emulators on your Windows environment. Virtually enjoy the benefits of the Raspberry Pi for free by using the provided emulators. Please give a thumbs up via the comments section if you found the article helpful.