Table of Contents
Microsoft Windows is a full-fledged operating system slapped onto laptops and PCs. Despite the developers’ long and hard efforts to make sure every user’s experience on Windows goes smoothly, some things are bound to mess up from time to time. This scenario relates to the software side and the hardware end of things as well. For instance, from a software perspective, you’ve got issues like the printer offline problem and the unmountable boot volume error in Windows 10.
As mentioned earlier, the same can be said about the hardware part of a Windows laptop. One persistent problem that has been riling up quite a several users is the Windows key not working anymore. The Windows key is a time-saving measure that quickly lets us search for what we need across the operating system, so having it non-functional puts a dent in the whole user experience. That is why we’ve decided to put together this guide and discuss how to fix the Windows key not working on Windows 10/11.
Make sure to read until the end to fix the issue promptly.
Resolving the Windows key not working issue
The following measures must be followed carefully if you want to solve your Windows key not working hassle on your Windows 10 or Windows 11 PC. Let’s get started without wasting any further time.
Check if there’s a Win Lock key on your keyboard
First, we don’t have to gravitate toward the more complicated end of fixes when we can try out some simpler ones at the beginning. Sometimes, users have a specific type of keyboard with a dedicated “Win Lock” key. You’ll find this key on specialized gaming keyboards with RGB lighting and more commonly. If you’re a gamer, you’re likely to have a component such as the one mentioned right now.
Therefore, for this fix, check if you have the Win Lock key on the keyboard pressed that has the Windows key disabled. Try looking near the function key row of keys on the keyboard, particularly near F9. If you locate this key on your keyboard, press it once to turn it off and try using the Windows key to see if it works now. Upon pressing the key, you should be able to get a prompt on your screen indicating whether Win Lock is active or not.
If you don’t get the prompt, try pressing the Win Lock key again to see if it would. If, in any case, things do not work out, or you do not have the Win Lock key in the first place, keep on reading to get to the next step.
Reboot the computer
Restarting your PC should be the next step after searching for a specific Win Lock on the keyboard. This is a step that had personally worked for us here at Windows Pixel sometime back when our device’s Windows key wasn’t responding. All you have to do in this case is click on the “Windows Start” button, select the “Power” key, and then choose the “Restart” option to finalize the process. The following screenshot should help sum up things for you.
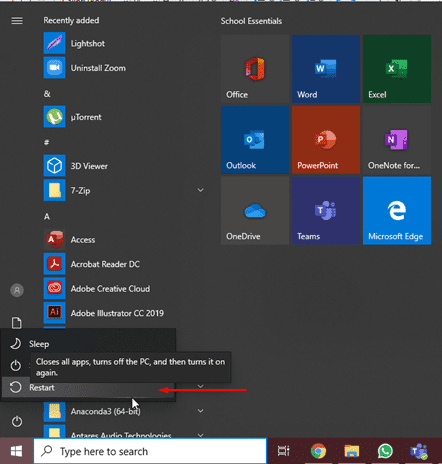
Restarting the PC
If even a reboot doesn’t help and the Windows key still isn’t working on your Windows 10 or Windows 11 PC, keep reading to try other approaches to this vexing problem.
Get your keyboard drivers up to date
Another probable reason your Windows key is giving you trouble is because of a lack of up-to-date keyboard drivers. This is a common occurrence in Windows PCs; plenty of users forget to keep their essential system components up to date. Therefore, if the issue is originating for this reason, then it appears we have a pretty simple fix. We must dig out our keyboard drivers on the Windows PC and prompt them to update. All this is pretty simple to do.
The following instructions will walk you through the process, so you can get it done quickly.
1. The first step is to open the Control Panel on your Windows PC. Please do this by typing for the required application in the Windows Search bar and clicking on the utility once it appears on the screen.
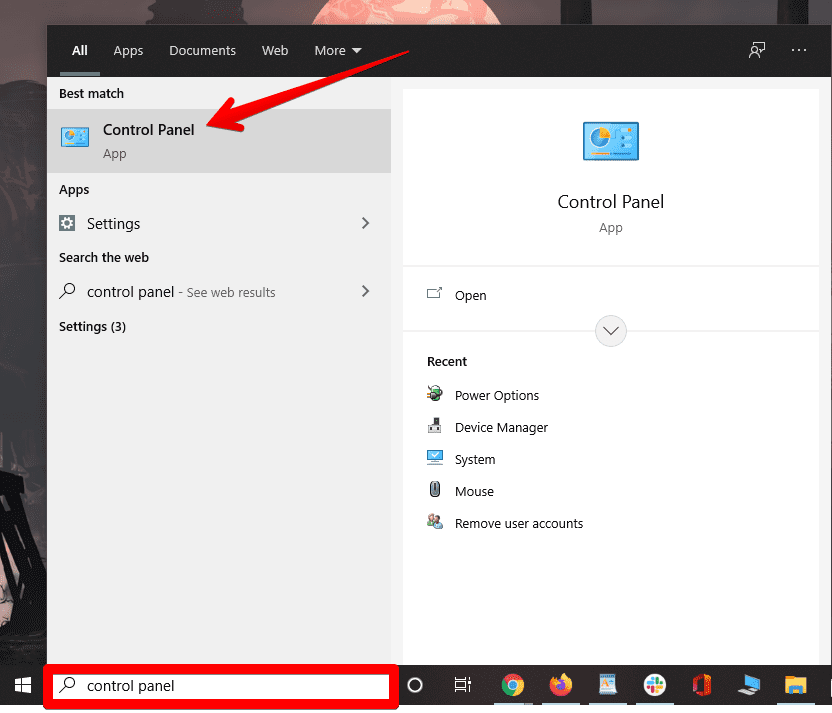
Searching and opening the Control Panel
2. Right after that step, you should have the Control Panel application open up on the screen. The next step is to click on the “Hardware and Sound” option. Follow this step, as shown in the screenshot below.
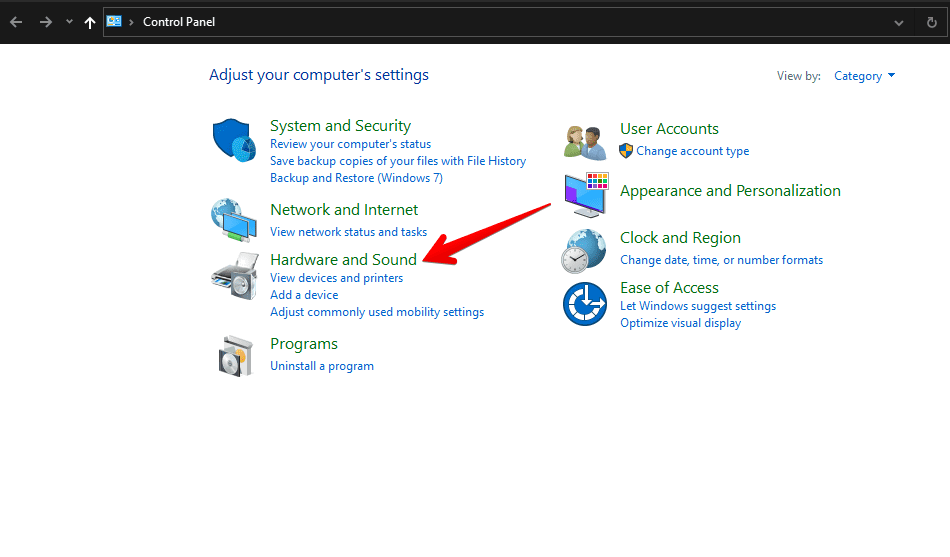
Opening Hardware and Sound
3. As you’re taken to a different page after clicking on “Hardware and Sound,” click on “Device Manager” to get to the next step. Again, check out the screenshot below, and you’ll understand what to do.
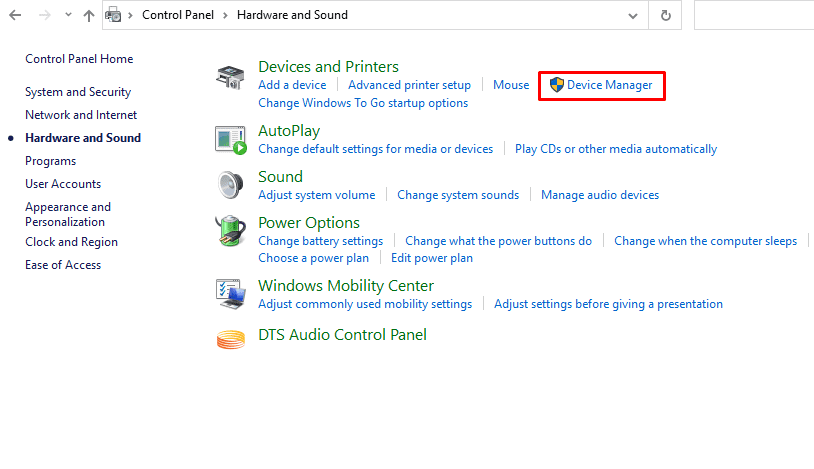
Selecting the “Device Manager” option
4. Selecting the “Device Manager” option will lead you to launch another window. Here, you’ll be able to visualize all devices related to your Windows PC. Spot the “Keyboards” section here and click on the drop-down arrow right beside it. You now should be seeing your device’s keyboard. Right-click the entry and select “Update driver” to get to the next step.
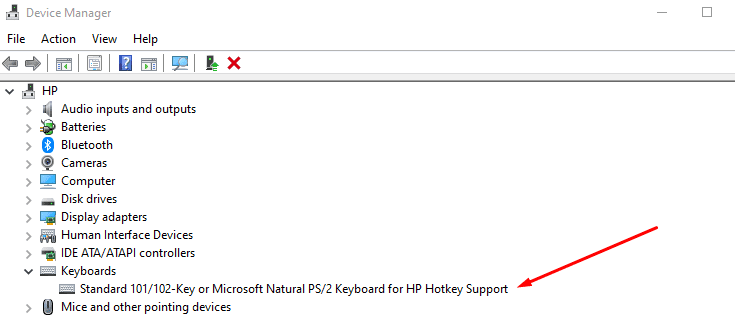
Updating the keyboard drivers
5. As soon as you complete the last step, you’ll be able to look for the drivers automatically. A dedicated window will appear to take you through the process, so select the right option, as shown in the screenshot below, for the best results.
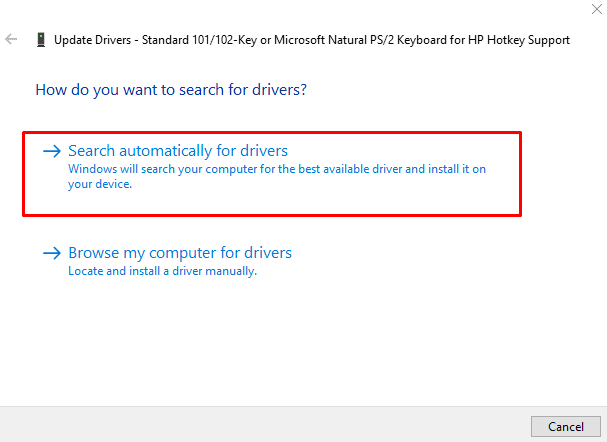
Searching for the drivers automatically.
That’s about it for this method of fixing the Windows key not working on a Windows 10/11 PC. After clicking on “Search for drivers automatically,” the operating system will begin the hunt and install the necessary drivers if they’re needed. However, the system could return with a prompt saying that the latest drivers have already been installed. In this case, it is not the issue of outdated drivers causing the problem. It’s something else. Let’s look into other possible causes down below.
Clean the Windows key section of the keyboard
The reason you cannot get the Windows key of your keyboard to work might incline to a more mechanical issue. Some users have had their Windows key filled up with dust and other obstructions that hindered the functioning of the key. In this case, you will not be able to use the Windows key, so it’s worth taking a closer look at it and checking if any accumulation of dust particles is hindering the key from being pressed.
There are excellent online tutorials on how to clean your Windows keyboard, so you can easily follow the helpings of the internet for this purpose. However, at first, you should make sure that this is why your Windows key isn’t working. If your keyboard is new and isn’t relatively old, then there’s likely another issue with the device and not a physical hindrance.
Disable Game Mode
It has been found that the specialized “Game Mode” functionality on both Windows 10 and Windows 11 has been barring players from actively using their Windows key. This is similar to the Win Lock scenario we covered above. The Game Mode prevents the Windows key from becoming functional, so players can avoid crashing their games by accidentally pressing it during their playthrough.
That is why we’ll be disabling the Game Mode in this step in the hope of fixing the Windows key on the PC. If this measure doesn’t help, you can toggle the feature back on anytime.
1. The first step is to open your Windows PC’s “Settings” app. This can be done in various ways, even by clicking on the “Settings” icon in the Windows Start menu sidebar.
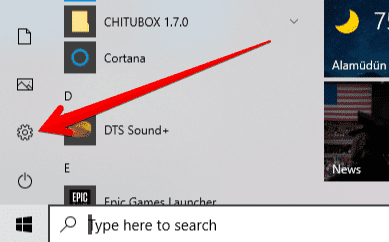
Clicking on “Settings”
2. The next step after opening up “Settings” is to select “Gaming” within the main settings hub of the device.
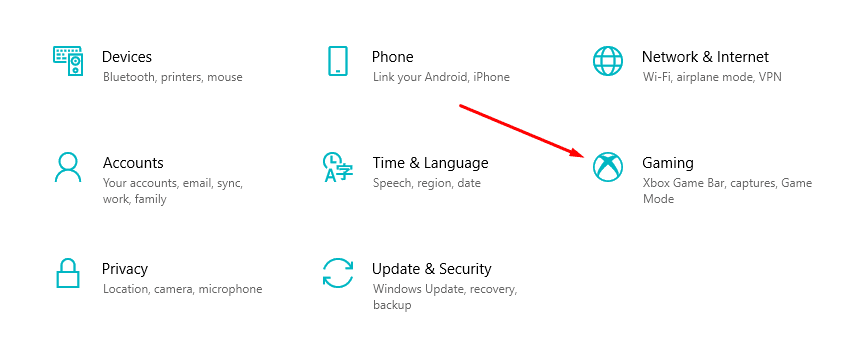
Clicking on “Gaming”
3. After clicking on “Gaming,” you’ll be taken to a different page. Select “Game Mode” from the sidebar and then click on the toggle, as shown in the screenshot below, to finalize the process.
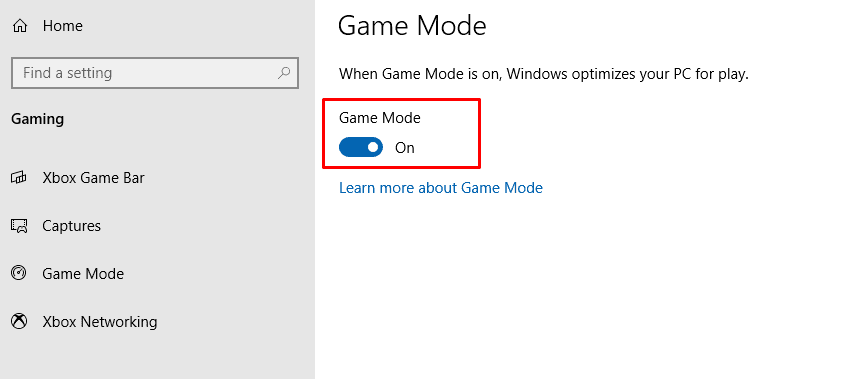
Disabling Xbox Game Mode
That’s about it! We recommend restarting your PC to apply the changes profoundly to the system. After the system boots on, try using the Windows key to see if it works again. If it still doesn’t, keep on reading to try other fixes.
Troubleshoot the keyboard
Windows 10 and 11 are feature-rich operating systems with a plethora of functionality. One of its features includes a troubleshooter for a wide variety of devices. For something that’s more catered to the issue we have at present, we will utilize the keyboard troubleshooter to see if it brings favorable results. Check out the following steps to learn how to do that.
1. The first step is to open the “Settings” app on the operating system and choose the “Update and Security” option.
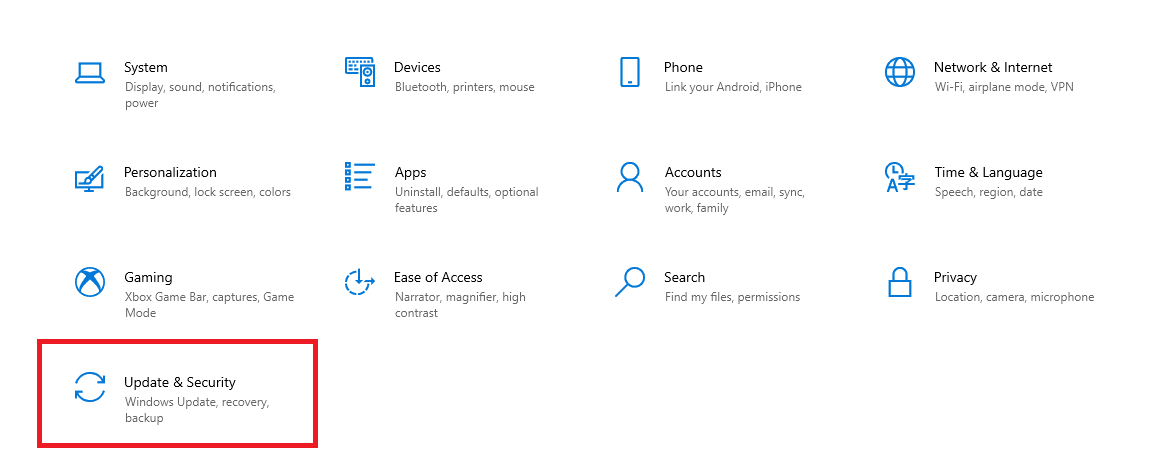
Clicking on “Update and Security”
2. Select “Troubleshoot” from the sidebar inside the “Update and Security” portion. Once done, choose “Additional troubleshooter” next to proceed ahead.
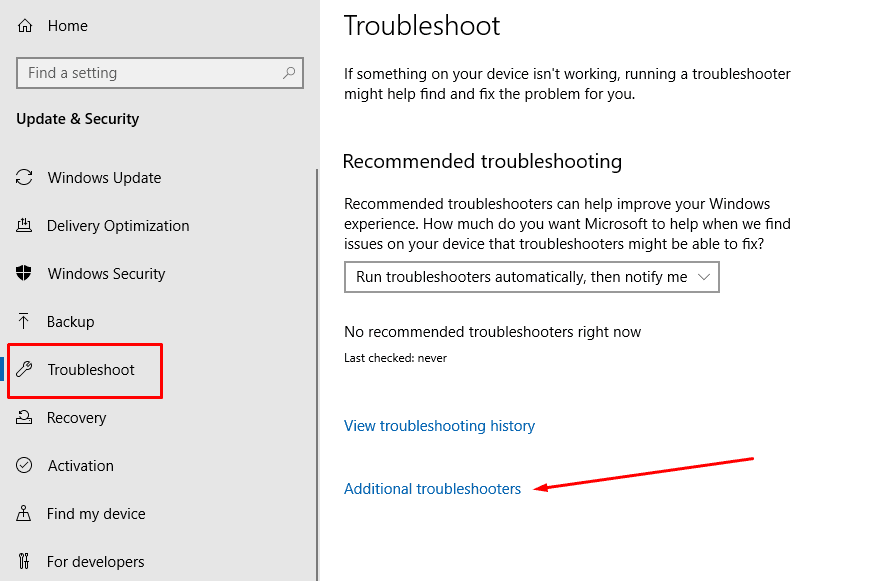
Selecting “Additional troubleshooters”
3. The final step after selecting “Additional troubleshooter” is to scroll down until you find the “Keyboard” option. Click on it to reveal “Run the troubleshooter” and then select it to start the process on your Windows PC.
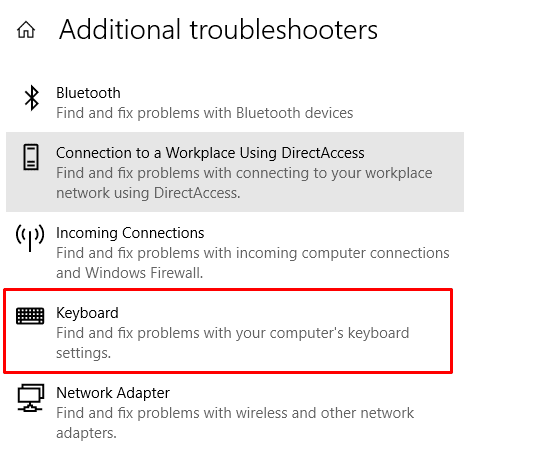
Running the keyboard troubleshooter
4. Clicking on “Run the troubleshooter” will prompt you to open a separate window where the troubleshooter will run. The system will now take some time to detect issues with this component and fix or update them as it goes on. You should be done soon.
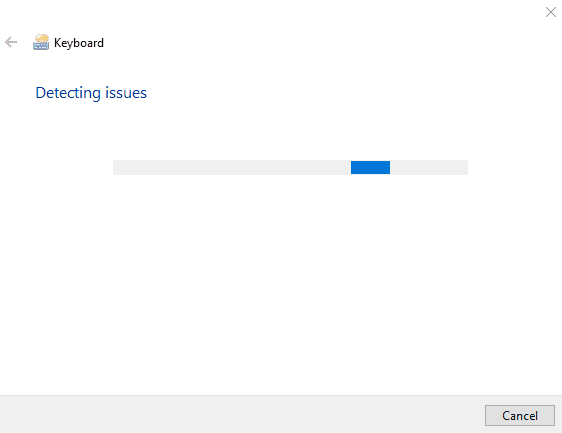
Keyboard troubleshooter in action
That’s about it knowing how to troubleshoot your keyboard. Keep on reading if you still haven’t fixed the issue.
Check for viruses on the device.
It is quite possible that a virus could be causing your Windows key to become non-functional. If you’re experiencing other issues on the device besides this one, this is likely the case. To confirm the suspicion, you’ll have to run an antivirus scan on the device and see if the software detects anything fishy. If you don’t have any other anti-malware program installed except for Windows Defender—the built-in antivirus for the operating system—feel free to check out the 10 best free antivirus software for Windows.
Avast Antivirus seems a good pick, so we recommend downloading it on the PC and running a scan. If you’ve got any foreign invader residing on your computer, deal with it on the fly, restart the device, and try using the Windows key again to see if it works. There’s a high chance that you should be able to use your device optimally if the existing issue has been dealt with.
However, if you didn’t have any virus, to begin with, or the situation still hasn’t been alleviated for you, keep reading to try a couple of more potential fixes.
Toggle off the “Filter Keys” feature
We’ve gathered another piece of information that has helped many users resolve the problem. It appears that the “Filter Keys’ feature in the “Ease of Access” portion of your Windows PC’s “Settings” is causing the Windows key not to work. To test whether this is the case, we’ll simply be disabling Filter Keys and confirming if that brings good results. Follow the steps listed ahead to learn how to do this.
1. The first step is to open your Windows PC’s “Settings” system utility and select “Ease of Access” once you’re done. The following screenshot should clear things up.
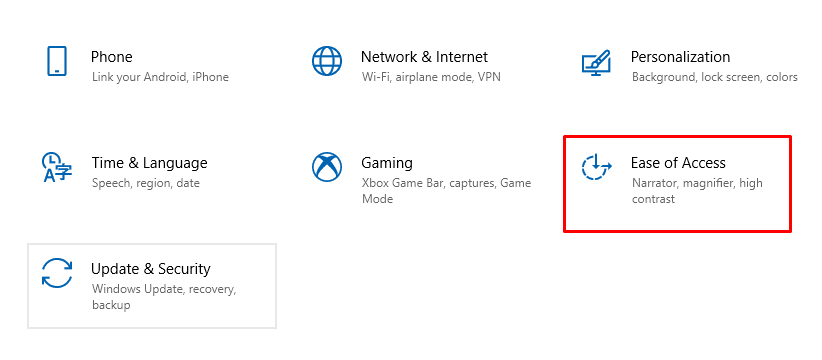
Selecting “Ease of Access”
2. As you’re taken to a new page after clicking on “Ease of Access,” click on “Keyboard” under the “Interaction” panel to move forward.
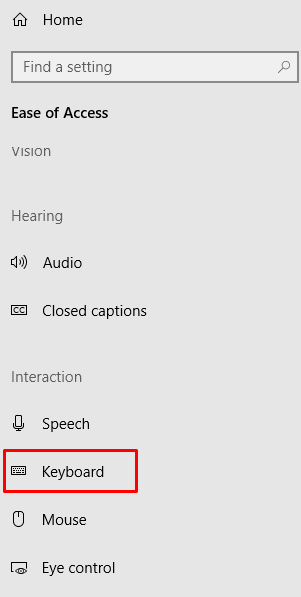
Clicking on “Keyboard”
3. Finally, scroll down on the right-hand side of the screen until you find the “Filter Keys” option. Click on the toggle underneath the feature to disable it easily. That’s about it.
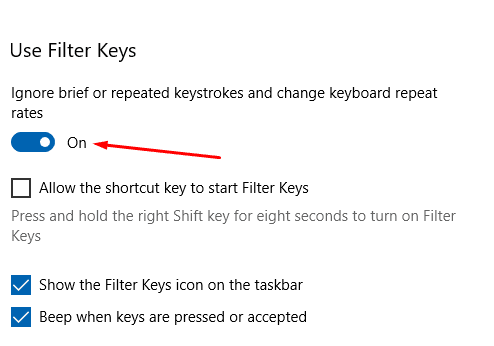
Disabling “Filter Keys”
This is how you disable the Filter Keys option on your Windows PC. Close the window and try pressing the Windows key to see if it works now or not.
Conclusion
After implementing all of the fixes we’ve outlined above, it’s likely that you’ll fix the Windows key not working issue. We encourage you to follow the steps carefully for the best results.
Personally, restarting the PC, disabling Game Mode, and running the keyboard troubleshooter have all worked great for similarly troubled users, including us. Do let us know in the comments section if you were able to fix the problem afterward or not.
