Table of Contents
Software updates are one of the few things that annoy us the most. Because updates take so long to run, Windows users frequently make jokes about them (yes, you should initiate your update overnight). Updates, like any excellent software, are an essential component of keeping our computers healthy and secure. However, it isn’t always practical to do so right now, and it can also cause issues with other products you’re using.
Windows updates are automated, as is the case with most modern technology. The reason for this is that engineers genuinely care about the product they create, and they don’t trust end-users to update it themselves. As a result, automatic updates have been developed to make your life easier while maintaining the seamless operation of your system.
An incorrectly scheduled automatic update can be significant pain. This article will lead you through all you need to know about halting an update and reversing it if necessary, whether the update creates problems and bugs with your PC or it is initiated while you’re working.
Updates for Windows 10 keep your PC bug-free and secure against the latest security threats. But, unfortunately, the upgrade procedure can occasionally bring your computer to a halt.
Methods for disabling Windows 10 updates
Nothing is more unpleasant than when an automated Windows update swallows all of your system CPU or RAM when you’re composing an email, working on a term paper, or paying your bills. As a result, there has been a lot of quest into the various options for turning off Windows 10 updates.
Select a method for turning off Windows 10 updates from our proposal herein. In addition, you have the option of turning them all off permanently or merely turning off non-critical updates. You can also manually halt them or create a timetable for when they occur.
Let’s look at all the options for controlling Windows 10 updates and regaining control over your machine.
How to turn off Windows updates in Windows 10
Although stopping Windows 10 Updates isn’t permanent, there are a couple of ways to disable them temporarily unless you’re unplugged from the internet. We aren’t here to debate Windows 10’s aggressive approach to upgrades; after all, it is the most widely used operating system in the world, making it the most vulnerable to malicious hackers.
Follow along for the best current ways for stopping updates, even if Windows 10 has a habit of allowing them to happen even after adjusting the settings. You may want to automate one of these interim fixes by using a script or batch file.
Using Services.msc, disable Windows 10 update
Follow these instructions to turn off Windows 10 updates:
1. To access your PC’s service console, press Win+R and type “services.msc.”
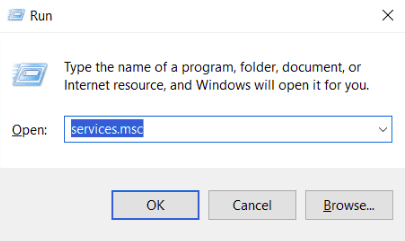
services.msc
2. To enter the General settings, scroll down and double-click on Windows Update.
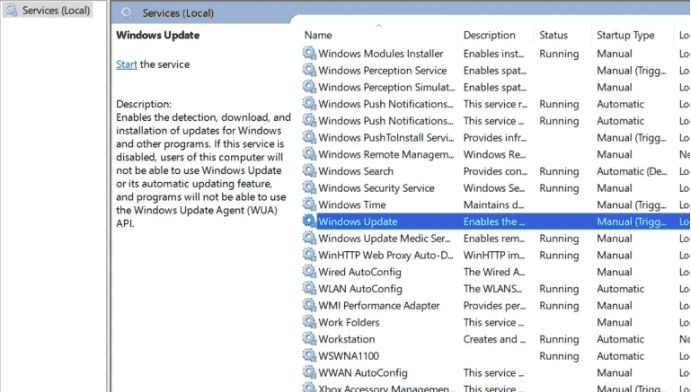
double click on windows update
3. Select disabled from the dropdown option.
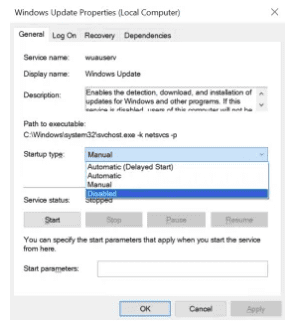
select disabled from the dropdown menu
4. After that, click OK and restart your computer.
This operation will turn off automatic updates in Windows for good. If you want to re-enable it, repeat the procedures above and change the choice to Automatic.
This is another more friendly approach to adjust the Windows Update settings from the Windows Settings menu on your computer. This method may be more convenient for some people, depending on their level of technological know-how, but it is not a long-term answer.
To turn off your updates, go to the settings and do the following:
1. Select the Settings cog from your Windows Start menu.
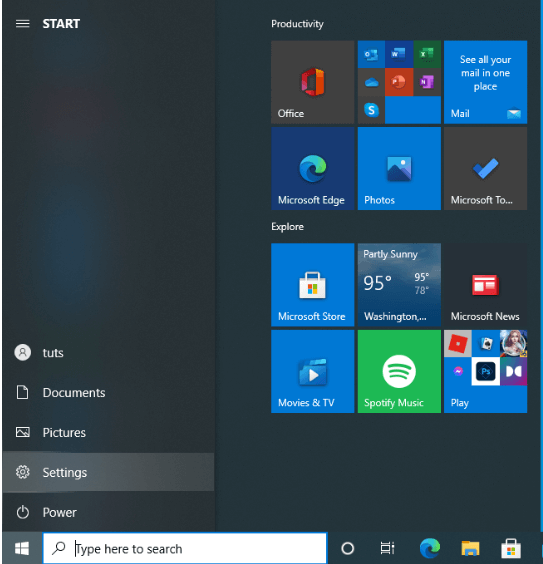
Click on the settings cog
2. Now select Update & Security from the Settings page.
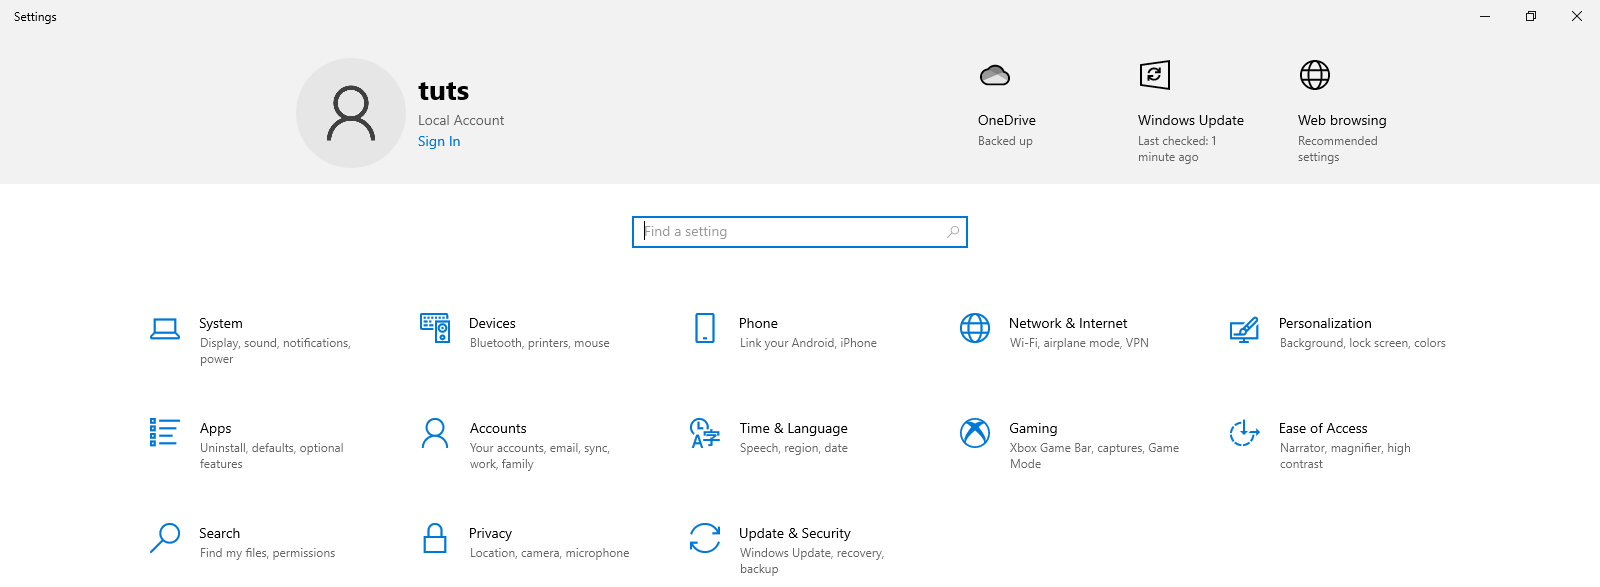
click on update & security
3. Next, select Advanced Options from the dropdown menu.
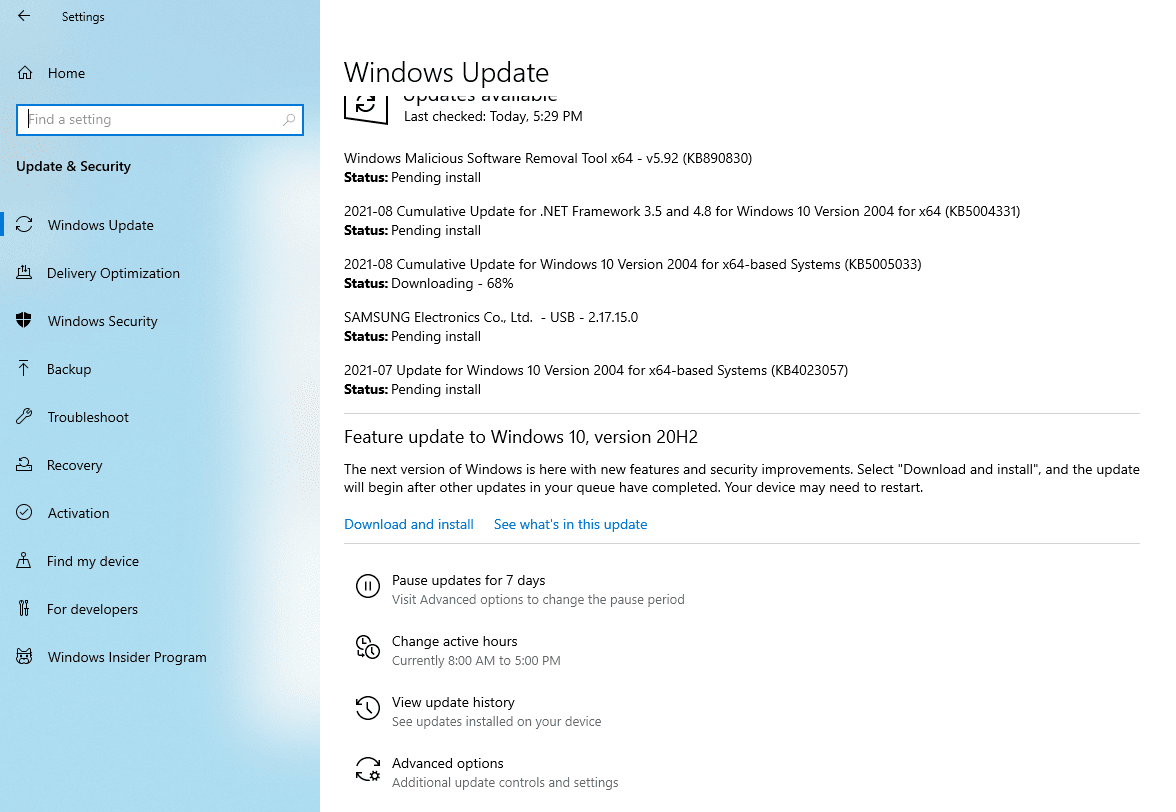
Click on advanced options
4. From the selection, select a date for which you’d like to suspend automatic updates. Windows only allow you to pause updates for around six weeks as of this modification.
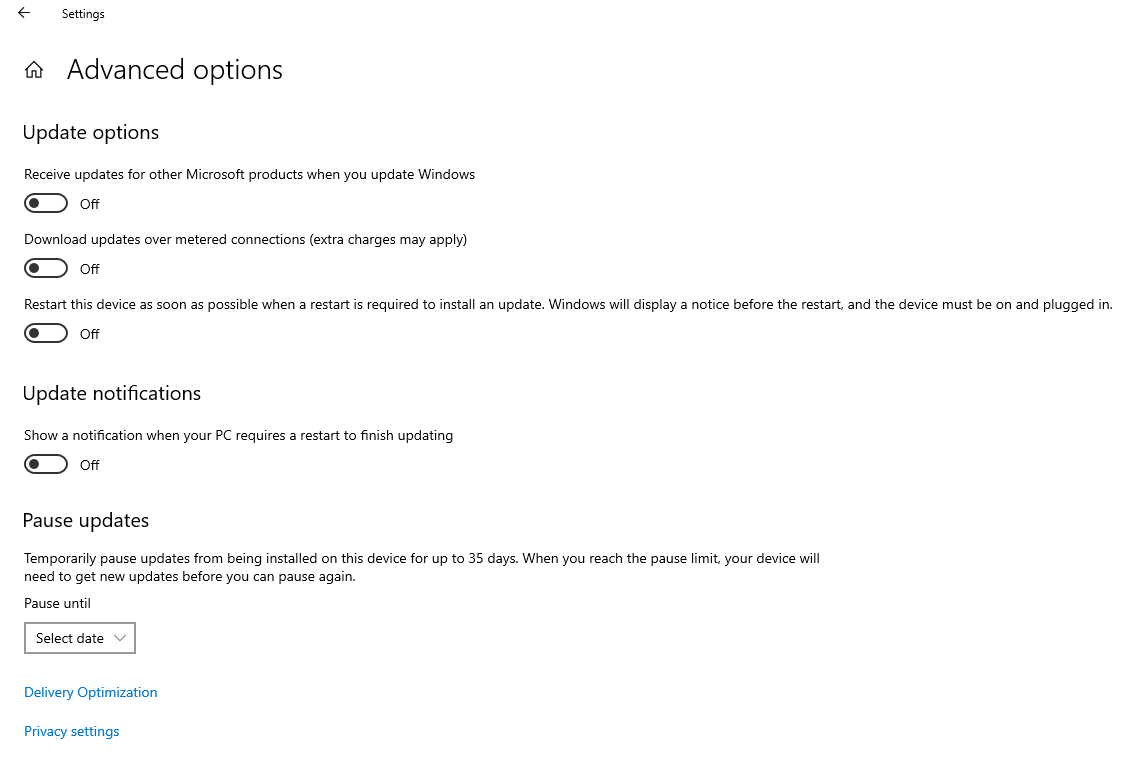
select a date to suspend automatic updates
As previously indicated, this is not a permanent solution, but it’s helpful to know whether you only need to suspend updates for a short period. When you pause your updates, you don’t have to worry about your PC becoming significantly out of date because the automated updates will turn back on their own.
How to use the Registry to prevent Windows 10 from downloading
The initial steps vary depending on whatever version of Windows you’re running, but the process is fundamentally the same. Follow these procedures to disable automatic updates in the Registry:
Open the Start menu, type “regedit,” and then select Registry Editor from the results. (TOP TIP: You can also open up the Run window by pressing Windows key + R.)
Then type “regedit” on the command prompt.
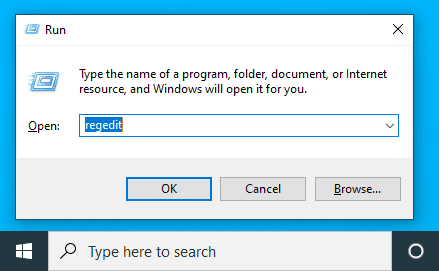
registry editor
You may examine the key that records whether your system is ready to download Windows 10 now that the Registry Editor is open. Double-click HKEY_LOCAL_ MACHINE > SOFTWARE > Microsoft > Windows > CurrentVersion > WindowsUpdate > OSUpgrade using the options on the left side.
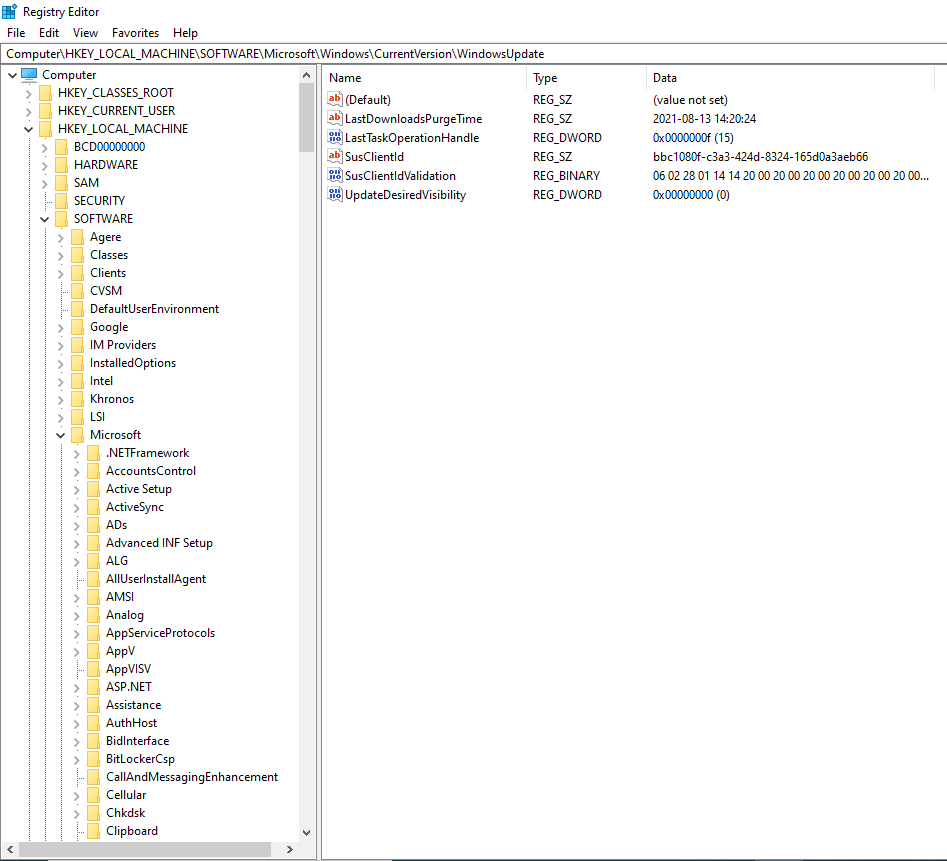
os upgrade
This is how your path should look:
HKEY_LOCAL_MACHINE/SOFTWARE/Microsoft /Windows/CurrentVersion/WindowsUpdate/OSUpgrade
Once you’ve found the proper key, you’ll need to enter a value that informs the system you don’t want Windows 10 to be downloaded. To do so, right-click on the key name, choose New from the submenu, and then DWORD (32-bit) Value from the dropdown menu. You’ll notice that a new value called New Value #1 is created; rename it to AllowOSUpgrade.
Make sure the OS Upgrade function is turned off in Registry Editor as the final step. To achieve this, double-click the file and make certain the value is 0 and the hexadecimal box is checked. Next, refresh the page and then shut Regedit to finish the process.
Many people have complained that this strategy does not work or take effect right away. One (though peculiar) workaround is to reopen the Settings and select ‘Check for Updates.’ It will compel the modifications to take effect.
You should now be able to utilize Windows Update without having to worry about the Windows 10 Upgrade sneaking into the Optional upgrade list and ticking itself for download.
Stop Windows 10 updates by using a metered connection
Use a Metered Connection to Avoid Updates – in most circumstances. Windows will not download updates over a metered connection, which is any connection with a data cap.
Setting a metered internet connection is another method that may temporarily prevent your Windows 10 PC from updating; automated updates will usually not take place.
The most straightforward approach to consistently block most updates is to use the “metered connection” option. It’s compatible with all versions of Windows 10, including Windows 10 Home.
Go to Settings > Network & Internet to set your internet connection as metered. Select Properties beneath the network name you’re currently connected to on the Status tab.
Then turn on Set as metered connection under Metered connection. Set a data limit is also an option. However, it’s not necessary if you’re not on a metered connection.
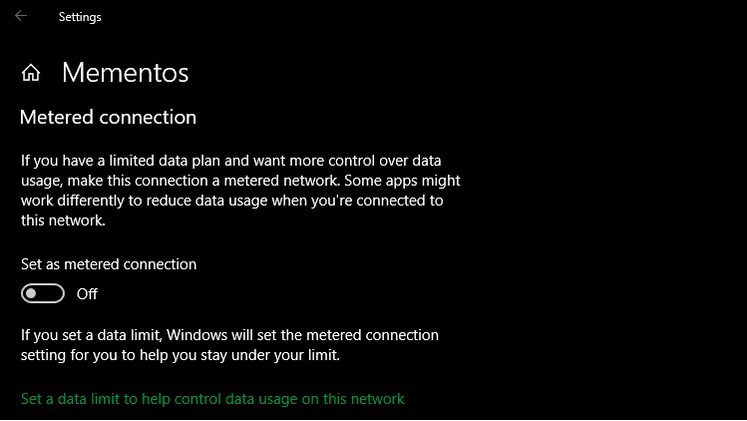
metered connection
If you want to install updates, click Settings > Update & Security > Windows Update and select Check for updates, which will start the download and installation process manually.
You can also activate the option to Download updates across metered connections on that screen, which will effectively prevent the metered technique of limiting updates.
On the off chance that you prefer a step-by-step procedure, follow these steps to set up a metered connection:
- Click on the Settings icon in the Start menu
- Now select Network & Internet from the dropdown menu
- Then, on the left-hand side of the screen, select Wifi
- Then select Manage known networks. Click on the wifi network you’re using and then Properties on the new screen that appears.
- Toggle Set as metered connection to On
Other systems, such as OneDrive, may also fail to update or backup information, so this may not be the best solution for you. However, it should disable automatic updates on your computer.
Using Group Policy to stop Windows 10 Updates
This section applies to individuals who have a version of Windows 10 that isn’t the Home Edition.
Open the Start menu or press Windows + R, type “gpedit.msc,” and press Enter.
Then select Computer Configuration > Administrative Templates > Windows Components > Windows Updates from the drop-down menu.
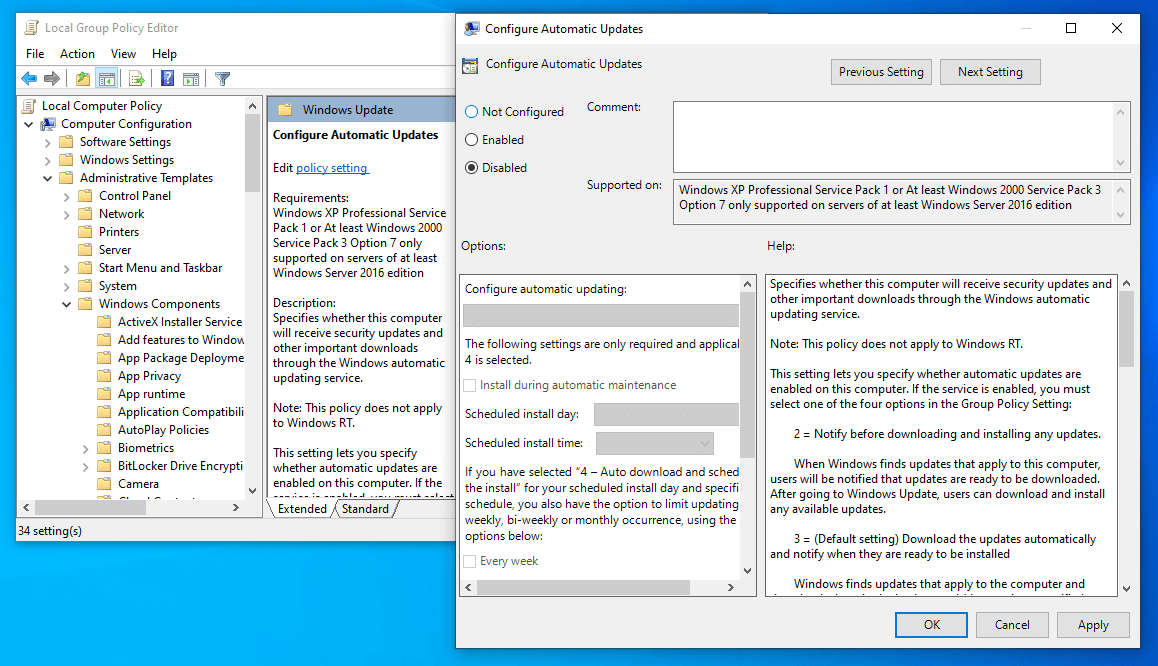
using group policy to stop windows 10 updates
Locate and double-click Configure Automatic Updates.
After that, select Disabled and click Apply, then OK.
Perhaps you’ve come to this page because you’ve discovered that a Windows 10 update has already been installed, and you’re unhappy with the results. Unlike other operating systems, Windows allows you to uninstall an update whenever you want.
Access your PC’s Settings by following the same steps before, then click on Update & Security.
1. To get started, go to the right menu list and select Delivery Optimization, then View Update History.
2. Now, select Uninstall Updates from the dropdown menu.
You can choose to uninstall the updates as needed from here. However, if you’re doing this because the latest update is causing problems with other applications on your computer, do some research before uninstalling everything.
Check your driver and other updates to see whether the problem is caused by something different than the Windows operating system.
Set a timer for updates to be paused
You can utilize the option to delay updates for up to a few weeks if you need to stop your computer from installing all updates for a while. It is a built-in feature in all Windows 10 versions, as long as you’re using the most recent version.
Go to Settings > Update & Security > Windows Update to pause Windows Update. You can halt updates for a week by selecting Pause updates for seven days; by clicking again afterward, you can prolong this period.
Instead, select Advanced settings if you want to pause for a more extended period. Use the selection box under Pause updates to choose a date up to 35 days from now. Updates won’t start installing until this day arrives, and you’ll have to install all available updates before pausing again.
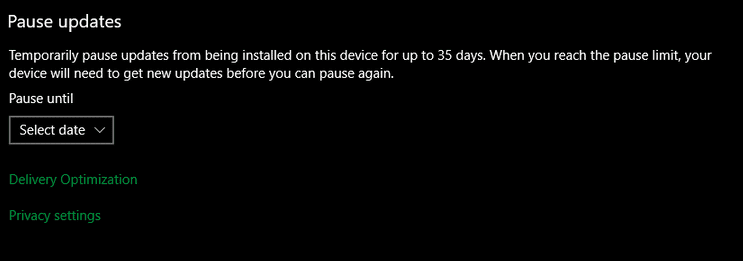
pause updates for a limited time
To resume updates once they have been interrupted, go to the main Windows Update page and click Resume updates.
Receive notifications before updates are installed
You can set Windows 10 to notify you when new updates are available and manually initiate the download. It is helpful for people who have limited bandwidth or a sporadic internet connection. Unfortunately, you can only utilize this approach if you have access to the Group Policy Editor, which is not available to Home users (under usual circumstances).
To access the Group Policy Editor, press the Start button to bring up the search bar, type Group Policy into the search box, and select Edit Group Policy from the results. Next, navigate to Computer Configuration > Administrative Templates > Windows Components > Windows Update and select Configure Automatic Updates while the editor is active.
Set the option to Enabled, then select:
2 – Notify for download and auto-installation under Configure automatic updating.
4 – Auto download and schedule the installation
The latter option allows you to pick when updates are installed automatically using the choices below.
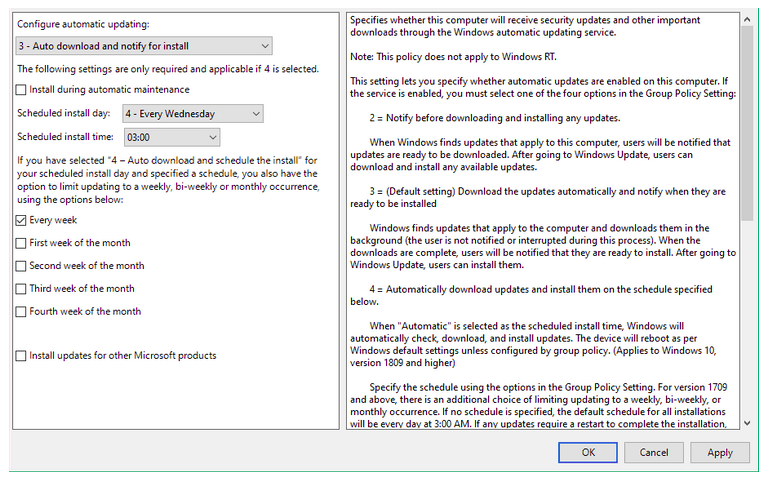
get notified before updates are downloaded
When option #2 is selected, you’ll receive a notification that you require updates the next time they become available. When you choose the message, you will be taken to Windows Update, where you must click the Download button to begin the update process.
It’s worth noting that selecting this setting may block some choices in the Settings app’s Windows Update section.
Enabling the previously described Group Policy change informs Windows that your business manages some settings, thereby restricting them.
Wait until Windows updates are safe before installing them
If you want to temporarily opt-out of Windows quality or feature updates, the following choices are ideal. Delaying updates allow you to buy time and ensure that you are not affected by glitches, as crucial Windows 10 releases are known to have troubles at launch.
The deferred updates will be delivered automatically after the grace period has expired. On the other hand, Microsoft should have addressed any flaws that arose during the initial distribution by now.
The ability to postpone updates can be included in the Settings app. They’re now in the Group Policy Editor, though. However, users of Windows 10 Home are unable to use this feature.
How to postpone feature updates for up to a year
Go to Computer Configuration > Administrative Templates > Windows Components > Windows Update > Windows Update for Business in the Group Policy Editor (opened in the same way as before).
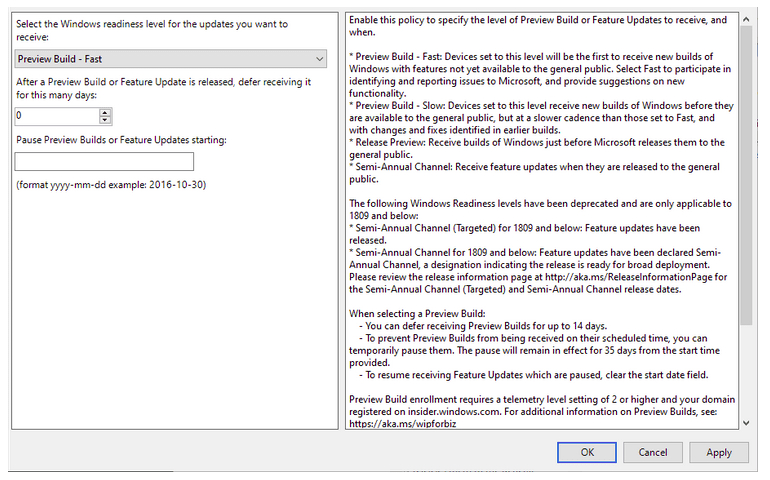
delay windows updates until they are safe
Select Preview Build -Fast Feature from the dropdown menu as shown above. After you’ve enabled this policy, you’ll need to choose your Windows readiness level. The default configuration is Semi-Annual Channel, and however, if you want preview updates or anything similar, you can change it to something faster.
After that, specify how many days (up to 365) you wish to postpone preview builds or feature updates. If you choose, you can also set a start date for the deferral. Keep in mind that feature updates are big Windows 10 updates that come out about twice a year.
How to postpone quality updates for a period of up to 30 Days
Quality updates are smaller Windows 10 patches that appear more regularly than extensive feature updates. To change this, go to the setting, select when Quality Updates are Received in Computer Configuration > Administrative Templates > Windows Components > Windows Update > Windows Update for Business.
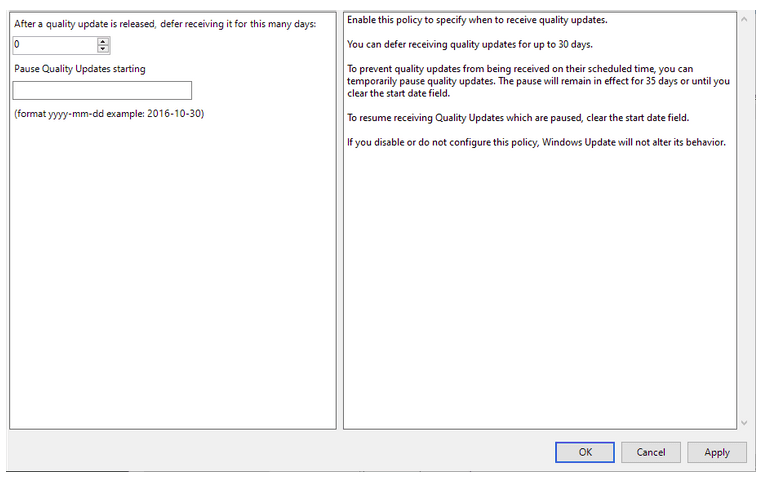
defer quality updates for up to 30 days
You can delay getting quality updates for up to 30 days if this setting is enabled. If you wish, you may also choose to pause Quality Updates on a specific date.
Updates are disabled during active hours.
Windows 10’s latest editions allow you to select active hours, which are the periods when you’re most likely to use your computer. Windows Update will not restart your device to install updates during this time. Under Settings > Windows Update > Change active hours, you’ll see the option.
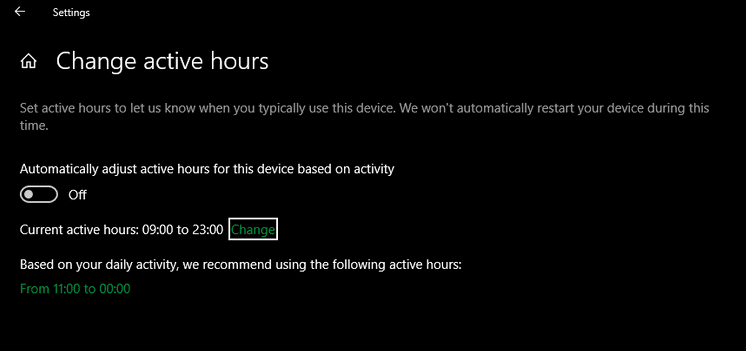
block updates during active hours
If you like, you can use the slider to modify active hours based on your activity automatically. Windows will also suggest times based on how often you use your computer.
Otherwise, change the times when you’re generally active by clicking Change. It has a maximum range of 18 hours, so you can’t leave it on all the time.
Make a plan to install the updates you’ve downloaded
It’s only a matter of time after Windows Update has downloaded new updates that require a reboot before you have to reboot. If you have pending updates, you can schedule a restart rather than waiting for Windows to complete it.
As previously suggested, go to the Windows Update page in Settings to do so. Set the option to restart the computer On and pick a time and date that works for you. Schedule the restart next to the restart now button. Instead of resuming on its own, Windows will employ this method.
We recommend enabling the Show a notification when your PC requires a restart slider under Windows Update > Advanced options for optimum results. You’ll get more information about restarting as a result of this, and you’ll be able to postpone a restart that Windows initiates on its own.
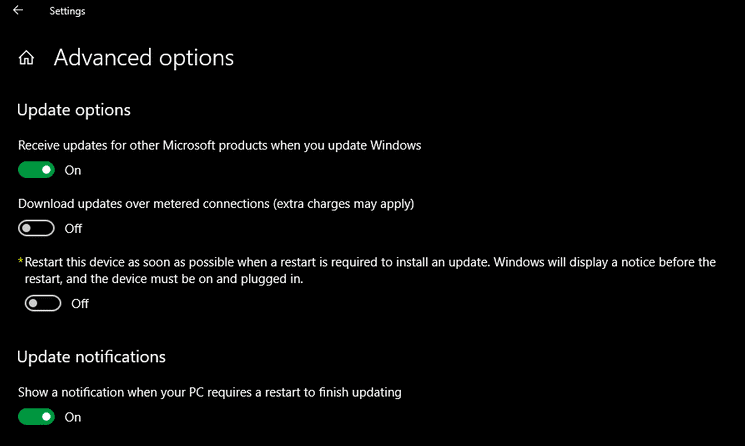
Scheduling the installation of downloaded updates
Turn off Windows Updates completely
As a final resort, here’s the one approach that can entirely disable updates, either permanently or until your computer is restarted. It’s included in all Windows 10 editions.
Open the matching result by going to Start and typing Services. Next, locate and double-click the Windows Update service in the list.
Click Stop under Service status to turn off Windows Update until you reboot. In addition, you can select Disabled under Startup type to prevent the service from beginning when Windows starts. It will stop Windows Update from operating until you manually restart the service.
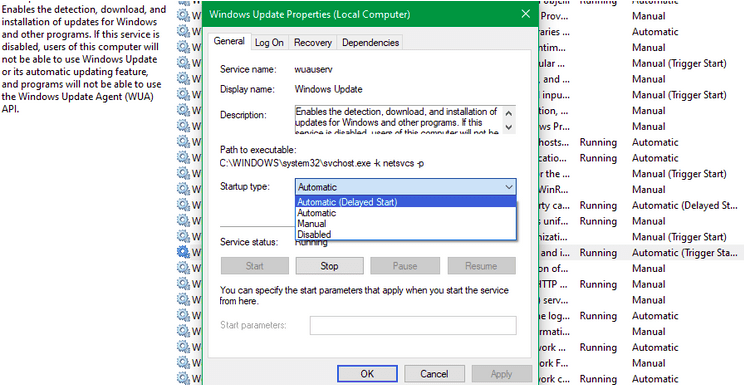
completely disable windows updates
Remember to turn updates back on as soon as possible to safeguard your machine with security patches if you do this.
Managing Windows 10 Driver Updates
Windows Update also manages driver updates in Windows 10. You’ll find them in a distinct section of the Windows Update page in the most recent versions, which you can access by clicking View all optional updates. Expand Driver updates to get a list of possible drivers that could help you solve your problems.
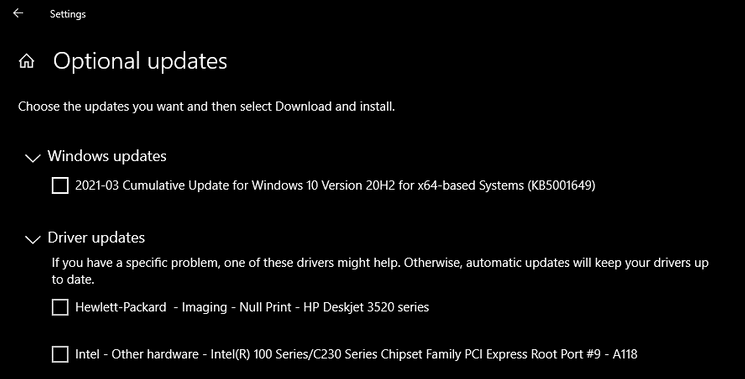
handling driver updates in windows 10
Otherwise, Windows should only install new drivers when they are required.
As of this writing, Microsoft’s Show or Hide Updates Troubleshooter tool, which allowed you to disable driver updates in Windows Update, is no longer available.
How to manage Windows 10 App Updates
Here, we’ve concentrated on how to utilize Windows Update to keep your system up to date.
It’s important to remember that the same cautions apply here. When the latest version of an app is problematic or has other drawbacks, turning off app updates can be advantageous. On the other hand, regular updates help keep the software on your system safe, so don’t put them off for too long.
Only pause Windows Update if it’s indispensable.
You now know how to suspend Windows 10 updates whenever you want. Automatic updates are generally beneficial because they keep your device secure without requiring any action on your part. However, temporarily disabling updates can assist if you need to keep your PC from restarting or are concerned about difficulties with the latest version.
Just make sure you install updates as soon as possible, as not doing so puts your computer in danger of being infected with malware.
Frequently Asked Questions
Can I Turn Off Windows 10 Updates Forever?
The ability to permanently block Windows 10 updates has sparked a lot of debate. Some people claim that Microsoft is so obstinate that there is no way around it. The updates come back on once you restart your machine.
While this may be true for some software versions, it worked in our tests on Windows Home version 10.0.19041 in August 2021. If the approach you’re using doesn’t seem to be working, try one of the other methods indicated above, or uninstall any problematic updates using the instructions we’ve supplied.
Should I turn off Updates?
As previously stated, operating system upgrades are critical to your machine’s health and security. However, many upgrades inadvertently inflict more harm than help when they are first introduced. Therefore, disabling updates should not be an issue if you wish to wait and install updates on your schedule.
While updates are essential, they aren’t always crucial on the day they’re delivered.
Conclusion
If you need to stop Windows 10 Updates for any reason, this article has supplied you with the most acceptable alternatives, however temporary they may be, to do so. Even if the only permanent remedy is to keep reverting to a previous version of Windows 10 or to stay isolated from the internet, one does exist.
Do you know of a better way to permanently disable Windows 10 updates? Would you please tell us about your experience in the comments section below?
1 comment
The following .cmd file will turn off WU (here is your windows user name):
echo on
echo stops windows update service
echo NB run as an administrator
if not exist c:\windows\system32\WaaSMedicSvc.dll goto :skip
rem
rem take ownership of and rename WaaSMedicSvc.dll
rem
copy WaaSMedicSvc.dll WaaSMedicSvc.BAK /y
takeown /f c:\windows\system32\WaaSMedicSvc.dll
cacls c:\windows\system32\WaaSMedicSvc.dll /e /p “<usernamer":f
erase c:\windows\system32\WaaSMedicSvc.dll
rem
:skip
rem
sc stop wuauserv
sc config wuauserv start=disabled
pause
The following .cmd file will turn it back on again:
sc config wuauserv start=auto
sc start wuauserv
pause
For both .cmd files, rt-click and select 'run as administrator'