Table of Contents
The long-awaited Microsoft’s Windows 11 update for computers that meet the minimum requirements of Windows 11 is available as a free upgrade. As you already know, the latest release of Windows, Windows 11, is not supported by all PCs meaning there is a minimum requirement required for a PC to run this version of Windows. This article tutorial will help those users who meet these minimum specs to upgrade freely to Windows 11.
Windows 11 is a significant milestone for Microsoft, which is the second most valuable company globally. Approximately 14% of Microsoft’s revenue is derived from the Windows operating system. The company has maintained a dominant stand in their operating systems through decades, but they had not released a new version until 2015, when Windows 10 was launched. The bright side about the release of Windows 11 is it might see Microsoft double their revenue from PC makers such as HP, ASUS, Lenovo, Dell due to the minimum specification feature that has been introduced.
Windows 11 has been widely termed as a performance booster and enhancer by the developers. Its sole purpose is to maximize performance, thus providing users with the best working environment. One of the significant visible enhancements that makes this operating system unique is the redesigned Start menu. Previous Windows releases had the Start menu on the bottom left corner, whereas Windows 11 has its Start menu centered.
This was said to be a way of helping users save time when accessing the start menu. There are other outstanding features incorporated into this operating system that we looked at here. This article shall focus on how to upgrade to Windows 11.
Before upgrading to Windows 11, it is vital to ensure your PC meets the minimum required specification as illustrated below:
Windows 11 system requirements
- Processors: A minimum of 1GHZ or faster with more than two cores. The CPU processor will be a vital aspect in determining whether your PC will run Windows 11. Since the number of cores (2 or more) and the clock speed (minimum of 1GHZ) are components that cannot be upgraded and are considered inherent to the processor design, they should meet a specific criterion to be eligible.
- RAM: A minimum of 4GB. Your PC has to have at least 4GB of RAM to be eligible to run Windows 11. If you plan on upgrading your RAM, you can consult an expert or your PC manufacturers to get help at some cost.
- Storage: A minimum of 64GB. Ensure you have at least 64GB of space or more to install Windows 11. Sometimes your PC might have inadequate storage. If you encounter such problems, you can consult an expert or your PC manufacturers to upgrade the drive. Please note that this is not free. Hence you will spend some bucks.
- Firmware: Your PC should support UEFI, which is an abbreviation for the Unified Extensible Firmware Interface. This is the modern version of PC BIOS. In addition, your PC should support Secure Boot.
Note: if your PC does not support UEFI, then it cannot support Secure Boot since this feature can only be enabled with UEFI.
- Graphics card: Ensure your PC is compatible with DirectX 12/ WDDM 2.0
- TPM: Your PC should support TPM version 2.0. The Trusted Platform Module (TPM) is a dedicated microcontroller whose primary objective is to secure the hardware via the aid of integrated cryptographic keys.
- Display: More than 720p high definition is recommended with a diagonal measurement of more than 9” plus 8 bits per color channel. This requirement is mainly to boost clarity and improve performance, but it can be ignored.
- Windows Version: Only devices running Windows 10, version 2004 or later, will be eligible to upgrade to Windows 11 for free. The free updates will be provided to these users via the Windows Update settings.
- Microsoft accounts and Internet connectivity: For those who are currently using Windows 10 Home edition, you will be required to have an active internet connection and a Microsoft account to complete the device setup for the first time.
If you meet all the requirements provided above, you are confident that the upgrade process will be successful. However, it is essential to note that there are those using the S mode. If you are a victim, then ensure you have followed the instructions provided herein to the latter.
For those using Window 10 Education, Pro, and Enterprise, the S mode is not available in Windows 11; hence, you must opt-out of the S mode before upgrading. Also note, that once you are out of the S mode, you won’t have an option to revert.
Note: Windows 10 Home edition can upgrade to Windows 11 without opting out of the S mode.
Ensure to complete the instructions before attempting the upgrade process:
1. If you are using the S mode, go to Settings> Update & Security > Activation
2. Select the “Switch to Windows 10 Pro or Switch to Windows 10 Home” section the click the “Go to the Store” link
Note: DO NOT select the link provided under the “Upgrade your edition of windows” since this is an entirely different process that won’t switch you out of the S mode.
3. Once you are redirected to the page that will appear in the Microsoft store, switch out of the S mode by clicking the “Get” button. Confirm you intend to opt-out to be provided permission to install applications outside the Microsoft Store.
Microsoft PC Health Check app
Note: If you find this process to be hectic and tiresome, you can use what we refer to as an easy-to-use process that will determine if your PC meets the minimum required system requirements. The PC Health Check app for Windows 10 will help diagnose and check on your behalf whether you are eligible to use Windows 11 or not.
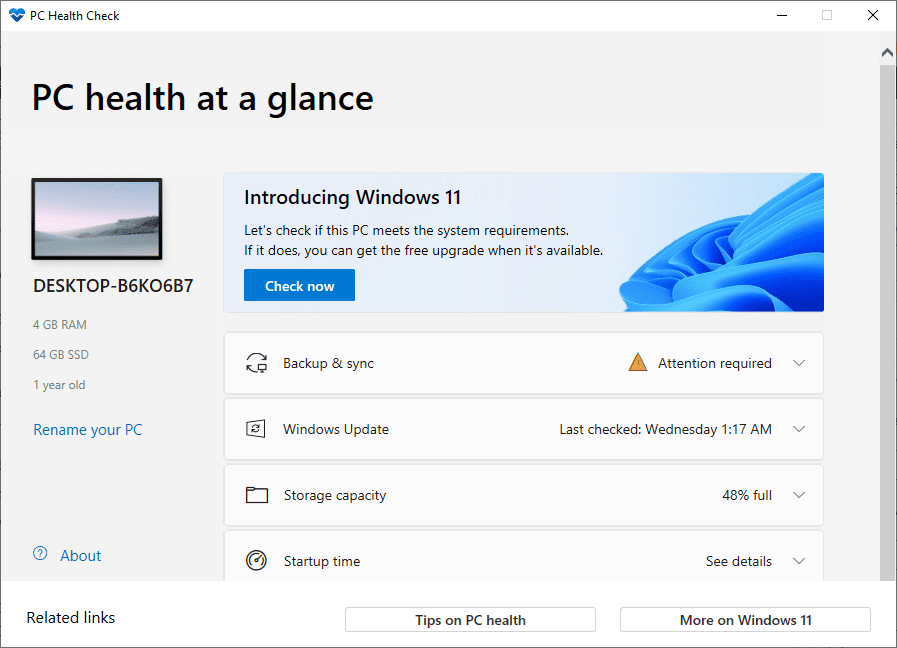
PC Health Check App
After launching the app, click on the “Check now” button and wait for the scanning process to finish. If your PC is eligible for Windows 11, it will show you a report. If not, you will have to see the report and take action accordingly to make it compatible.
Windows 11 upgrade
Now you can proceed and upgrade to Windows 11 by following the steps provided below. Note that Windows 11 is available for a free upgrade for Windows 10 users.
Suggested Read : Windows 11 upgrade FAQ
- First, go to Microsoft’s official website to download windows 11.
- Then, click the “ Download Now” button to get the Windows 11 installation Assistant.

Click the Download Now button to download the Windows 11 installation Assistant
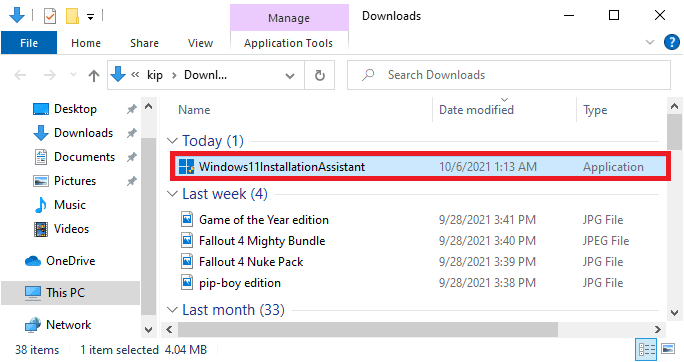
- Once the download process is complete, open the downloaded file

Open downloaded Windows 11 installation assistant
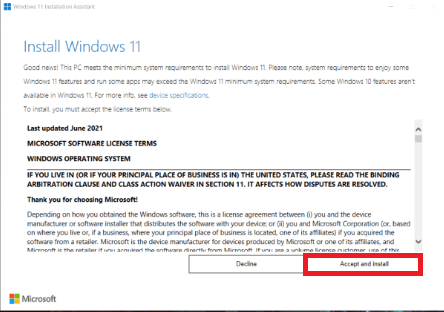
- Select “Accept and Install” when the license agreement terms pop up

Windows 11 installation assistant
Your computer will start downloading the required prerequisites needed to install Windows 11. Be patient since this process might take quite a while, depending on your processor and internet speed.
The Windows 11 installation assistant will do all the work for you, give it time to download and install all the required files. As previously said, the completion speed will depend on your processor and internet speed.
Note: You can continue using your computer while the Windows 11 installation assistant installs Windows 11 in the background. Once the installation process completes, you will be prompted to restart your PC for the assistant to complete the upgrade process.
Once everything is complete, you will see the new Windows 11 Home screen. That’s all you have successfully upgraded to Windows 11.
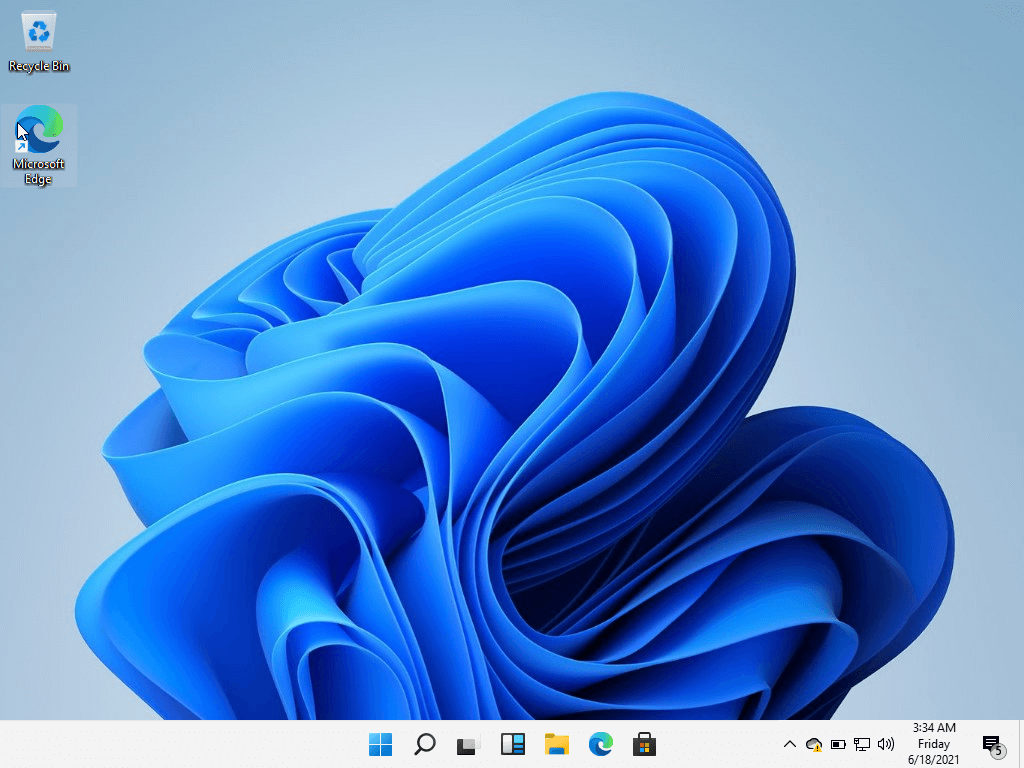
Windows 11 Home Screen
Windows 11 downgrade
If you intend to revert to Windows 10 after upgrading, Microsoft allows you up to 10 days after the upgrade. To revert to Windows 10, follow the steps below:
- Navigate to “Settings”
- Select “System”
- Select “Recovery”
- Select the “Go Back” option
Conclusion
The new release of Windows, Windows 11, has been anticipated to bring lots of performance enhancements to the previous version of Windows. So please give us your insights on this new Windows release. Why do you love or hate it, and any recommendation on what could be done to make the operating system blissful?
We look forward to hearing from you.
