Table of Contents
For consumers who want to upgrade from Windows 10 to Windows 11, some necessary constraints on machine settings might prevent you from upgrading. The UEFI boot technique, GPT disk style, TPM 2.0, and Secure Boot are notable constraints that should be appropriately set to upgrade from Windows 10 to 11.
To run the latest version of Windows, you must have Secure Boot enabled on your PC. A wide range of devices thankfully supports secure boot, and chances are your PC does as well, only that it might be inactive. The most straightforward approach to see if your PC supports Secure Boot is to boot into BIOS and look for a Secure Boot option in the BIOS security options.
You can consult your PC manufacturer’s documentation or follow these methods to access these settings: Select Restart now under Advanced startup in Settings > Update & Security > Recovery > Advanced Startup > Restart Now as shown in the image below:
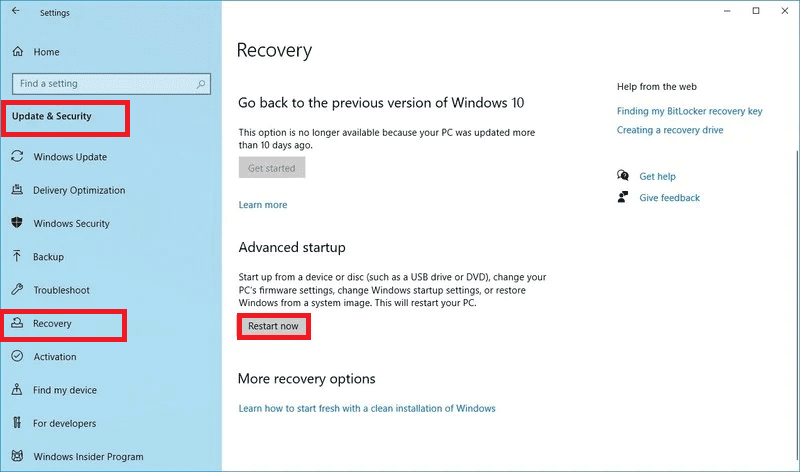
windows-10-recovery-settings-advanced-startup
Now your PC will reboot. After rebooting, follow the steps mentioned below:
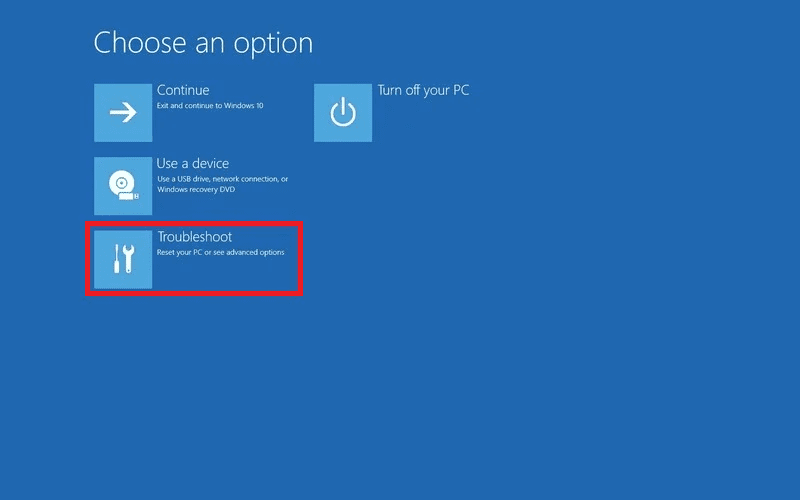
- Select the Troubleshoot option

Troubleshoot
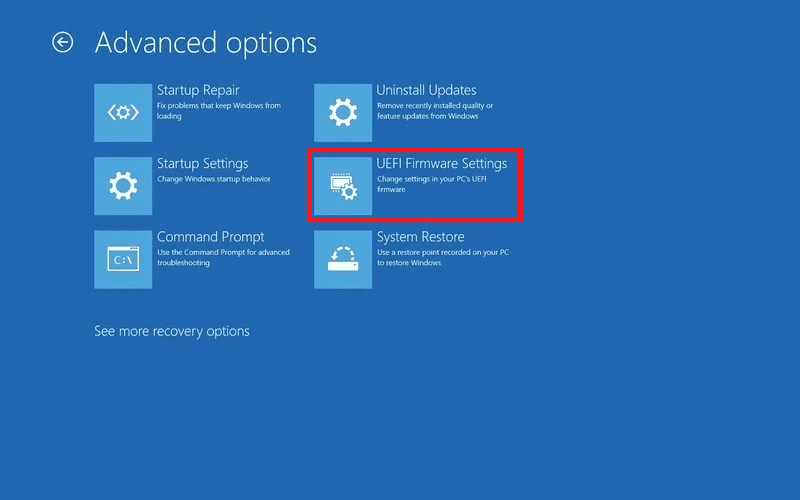
- Advanced options

Select Advanced options
- UEFI Firmware Settings

UEFI firmware settings
Note: If you don’t see the UEFI Firmware Settings, your PC does not support the UEFI mode. Hence you won’t be able to upgrade to Windows 11.
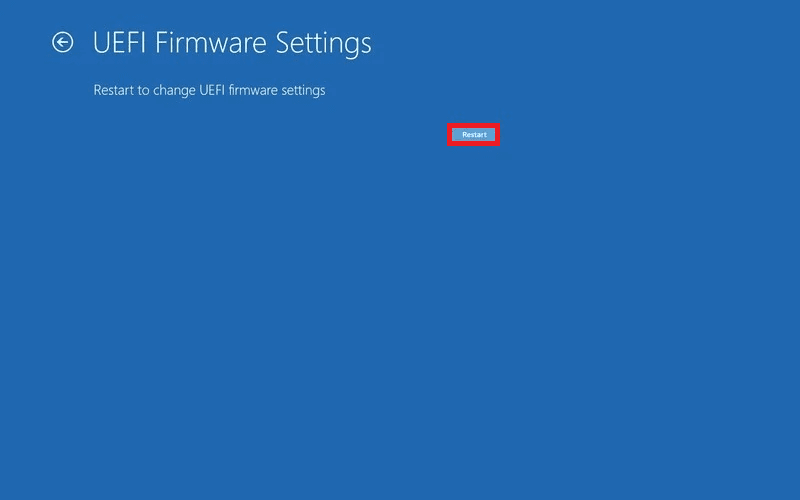
- Restart on the next screen to make adjustments.

Click on the Restart Button
To make these changes, change the PC boot mode from “Legacy” BIOS (also known as “CSM” Mode) to UEFI/BIOS (Unified Extensible Firmware Interface). There are alternatives to enable both UEFI and Legacy/CSM in some circumstances. If that’s the case, you’ll need to make UEFI the first or only option. If you’re unsure how to make the necessary adjustments to enable the UEFI/BIOS, we recommend looking for support information on your PC manufacturer’s website.
While one of the requirements for upgrading a Windows 10 device to Windows 11 is that it be Secure Boot capable (UEFI/BIOS enabled), you may want to allow or turn Secure Boot on for added security.
What is Microsoft Secure Boot, and how does it work?
Secure Boot is a critical security feature that prevents malicious software from starting up when your computer is turned on (boots). Most recent PCs are Secure Boot capable, although in some cases, there may be settings that make the PC appear to be Secure Boot incapable. The PC firmware can be modified to adjust these parameters. Firmware, often known as BIOS (Basic Input/Output System), is the software that runs before Windows when you switch on your computer for the first time.
Secure Boot is a feature related to UEFI-based systems. Secure Boot’s primary goal is to provide previously unattainable security by assuring that only trustworthy software components signed by Microsoft or computer manufacturers (OEMs) are used by the PC while you are booting.
As you can see, Windows 11 requires UEFI boot mode and the Secure Boot function is only available on UEFI-based systems. Therefore, the Secure Boot feature is not available on Legacy-based machines unless it supports UEFI. Enabling Secure Boot is a required option for users who plan to upgrade from Windows 10 to 11. Please continue reading to learn how to enable it in the following section.
How to enable Secure Boot mode to upgrade to Windows 11
You should be able to find a Secure Boot sub-menu once you’re in the BIOS of your motherboard. It could be hidden under the “Security,” “Boot,” or “Authentication” tabs.
If it is not already, change it to “Enabled.”
There are a couple of ways to see if Secure Boot is already enabled from Windows (save yourself a trip to the BIOS): In addition to Microsoft’s PC Health Check tool (direct download), you may go to Start and put in System Information, then run the software to see a range of information, including the status of your Secure Boot toggle and your current BIOS mode.
The user can’t get Secure Boot to work, and he is not sure if he has UEFI.
Unless the user’s computer is quite old, almost all certainly support a UEFI BIOS. The major problem is some users don’t know how to enable it. The user may be using an “old” BIOS that partitions drive using MBR (Master Boot Record) instead of the newer GPT (GUID Partition Table) standard that Windows requires UEFI.
Although Microsoft offers an MBR to GPT conversion tool, tampering with partition tables puts the data on your hard drive at risk. One Verge employee found that the tool didn’t work for him, so he tried another way that ended up wiping his entire disk. (This that not, therefore, imply that the method fails for everyone)
One might do a clean install of Windows 11 if he has a backup of his data or does not care much about wiping the data present in the hard drive. However, if you are working in an organization, a precaution is that you should not try this method as it might cause you lots of trouble. The best option to try out this option is when using your PC. On the other hand, you might fancy trying out a dual boot. This will aid in protecting your data. Furthermore, if your CPU is too old, that may be your only straightforward option.
What to do when the processor is not supported to upgrade to Windows 11
While there are always creative ways to get around Microsoft’s restrictions — some developers fooled the Windows 11 updater by combining old and new ISOs in a Frankenstein-like fashion — the company generally frowns on users with older CPUs installing Windows 11 over their existing Windows 10 operating system while keeping their current settings and files. However, it turns out that there is a simple fix for this: change one registry setting!
Secure Boot on Windows 10: How to enable It
Shut down the computer and restart it to enable Secure Boot. To access the ‘Startup Menu,’ press the ESC key when the display turns on.
Then, to access the ‘BIOS Setup,’ press the F10 key. The keys to accessing the various settings listed below may differ depending on the computer model you are using. Check the information on the computer screen or look up your computer model on the internet.
Then, in the ‘BIOS Setup,’ go to the ‘Advanced’ page.
If the ‘Secure Boot’ option is greyed out, the current ‘Boot Mode’ is likely set to ‘Legacy. Select the ‘UEFI Native (Without CSM)’ choice under ‘Boot Mode’ and then tick the ‘Secure Boot’ checkbox to get the ‘Secure Boot’ option.
You will be asked to confirm the change as soon as you check the checkbox. Then, select ‘Accept’ from the drop-down menu.
Finally, click ‘Save’ to apply the modified SecureBoot settings to your system.
Restart your computer after changing the settings.
Secure Boot can also be enabled by following the steps below.
- In the Windows search box, type Advanced startup. Then choose Change advanced startup options from the drop-down menu.
- Click the Restart now button under Recovery > Advanced startup.

windows-10-recovery-settings-advanced-startup
- Your computer will reboot, and the Choose an option screen will appear. Select Troubleshoot from the drop-down menu.

Troubleshoot
- Select the Advanced options.

Select Advanced options
- Your computer will now restart, this time in BIOS mode.
- Select the Security tab from the BIOS settings menu.
- Locate the Secure Boot option, select it with the Up and Down arrows, and set the status to Enabled.
Installing Windows 11 is simple
Your computer’s secure Boot has now been activated. If you wish to check the status, use this program to see if your PC meets the Windows 11 system requirements. You may also find Windows 11donwload and install solutions on the same page.
Does Secure Boot Have an Impact on Performance?
Some consumers are concerned about enabling Secure Boot. They fear that this will cause their laptops to lag. It is not necessary to be. Enabling Secure Boot adds to your computer’s security and protects it from virus attacks. It would simply safeguard your machine and not cause any downside on performance-related issues.
How to enable TPM 2.0 in the BIOS
Support for TPM 2.0 is one of the additional system requirements for Windows 11. When you run the Windows 11 installation from within Windows only, rather than via a bootable USB, the error “The PC must support TPM 2.0” appears. There’s a chance you might conclude that your PC won’t be able to run Windows 11. However, that is not the case, thanks to TPM2. Enabling TPM 2.0 in the BIOS settings might fix the error named above, and the process is simple.
Please note that before you go ahead and enable ‘TPM 2.0’ in the BIOS, double-check to ascertain that it is present in your system. To check the status of ‘TPM 2.0,’ press WINDOWS + R to open the ‘Run’ command, type tpm.msc in the text box, and then click OK or ENTER to open the TPM Management window.
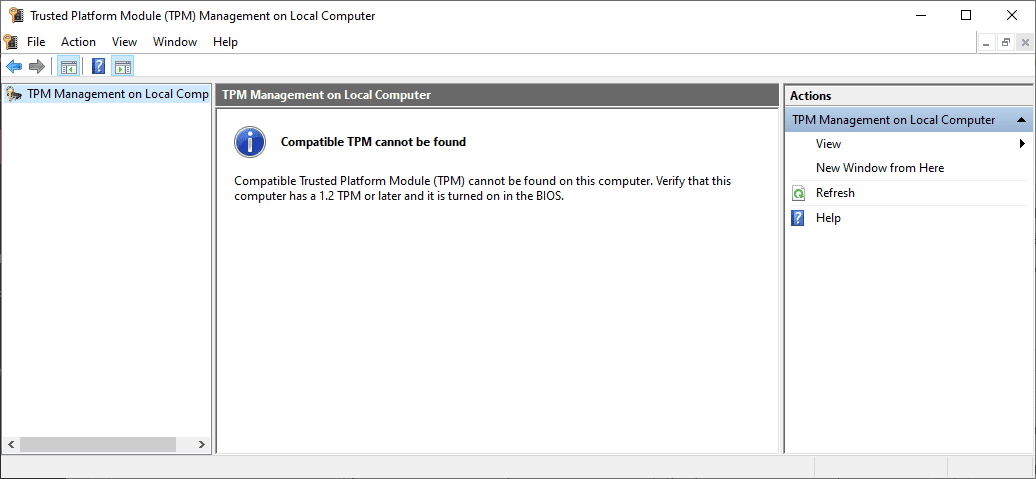
Select TPM 2.0
Check the ‘Status’ section next. It’s already enabled if it says, ‘The TPM is ready for use.’
If the message “Compatible TPM cannot be found” appears, it’s time to enable it in the BIOS. Locate and pick the ‘TPM Embedded Security’ option under the ‘Security’ menu. To enable ‘TPM 2.0,’ restart your computer and open the ‘Startup Menu’ by pressing the ESC key as soon as the screen comes up. The numerous vital selections for the various menus will be displayed to you. Find the one that says ‘BIOS Setup’ and hit it. It was the F10 key in my case (HP Laptop).
Then, find the ‘TPM Device’ option and change it to ‘Available.’ Finally, click ‘Save’ to save your changes at the bottom. For more details, you can refer to our website for more TPM2.0 detailed articles.
Conclusion
This article explicitly suits anyone who plans on upgrading from Windows 10 to Windows 11, but Secure Boot has not been enabled in their computers. Upgrading to Windows 11 differs from other Windows versions updates in several ways. To meet the standards of Windows 11, you will need to do more, unlike the previous upgrades. If this level of technical depth is unknown to you, we recommend consulting your PC manufacturer’s support for more information about your device. Good luck, and we hope you enjoy the new Windows OS experience and performance. Give a thumbs up via the comments section if you found the article helpful.

